Prior to printing your documents or executing other printer-related tasks, setting up the Canon PIXMA TR8520 Printer is essential. Do you know how to set up a Canon TR8520 Printer on your system? Whether the setup has to be done for a wired version or for a wireless one, we know the methods that you can do without requiring any kind of professional help. We will be educating you about the Canon TR8520 setup methods for Mac as well as Windows. In addition, if you wish to use its feature for faxing your documents, then you can prefer reading this post for knowing the fax setup too.
6 topics with respect to the Canon printer setup for TR8520 model have been stated below. In this blog, we will be reading these topics in detail.
How Do I Perform Canon TR8520 Setup via USB Port?
The simplest method to establish the Canon PIXMA TR8520 setup involves the usage of the USB port. You can plug in the USB cord in the port for making a connection between your Canon printer and your system. Prior to that, you can tap on the button for Start-up Setup and input your region. After agreeing to the License Agreement, you will find the window for the Extended Survey Program. You can select a suitable option in the window and then begin the usage of the port for the printer setup.
- First, ensure that the TR8520 Canon Printer driver has been installed on your system.
- Now, press the “Startup Setup” button.
- Choose your “Region”. Then press “Next”.
- Tap the button for “Yes” to accept the “License Agreement”.
- When the window for “Extended Survey Program” appears, tap on “Agree” or “Do Not Agree”. Then press “Next”.
- The sixth step is to choose the radio button for “USB Connection”. Then press “Next”.
- Now, plug in the USB cord. Use the cord for connecting your Canon printer to your system. Then press “Next”.
- When the “Setup Complete” screen appears, tap on “Next”.
- In case you wish to install any additional apps, then you can choose them now. Then press “Next”.
- Press “Next” again. Alternatively, you can choose the option of “Skip”.
- When the installation of this Canon PIXMA printer setup is over, press “Exit”.
What is the Procedure for Canon TR8520 Wired Setup?
The readers who are having a wired version of the Canon PIXMA TR8520 Printer will require an ethernet cable for performing the setup. The cable has to be plugged into the device’s port as well as your computer. Then via Home, you can select Wireless Frequency and enter the LAN Settings. To know what you are required to do after visiting these settings, please read further.
- See to it that the “On” lamp has its light turned on.
- Allow your Canon printer to complete the process of initialization.
- Use an Ethernet cable. Plug it in the port of your Canon printer. Insert the other end of the cable into your system.
- On the operational panel of your printer, press the “Home” icon.
- Now, select the icon of “Wireless Frequency”.
- Tap on “LAN Settings”.
- Then choose the option of “Wired LAN”.
- The eighth step is to activate the “Wired LAN”.
- Now, move back to the “Home” screen.
- Print a test page to check that the setup for your wired printer has been accomplished without any flaws.
The method for Canon Printer TR8520 setup for the wired version should now reach completion.
How to Do Canon TR8520 Wireless Setup?
The method given here for the Canon TR8520 setup for wireless is reliable and has been used by several users. For administering this method, you can initially get a wireless connection and ensure that your system is connected to it. Then using the wireless, you can obtain access to your Canon printer from your system. Now, when your computer is on, you can tap on Wireless Frequency and find the LAN Settings. These settings will help you in doing the wireless setup for Canon TR8520 Printer.
- Connect your computer to a wireless connection. Use the wireless to access your Canon printer via your computer.
- Also, see to it that your Canon wireless printer is on.
- In case your Canon printer is aligning the print head, wait until the process is over.
- Access the operational panel of your printer. Press the icon of “Wireless Frequency”.
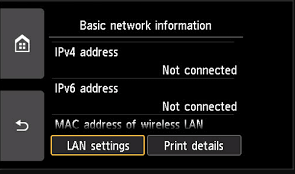
- Click on “LAN Settings” when you see the “Basic Network Information” screen.
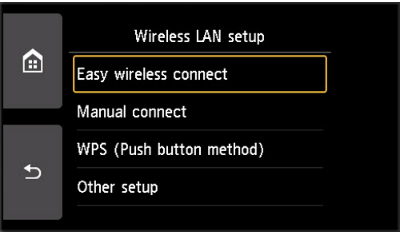
- Choose the “Wireless LAN” option.
- Now, tap “Easy Wireless Connect”.
- Press “Yes” when the “Confirmation” screen shows up.
- Press “Ok”. Then install “IJ Utility” on your computer system.
- Insert the “Installation CD” into your system and load it.
- Now, initiate the process of setup. Press the button for “Start Setup” in the “Setup” window.
- Go through the instructions on your screen for installing the drivers for your Canon printer.
- Then select the type of connection and press “Next”.
- Choose the “SSID” of your wireless router. Enter the password for it. Then press “Next”.
- Now, print a test page to ensure that your Canon PIXMA Wireless Printer has been correctly set.
- You can add any Canon application. This is optional.
How should I Do Canon TR8520 Wireless Setup on Mac?
Should you prefer setting up your TR8520 Canon Printer on Mac, you can open Home on the printing machine and select Network. Entering the LAN Settings, choose the option of Wireless LAN. This will present you with Wireless LAN Setup. Once you have selected this option, we will suggest reading the following guidelines to do the Canon TR8520 setup on Mac.
- Power on your Canon printer.
- Access “Home” on your Canon printer.
- Choosing “Network” is the third step.
- Next, select “LAN Settings”.
- Then choose the “Wireless LAN” option.
- The sixth step is to choose the “Wireless LAN Setup” option.
- Now, select the option of “Easy Wireless Connect”.
- For heading to the “Setup Application” screen, press “Yes”.
- Visit the official website of Canon.
- Downloading the “Setup” file is the next step. Run it after downloading.
- You will be required to fill in your “User Name” as well as “Password”.
- Then press the button for “Install Helper”.
- Finally, the setup of your Canon wireless printer on your Mac will be complete. Ensure that you have the drivers for the device for printing any document.
Please Note: While getting the drivers after the Canon TR8520 Printer setup, ensure that they are the latest ones.
What is the Method for Canon PIXMA TR8520 Fax Setup?
For certain businesses, faxing can be essential. To send and receive faxes using the Canon TR8520 Printer, you can prefer the setup method displayed here. In brief, you have to connect your printing device to the wall telephone. You can utilize a phone cord for making a connection between the machine and your phone. After that, you can opt for Phone Line Configuration and visit the Settings to make the required changes.
The settings that have to be made for going ahead with the Canon TR8520 fax setup have been mentioned as follows:
- Directly connect your Canon printer to a wall telephone.
- Use a working phone cord for connecting your printer and phone.
- Select “Phone Line Configuration”.
- Press “Settings”.
- Choose “Device Settings”.
- Go to “Fax Settings”.
- Pick the type of telephone line.
- For reception, select a suitable point.
- Choose “Fax” available on your Canon TR8520 Printer.
- Visit the “Function List”.
- Opt for “Receive Mode Settings”.
- Press “Ok”.
- Input the “Date/Time” as well as the “Sender Information”.
- Pick the “Region” or “Country” where the Canon printer was purchased.
- Open the “Home” screen and visit “Setup”.
- Enter the “Fax User Settings”.
- Now, select “User Information Settings”. Make any changes if you wish to.
How to Perform Canon TR8520 Wireless Setup on Windows?
If you’re having a Windows computer, you can use the Easy Wireless Connect option to set up your Canon PIXMA TR8520 Printer on it. Keeping your printer on, visit Home. Then choose Network for accessing the LAN Settings. From these settings, opt for Wireless LAN. This is followed by choosing Wireless LAN Setup. After that, you can use the Easy Wireless Connect option for doing the Canon PIXMA TR8520 wireless setup on Windows.
- Ensure that your Canon TR8520 Printer is on.
- Enter “Home”.
- Open “Network”.
- Select “LAN Settings”.
- Opt for “Wireless LAN”.
- Make a selection for “Wireless LAN Setup”.
- Then visit “Easy Wireless Connect”.
- Press “Yes”.
- Go to the setup screen.
- Visiting the main website of Canon, get the setup file downloaded.
- After downloading, right-click on the setup file for running it.
- Choose “Start Setup”.
- Enter your “Region”.
- Comply with the “License Agreement”.
- When the dialog box for “Connection Method” appears, press “Yes”.
- Provide the “Network Key” once the wireless router has been chosen for connecting to your Canon printer.
- Press “Next” after the “Network Connection” reaches completion.
- Choose the software for the application.
- Push “Next”.
- When the setup is over, press “Exit”.
To Conclude
Setting up your Canon TR8520 Printer is necessary otherwise you may not be able to use it for printing, scanning, faxing, etc. Setting up the printer is a task that every user may not be well-versed with. The first-time users of Canon PIXMA TR8520 Printer often get stuck while setting up. Fortunately, that will not be the case with you since you have now become familiar with various methods to set it up. We thank you for attentively reading the methods formulated by us.
For additional readings, we will suggest you to take a look at the methods for Canon TR7520 setup and Canon PIXMA TR4522 setup.