
You should know how to delete an invoice in QuickBooks when you have several inessential bills. Such bills/invoices can take up space in the software. Also, keeping a record of the ones that are not required or are duplicates may not be useful. Should you suspect that the financial document(s) may be needed in the future, then you may void it. When you void an invoice in QuickBooks, you maintain the record. However, the amount does not affect your balance.
Since you have both features available in QB, you should understand the difference between void and delete. As you gain clarity, you can initiate the methods depending on the feature you use. From QuickBooks Online to Desktop, several methods are available for both functions.
- Should I Void or Delete an Invoice in QuickBooks?
- How to Delete an Invoice in QuickBooks?
- Method 1: In QuickBooks Online
- Option 1: From Invoice Window
- Option 2: Using Sales/Expenses Menu
- Option 3: For Single/Batch/Multiple Invoices
- Method 2: On QuickBooks Desktop
- How to Delete an Invoice Payment in QuickBooks?
- How to Void an Invoice in QuickBooks?
Should I Void or Delete an Invoice in QuickBooks?
Prior to using the QuickBooks delete invoice feature, it is useful to know when to remove or void the document. When you void an invoice, you retain the document’s number. However, its amount is converted to zero. Given that you delete it, the entire invoice gets removed from the software. Both actions can be of use as per the need of a situation or depending on some factors.
You should void the invoice in the following situations:
- When you do not want a transaction to affect your reports, balances, etc., please prefer this action.
- You may need a record of certain invoices in the future. Assuming that you void invoices in QuickBooks, you can access the record again.
The feature to remove QuickBooks invoices is preferable in these instances:
- Some bills or invoices are not available for voiding. You may only delete them. These are inclusive of:
- Deposits
- Estimates
- Purchase orders
- Delayed charges
- Supplier credits
- Delayed credits
- A user may not require these financial documents any longer.
- Duplicate invoices may not be a part of your requirements.
- If you accidentally generate an invoice for a customer that is no longer in relation, then you can delete it.
How to Delete an Invoice in QuickBooks?
You can see different menus and buttons in QuickBooks Online and Desktop to delete single or multiple invoices/bills. In QBO, you can navigate to an Invoice window for removing one invoice. An individual document can also be cleared by using Sales/Expenses. Particularly for multiple or a batch of invoices, you should use the Action option. How to delete an invoice on QuickBooks Desktop, as an overview, can be learned with the usage of the Edit feature.
Method 1: In QuickBooks Online
You can clear a bill/invoice when it is individual in QuickBooks Online. This is done from the window in which you can locate the bill. Similar to this is a method that uses the Expenses or Sales menu. A user can also batch delete invoices in QuickBooks Online specifically with the Action feature in the menu of Sales.
Option 1: From Invoice Window
In QBO, a user may know the location of bills while he/she creates them. To delete one, he/she can open this location and access the financial document. In the software’ Invoice window, an option called More will be given. On pressing it, Delete should appear. While you press it, also confirm the step.
In QuickBooks Online, how to delete an invoice becomes clearer with these directions:
- Head to the location of your invoice/bill.
- Enter the window for “Invoice”. You can now press the “More” option.
- Push the “Delete” button.
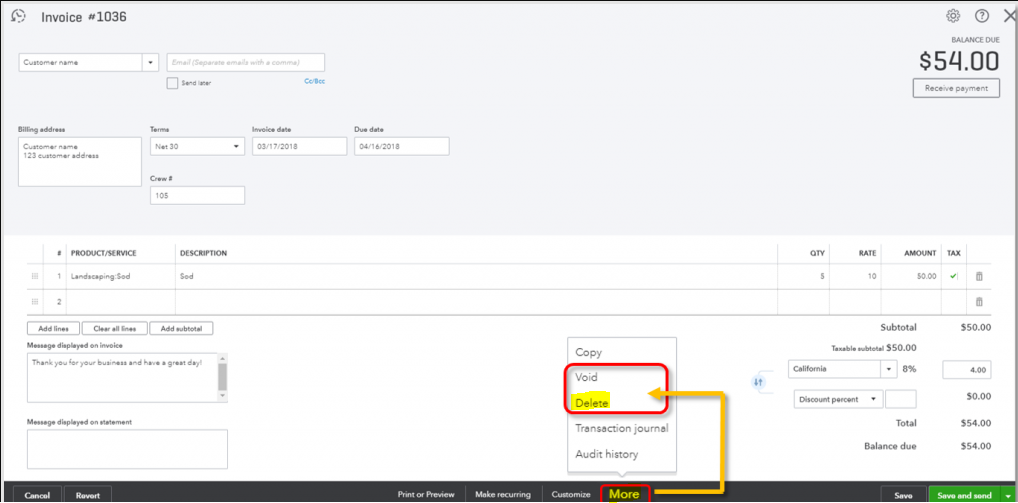
- Move ahead by clicking on “Yes”.
Option 2: Using Sales/Expenses Menu
The accounting software can have the Sales/Expenses menu for initiating different processes. With either of these, you can go to the bill’s location mainly when removal is the process of concern. Next to it, you will see More. Hit this button to see the option for clearing it. You can delete an invoice in QuickBooks Online for any other customer as well by repeating the method.
- Open the menu for “Sales” or “Expenses”.
- You can locate your invoice here. Then open the financial document.
- The “More” button has to be pushed.
- The user can choose “Delete” to remove the document.
Tip: You may head to where an “Audit Log” is in QuickBooks Online. Here, you can locate the deleted bills.
Option 3: For Single/Batch/Multiple Invoices
Sometimes you may create multiple duplicate invoices. At other times, a group of customers may no longer maintain the terms. Hence, the record of their invoices may become insignificant. For all such reasons/purposes, you can use the batch delete invoices QuickBooks Online feature. It works through the Action option that contains features like Delete.
- Enter “Sales” after running “QuickBooks Online”.
- You have to choose “Invoices”.
- Find one or multiple invoices for their removal.
- Press “Action”. You can locate this column in a dropdown.
- Now, go for the “Delete” option.
Method 2: On QuickBooks Desktop
QBDT users get access to an Edit feature for invoices. This helps you manage such documents as per your requirements. In an attempt to understand how to delete an invoice payment in QuickBooks, you should find this feature. Initially, you need to open the bill/invoice. Next to it, the feature is given. On tapping it, you have to choose the Delete button to erase that particular document.
- Start by opening that invoice that you do not require.
- Run QuickBooks Desktop’s “Edit” feature.
- Then press “Delete”.
In the process, you may press the keys “Ctrl” and “D” together. This will help quickly remove the QuickBooks Desktop invoice.
Note: You may also use the above-given methods to delete an invoice in QuickBooks 2011, 2012, 2016, 2017.
How to Delete an Invoice Payment in QuickBooks?
In a few instances, a user may want to do away with a payment in the invoice instead of removing the entire document. There is a certain method that only focuses on how to delete a payment from an invoice in QuickBooks especially when it is duplicate, irrelevant, or incorrect. You can proceed to the menu called Company. Use Make Deposits to arrive at an invoice. Find where that payment line is and remove it.
- Please select “Company” in the accounting software.
- You may proceed with “Banking”.
- Hit the dropdown. From it, you have to pick “Make Deposits”.
- Choose the line of payment in the invoice which is duplicate or not important.
- Tap on “Edit”. Again, choose that line and continue deleting it.
- Save the changes afterward.
How to Void an Invoice in QuickBooks?
When certain invoices start affecting your account balance, you may void them through QB’s Sales or Customers menu. To void an invoice in QuickBooks Online, you can use the More option for a single invoice or the Action button for multiple bills. For clearing such a document from the Desktop version, you can simply use Edit and go for managing it.
Method 1: In QuickBooks
A user can invalidate an invoice in the software by approaching Sales. This is a menu with several options including the one that voids a bill. Likewise, you may check the Invoice option in Customers. The menu enables you in voiding the QuickBooks invoice by managing it through the Edit option.
Option 1: Through Sales Option
Given that you are familiar with the Intuit software’s Sales menu, you should void a bill by running a company file linked to it. From this file, you can visit the said menu. It will show you the More option. In it, you can locate the option to void the document.
Let us further see this method on how to void an invoice in QuickBooks:
- Run the software and use a QuickBooks company file in connection to an invoice.
- On navigating, you will find transactions.
- Go to “Sales”.
- Choose those transactions of the invoice that need to be voided. You may pick an entire list.
- Tap on “More”.
- Now, you can opt for “Void”.
- Press the button for “Yes” to confirm this action.
You may repeat this method to void more transactions in this or any other invoice.
Option 2: From Customers Menu
In case you want to void an invoice in QuickBooks, you can find the Customers menu useful. It has a Customer Center through which you can find the option for Invoice. It is of use for picking a specific document to invalidate it. In the process, you will also use the Edit function.
- In the beginning, please tap on “Customers”.
- Then move to “Customer Center”.
- Choose one customer on reaching “Customers & Jobs”.
- Tap on “Show”.
- Via the dropdown, please pick “Invoice”.
- Now, you have to visit “Transactions”. When the name of the customer is not known, this step will help.
- Click on the option of “Invoices”. Its location lies in “Transaction Types”.
- Find the QB invoice for voiding it.
- As you press it twice, you will find “Edit”.
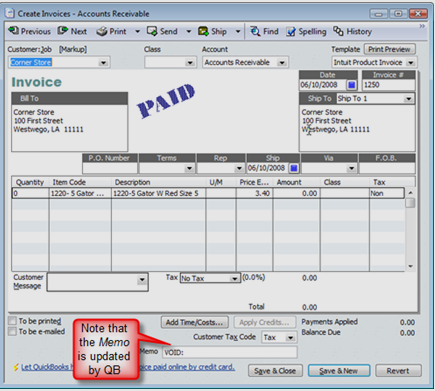
- Tap on “Void Invoice” and then save the method.
You can confirm this method’s success when that invoice receives the void stamp. Also, its amount will become zero.
Method 2: On QuickBooks Online
To grasp how to void an invoice in QuickBooks Online, you should first use the More feature. You can find it helpful when you do not want to validate a single bill. To do so for multiple invoices, you can see the Action option. Although it lets you remove one invoice too, it is more suitable for users who need to void a batch.
Option 1: Using the More Button
It may be time-saving to use the More feature for voiding QBO invoices as it comes with a direct option for doing so. Prior to accessing it, you should know the location of the document. From its location, you can easily access the feature and see Void in it. Going further with the method, you can press Yes for confirmation purposes.
- Go to the location in which you created your QuickBooks invoice.
- On finding the document, its window will start running. Go to “More”.
- Tap on “Void”.
- Then hit “Yes”. With this, you will give the confirmation to void the invoice in QuickBooks Online.
Tip: A similar method is available for use. In that, you need to check the QBO menu for “Expenses” and “Sales”. Steps 2, 3, and 4 can be executed again after reaching this menu.
Option 2: From Action Option
Sometimes you may find multiple invoices with no requirements. You can make them invalid in the accounting software with the Action functionality. It can be found after you open the Sales menu. To continue knowing the process to void invoices in QuickBooks Online, follow the directions emerging after you find the said functionality.
- The “Sales” menu is given in QBO. Please enter it.
- Going further, you have to choose “Invoices”.
- For voiding, you have to pick a single invoice or more as you need.
- Hit the “Action” option with the help of the dropdown.
- Then use “Void” to finish this method.
Method 3: In QuickBooks Desktop
Like several versions of the accounting software, the Desktop one also has the Edit menu. It is significant for managing your bill. Thus, when you want to show it as not valid, you can void an invoice in QuickBooks Desktop via this menu. Following this, its amount will become 0.
- Initially, access an invoice from its location.
- Open “Edit” by clicking on its menu.
- You will see the “Void” option. Choose it.
Any dialog box appearing after this may ask for your confirmation. You can provide it.
Tip: QB lets you review the bills or invoices that you remove/void. Use the “Reports” option. You will find it in the accounting software’s menu bar. Choose “Accountant and Taxes” from here. You will see “Voided/Deleted Transactions Summary”. You can restore the undeleted invoice in QuickBooks. To unvoid, however, you can recreate it from the information in the summary.
Conclusive Remarks
Both delete and void are important functions in the software. Whether you void or delete an invoice in QuickBooks depends on various factors like the ones discussed in this reading. With the detailed methods given, you can decide which function to use on QB and its versions.