Temporary files are the most unwanted data on your computer. Due to these temporary files, your PC may work slow or inappropriately. To keep your machine efficient enough, it is recommended to clear cache or temporary files from your computer. Therefore, we will talk about cleaning temporary files in this blog. Learn with us how to clear temp files on Windows 10, 8, 7, and Mac PC.
In this particular guide, you will discover different ways of removing temporary files from your Windows or Mac system.
- What Do Temporary Files Mean?
- How Do You Clear Temp Files on Windows PC?
- How to Clean All Temp Files in Windows 10 and 8?
- How to Clear Temp Files in Windows 7?
- Method 3: Launch Command Prompt
- What If You Fail to Clean Temp Files on Windows?
- Method 1: Fix when Disk Cleanup Gets Stuck
- Method 2: Download New Updates
- Method 3: Delete data from SoftwareDistribution Directory
- Method 4: Remove Temp Files from Safe Mode
- Method 5: Remove Third-party Apps
- How to Clear Temp Files on MacBook?
What Do Temporary Files Mean?
When you run an application on your computer, the temporary files take place. These temporary files can be created by your operating system itself. Even after you complete the task, the files stay right there on your computer. Not just this, these files get collected in a large number that does nothing but occupies space unnecessarily on your computer.
As a result, it affects your PC functionality or makes it slow during work. To deal with this situation, you should clear Windows temp files. Try a guide to clean Windows 10 cache.
Without further ado, let’s know how to clean temp files on Windows 10, 8, 7 and Mac PC.
How Do You Clear Temp Files on Windows PC?
To clear out temp files, all you are required to locate the temporary files on your system and remove them instantly. Now, there are different ways that can be followed to find temporary files on your computer. For instance, you can find and delete the unwanted temporary files with the help of the Disk Utility, Command Prompt, and Windows Explorer (This PC).
In case you have no idea how to clean temp files on Windows 10, 8, 7 then you can walk through the following guide. Here, we will tell you the effective ways to clear out temp files based on your Windows version.
Note for you: Before moving forward, make sure you have logged in with the administrative rights. Also, close all the running apps or programs in case you have opened any. Now, let’s continue reading.
How to Clean All Temp Files in Windows 10 and 8?
As stated earlier, you can follow different ways to delete temporary files on your Windows computer. For Windows 10 you can view hidden files to delete them, clean the disk, or run a command line to delete temporary files.
If you are a Windows 10, 8 user the upcoming instructions are for you. Follow these steps carefully and remove the unwanted data from your PC.
Method 1: Open Windows Explorer (This PC)
The first method to clean temporary files is to view them on your system via This PC folder. This will display a list of temporary files so that you can delete the one you want. Here is how to do that.
- Click on the search bar and type in “%temp%”.
- Press the “Enter” key. This will open all the folders of temporary files.
- Click on the “View” tab located on the top.
- Select the “Hidden Files” option.
- When you see the temporary files opened, use the “Ctrl + A” keys in order to select all the files.
- Then, use the “Shift” + “Delete” key in order to delete the files.
- Hit the “OK” button when you see the confirmation pop-up.
Once you do so, the selected temporary files will be deleted instantly. This is how you can clean out temp files on Windows 10 using the Windows Explorer (This PC) folder.
Method 2: Run Disk Cleanup
In this method, we will run the Disk Cleanup tool on your system. Once this tool launches on your computer, it cleans the disk properly. As a result, the temporary files get removed instantly. Now, this can be done in two ways; from Settings and Taskbar. Follow these steps to understand clearly.
Method 2.1: Windows Settings
- Open the “Windows Settings”.
- Click on the “Control Panel”.
- Go to “Administrative Tools”.
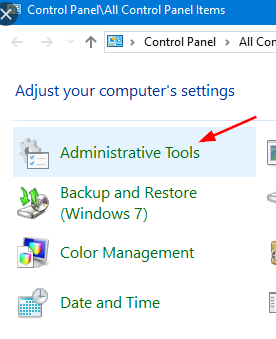
- Click on the “Disk Cleanup”.
- Now, choose the “Temporary Files” option.
- Hit the “Ok” button to delete the files.
Method 2.2: Windows Taskbar
- Search for “Disk Cleanup” on the “Taskbar”.
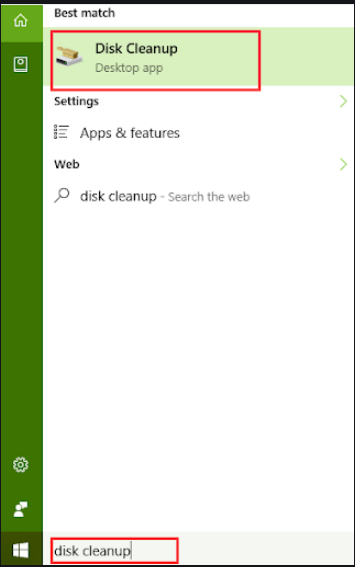
- Click on the drive you wish to clear. This will show you the “Disk Cleanup” window with the selected drive.
- Here, mark all those temporary files you want to delete.
- Click on the “OK” button.
- Confirm your action for deletion.s will free up some space on your computer
You can either follow Settings or Taskbar to reach all the temporary files. Thereafter, you can clear temp files on Windows 10 or 8 through Disk Cleanup. This will free up some space on your computer.
Method 3: Launch Command Prompt
Another method to clear temp files on Windows 10 or 8 is to run the command. This method works better than others. To run the command line, you can follow these steps :
- Press the “Windows” + “R” keys to open the “Run” box.
- Type in “CMD” or “Command Prompt”.
- Then, click “OK”.
- In the “Command Prompt” window, run the following command line.
- del /q/f/s %TEMP%*
- Press the “Enter” key.
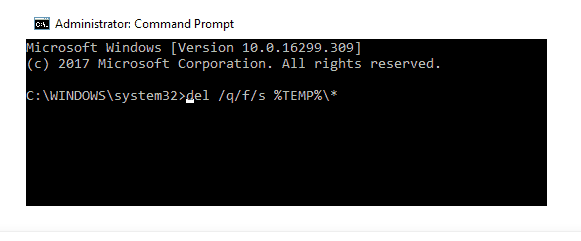
Once you are done running this command, this will clear all the temporary files available on your computer. These are the steps for how to clear temp files in Windows 8 or Windows 10.
How to Clear Temp Files in Windows 7?
Those who use Windows 7 can also follow the same steps to clear the temporary files. However, there can be a slight change in the settings options. To not make any confusion, we will be guiding you with the steps for how to clean temp files on Windows 7.
To clean up Windows 7 temp files, you can go to My Computer to locate temporary files. Then, you can delete them. Besides that, you can run the Disk Cleanup or execute the command line to clear out temp files. Below we will understand the procedure with a step by step guidance.
Method 1: My Computer
In this method, you can go through My Computer to reveal all the temporary files. Then, mark the unwanted files to remove. To do so, you can go through the following steps:
- Click on the search bar and type in “%temp%”.
- Press the “Enter” key. This will open all the folders that contain the temporary files.
- Click on the “Folder” or “Folder Options”.
- Click on the “View” tab located on the top.
- Under the “Hidden files and folders”, mark the “Hidden Files, Folders or Drives” option.
- When you see the temporary files opened, select all the files using the “Ctrl + A” keys.
- Then, use the “Shift” + “Delete” keys to delete them.
- Click the “OK” button to confirm your action.
This is an easy and manual procedure to get the job done. After following these steps, the temporary files will be removed from your Windows 7 PC.
Method 2: Run Disk Cleanup
Another best way to clear temporary files is to run the Disk Cleanup on Windows 7. For this method, you can launch the Disk Cleanup in two different ways; Start Menu and My Computer. Below we will show both the ways with step by step guidance.
Method 2.1: Start Menu
- Click on the “Start” menu.
- Go to the “All Programs” section.
- Click on the “Accessories” option.
- Open the “System Tools”.
- Choose the “Disk Cleanup”.
- Select all the temporary files and delete them.
Method 2.2: My Computer
- Visit the “My Computer” folder on Windows 7.
- Click on the drive that you think contains the temporary files.
- Right-click on the drive and choose the “Properties” option.
- Click on the “General” tab.
- Select the “Disk Cleanup Utility” to delete files.
These are the two ways to reach Disk Cleanup Utility. Then, you can remove selective or all the temporary files from your Windows 7 computer.
Method 3: Launch Command Prompt
This method provides a command line that you can perform in the Command Prompt window. If you want to know how to clear the temp files in Windows 7 using a command, you can go through the following steps:
- Click on the “Start” button.
- Type in “CMD” or “Command Prompt”.
- Then, click “OK”.
- In the “Command Prompt” window, run the following command line.
- del /q/f/s %TEMP%*
- Press the “Enter” key.
When you are done following these steps, the command will start doing its work. As a result, your temporary files will be deleted from Windows 7 PC.
Thus far, you have understood all the ways to clean temp files on Windows 10, Windows 8, or Windows 7.
Suggestion: If you are having issues with your internet browser then you can clear the browser cache to improve your browser experience.
What If You Fail to Clean Temp Files on Windows?
For any reason, if you fail to clean temporary files on your Windows computer then there must be some issues with your machine. Unstable Disk Cleanup, outdated versions, and third-party apps may prevent you to clear all the cache. To solve this problem, you can implement a number of solutions we are providing below.
Method 1: Fix when Disk Cleanup Gets Stuck
The most effective way to delete temporary files is to access Disk Cleanup. However, there can be instances when the Disk Cleanup gets stuck in between. As a result, you are unable to delete the temporary files. In this scenario, you can launch the Disk Cleanup with administrative rights.
In addition, you can run the command line: sfc /scannow /offbootdir=D:\ /offwindir=D:\Windows\
Method 2: Download New Updates
Some users have been reporting that they are unable to delete the temporary files on their PC. This can happen due to bugs that prevent certain operations to perform. In that case, you need to make sure that you have the most recent update of Windows PC. You can also turn off automatic windows 10 and Windows 7 updates.
To check the updates of your Windows PC, you can do the following:
- Click on the “Start” button located on the bottom left.
- Type in “Windows Update” and press the “Enter” key.
- Open the “Windows Update” window.
- Then, click on the “Check for Updates” option.
If you find any update available, you can download and install it on your computer. Thereafter, you can try clearing the temporary files and delete windows update files.
Method 3: Delete data from SoftwareDistribution Directory
In the SoftwareDistribution folder, there may be some data that is not allowed to clean temporary files. In this case, you can first delete data from the SoftwareDistribution directory. For this, you can do the following:
- Press the “Windows” + “R” keys to open the “Run” box.
- Type in “%WINDIR%SoftwareDistributionDownload”.
- Then, click the “OK” button.
- Choose all the files in the “Download” directory and remove them.
Method 4: Remove Temp Files from Safe Mode
In this method, you can first enter into Safe Mode and then try to clear temporary files using the normal method. To get into Safe Mode, you can follow these steps:
- Click on the “Start” menu.
- Click on the “Power” icon
- Press and hold your “Shift” key and select the “Restart” option from the menu.
- Click on the “Troubleshoot” option.
- Go to the “Advanced options”.
- Click on “Startup Settings”.
- Click the “Restart” button.
After following these steps, when your computer restarts, you will see a list of options on your screen. Here, you can choose the Safe Mode in any version by using the corresponding key. Once you are in Safe Mode, you can delete the temporary files on your Windows PC.
Method 5: Remove Third-party Apps
Users reported that third-party applications such as Spotify and Skype can cause issues with temporary files. As a result, you fail to delete them from your system. If that is the case then you should first uninstall such apps and then delete temporary files on your PC.
To uninstall third-party apps, you can do the following:
- Open the “Windows Settings” app.
- Click on the “Apps” to view the list of downloaded applications.
- Select “Spotify” or “Skype” or other apps that you think can cause issues.
- Then, click on the “Uninstall” button.
This is how you can remove the third-party apps from your computer. Thereafter, you can try cleaning the temporary files using the Disk Cleanup.
Bonus Tip to Clear Windows Temp Files
Till now you have read the method that you need to perform manually on your machine. In case, you want to save your time or are not willing to go through Windows configuration manually, we have got some alternative solutions for you.
You can use PC Cleaner Tools to delete temporary files on your computer. When you download and install a PC cleaner program, it automatically detects and cleans the unwanted files from your machine.
Now, in the upcoming details, we will be talking about the Mac computer. So if you are a Mac user, continue reading to know the best ways to clear temp files on MacBook.
How to Clear Temp Files on MacBook?
As is well known, one should clean your PC’s cache periodically. If you are a Mac user and want to know how to clean temp files from Mac, we will enlighten you.
All you are required to visit the Finder folder to locate and delete temporary files. Now, the Mac Finder can be approached in two ways; using Shortcuts or open Finder directly. Let’s know how to do that in the following steps.
Method 1: Open Finder using Shortcut keys
The first method is to use Shortcut keys in order to open the Finder. For that, you can follow these instructions:
- On your desktop screen, use the “Shift + Command + G” key combination. This will launch the Finder.
- Here, you can type the following command line:
- ~/Library/Caches
- Click on the “Go” option. This will display the stored cache files on Mac.
- Now, press and keep holding “Command + A” in order to select all the temporary files.
- Use the “Command + Delete” keys.
- Then, confirm the deletion.
In case, it prompts you for the password, you can enter it in order to complete the process. This is how you can use Shortcuts keys to open Finder.
Method 2: Go to Folder
Another way to open Finder is to reach its folder. To do so, you can walk through the following instructions:
- Close all the windows and open “Finder”.
- Click on the “Go”.
- From the drop-down list, click on the “Go to folder”.
- Here, type the following command line:
- ~/Library/Caches
- Click “Go”. This will display cache files on your Mac.
- Go to the “Toolbar” located on the top of the screen.
- Click on the “Edit” option.
- Click on the “Select all” button.
- Select the “Move to Trash” option located on the top.
- Now, press and keep holding “Command + A” in order to select all the temporary files.
- Hit the “Command + Delete” keys.
- Enter the password If it is required to confirm the deletion.
Once you are done executing these steps, the temporary files or cache files will be removed from your Mac computer.
Summing Up
After a period of time, every user should clean the cache or temporary files on their computer. In this guide, we have talked about numerous ways to clean temporary files on Windows and Mac computers.
In addition, if you are unable to clear temporary files on Windows PC, we provided the best possible solutions to fix that. Besides this, if you want to clear temporary files automatically, then you can use third-party programs (PC Cleaner Tools).
We have also covered a detailed guide on clearing cache and cookies and your computer as well as on the browser. Go through these curated articles: