
The ‘DNS Server Not Responding’ error can catch you off guard sometimes. It generally occurs while trying to connect a particular device to your home network. There are several ways to fix it up and we have got you the best ones in the guide below. But let’s get familiar with what exactly this error refers to.
What Does DNS Server Not responding Mean?
The domain names of websites you visit are stored on the Domain Name System (DNS) server. However, sometimes DNS fails to establish the connection as a result it shows the DNS server not responding error.
So since you now know the answer to the “what does DNS server not responding” question mean, let’s learn how to fix DNS server not responding on Windows 10 through this guide. It encompasses methods to get rid of the DNS server not responding error quickly.
Fix 1: Run Windows Network Troubleshooter
Before taking any strong action, always run the Windows Network troubleshooter to diagnose internet connection issues. Let us know how to report and fix the DNS server not responding on Windows 10, Windows 7, and Windows 8 via this fix.
For Windows 10:
- Open the “Settings” by clicking on the “Start Menu”.
- Choose the “Network & Internet” option. This will bring up the “Network Status” window.
- Under “Change Your Network Settings”, click on “Network Troubleshooter”. This will open the “Windows Network Diagnostics”.
- Here, you can follow the steps to start and wait for the troubleshooting test to finish.
- When you see the wizard for the error, you can go to the “Problems Found” section and find the root cause.
For Windows 7 and Windows 8:
Those of you who use Windows 7 or Windows 8 can perform the following tasks for running the Windows Network troubleshooter.
- Launch the “Control Panel” on Windows 7 or Windows 8.
- Click on the “Network and Sharing Center”.
- Here, you can go to the “Troubleshoot Problems” located under “Change Your Network Settings”.
- Select the “Internet Connection” to open a new internet connection window.
- Tap “Next” and click on “Run the Troubleshooter”.
- Now, click on “Troubleshoot my connection to the internet”.
- You can wait for the process to complete. Once done, go to the “Problems Found” section. Look for the error that is causing the DNS server not responding on Windows 7 error and fix it.
Fix 2: Change the DNS Server
If the DNS server is not responding, you can try changing the DNS server to Google DNS or OpenDNS. To make it easier for you, we have instructed the steps down below.
- Press the “Windows” key and “X” key together on your keyboard. Now, click on “Network Connections”.
- Then, you can find your network connection and click right on it to choose “Properties”.
- In the “Properties” window, you can place the checkmark next to the “Internet Protocol Version 4 (TCP/IPv4)” option. And then hit the “Properties” button.
- Next to this, you can choose any of the DNS server addresses that are as follows.
- Enter 8.8.8.8 as a Preferred DNS server. You can use 208.67.222.222 as well.
- For the Alternate DNS server, enter 8.8.4.4.
- Enter 208.67.220.220 for an Alternate DNS server.
- When you are done, click on the “Ok” button to apply the changes.
- If needed, you can disconnect the internet and connect it again.
Note: After you change the DNS server, you can try accessing the websites to check.
If you find the error DNS server not responding on Windows 7 or Windows 10 then there may be other problems. Let us move to the next DNS server not responding fix.
Fix 3: Enter the MAC Address
If the DNS server is not responding on Windows 10, you can resolve the DNS server error by adding the MAC address of the network manually. Here is what you need to do.
- On your keyboard, use the “Windows” key along with “X” key to select the “Command Prompt (Admin)” option.
- Then, you can enter the “ipconfig /all” command and hit the “Enter” button.
- This will show a list. From here you can select the “Physical Address”. And then type it down.
- Now, you can close the “Command prompt”.
Since you know the MAC address now, you can configure the network connection. To do so, you can go through the following steps.
- First of all, you need to open the “Network Connection” window and find your connection to open the “Properties”.
- When you see the “Properties” window, click on the “Configure” option on the right.
- Then, you can visit the “Advanced” tab. And from the “Property” section, choose the “Network Address”.
- Here, you can click on the Valura and add the MAC address that you noted down from the “Command Prompt”.
Note: When you enter the MAC address, make sure that you do not enter any dash in the “Value” section.
- Once done, you can click on the “Ok” button.
This will switch the network to OpenDNS or Google DNS server easily. When the DNS server is not responding, you can try implementing the above-mentioned steps as many users find it effective.
Fix 4: Download the Latest Drivers
Outdated drivers can also cause DNS server errors. If the DNS server not responding on Windows 10 then make sure that you install the latest drivers from your manufacturer’s website for the network adapter.
Note: Due to the DNS server error, you might not be able to visit the manufacturer’s website. So you can download the latest drivers on another device. Then install them on your computer. You may also uninstall the drivers before installing the new ones.
Here is what you need to do.
- On your keyboard, press the “Windows” and “X” key to select the “Device Manager” option.
- When the “Device Manager” window opens, you need to find “Network Adapters” and click right on that to select the “Uninstall” option.
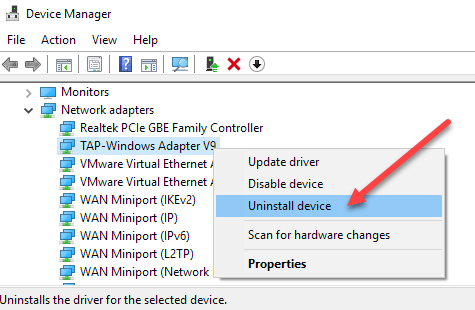
- You will see the prompt to confirm your actions. Here, you can select the option that says “Delete the driver software for this device” and click on the “Uninstall” button.
- When you are done uninstalling the driver, you can restart your computer.
After the restart, you will find the (default) network driver installed on your computer.
Advice: Most users find this a hectic process of installing the drivers manually. Above all, downloading the drivers may cause damage to the computer. To prevent this, you can update the drivers automatically using tools like TweakBit Driver Updater.
All you are required to do is launch the program and let it scan your computer. After the scan, you will see the list of updates for the drivers. You can click on the “Update Driver” (that you want to edit). To update each driver, you can simply click on the “Update All” button. This will install all the drivers automatically.
Fix 5: Disable Firewall and Antivirus
Firewall and antivirus play a vital role in protecting your computer from malicious users. However, the firewall may interfere with the internet connection which as a result shows Windows DNS server not responding error.
To disable the firewall, you can go to the Firewall settings and click on the Block Internet connection sharing option. If you are using Avast as your antivirus then you can open its settings and click on the Secure DNS option in order to disable it.
Fix 6: Update the Router’s Firmware
Due to the wireless internet connection, users may encounter errors such as the DNS server not responding to WiFi or the DNS server not responding router. If that is the case then make sure that you update the router’s firmware.
Note: This is the advanced process that can cause damage. To avoid any loss, make sure that you back up the settings of the router’s firmware before you update them.
Fix 7: Run netsh Command
If the DNS server fails to establish the connection and shows the DNS server not responding error then you can try using the netsh command on Windows 10. This is what you need to do.
- Launch the command prompts as an administrator.
- Then, enter the following netsh commands in the field.
- “netsh winsock reset”
- “netsh int ip reset”
- “ipconfig /renew”
- “ipconfig /flushdns”
- When you are done executing these commands, you can restart the computer.
By running these netsh commands, you will clear the DNS cache and reset the IP which will resolve the DNS server error on Windows 10.
Fix 8: Restart the Modem
Do you face HP laptop, DNS server not responding on Windows 10? Do not panic! You can try restarting the modem to resolve the error.
To do so, you just need to use the Power button of the modem in order to power it off. After waiting for at least 30 seconds, you can again turn the modem on by pressing the Power button. When the modem completely turns on, you can try surfing the internet. It will work now.
Fix 9: Start Your Computer In Safe Mode
VPN tools often interfere with the internet connection that causes this DNS server not responding to wireless connection error. In this scenario, you can try to access the internet in safe mode. In case you are not aware of how to enter safe mode on your computer, go through the following steps.
- Go to the “Start Menu” and click on the “Power” button.
- Now, hold the “Shift” key on your keyboard. Then click on the “Restart” button.
- Then, you need to select the “Troubleshoot” option.
- Go to the “Advanced” options. Choose the “Startup Settings”. And click on “Restart”.
- When your computer restarts, you will find a list of a few options. Then, you can use the “F5” key in order to choose “Safe Mode” with “Networking”.
- This will start your computer in the “Safe Mode”. Now, you can access the internet with no DNS server error.
Note: If your internet works fine, then it indicates that the problem was with the third-party apps. To avoid further error, you can detect and remove the problematic tools from your computer.
Fix 10: Disable Microsoft Virtual WiFi Miniport Adapter
Microsoft Virtual WiFi Miniport Adapter often causes DNS server error. If the DNS server not responding to WiFi error is seen, you can disable the adapters following these steps.
- Open the “Device Manager” window.
- Go to the “View” and click on “Show Hidden Devices”.
- Find the “Microsoft Virtual WiFi Miniport Adapter” and click right on it. Do the same for other adapters as well.
- Once done, close the “Device Manager” window and try accessing the desired website.
Fix 11: Disable the Internet Protocol Version 6
There are two kinds of IP addresses, v6 and v4. When you find the DNS server not responding to Cox, you can try disabling the internet protocol version 6. It can fix the problem. Follow these steps to get the job done.
- Open the “Network Connections” window and click right on your connection to select the “Properties” option.
- Here, you need to find “Internet Protocol Version 6 (TCP/IPv6)”.
- Then, remove the checkmark and click on the “Ok” button to disable it successfully.
Fix 12: Disable Additional Connections
On your computer, you may have multiple connections. Due to this, you might find issues with the internet connections especially while using the WiFi. So, if the DNS server not responding to wireless connections error emerges, you can disable the additional connections. Here is what you do.
- Open the “Network Connections” and click right on the connection to choose the “Disable” option from the menu.
- Similarly, you can disable all the connections available on your PC. Make sure you do not disable your own network connection.
Fix 13: Uninstall Problematic Third-Party Apps
Sometimes the problem is not with your computer but the third-party apps that bring issues on the system. When you find that the error DNS server not responding on Windows 10, make sure that you check all the installed apps.
If you find any inappropriate app that causes DNS server error then you can instantly remove or disable it. After this, you can try accessing the web.
Fix 14: Change the DNS Address on the Router
DNS server error can also be fixed by changing the DNS address on the router. Learn here how to fix DNS server not responding.
To resolve the error, you will have to access the router’s configuration page and search for the DNS setting. Then, you can change it to either OpenDNS or Google DNS. This will surely fix the DNS server not responding on Windows 7 or Windows 10.
Fix 15: Reset the Router
The configuration of your router can create issues with the DNS server. If the error DNS server not responding router shows up, then you simply reset the router to the default.
All you are required to do is open the router’s configuration page and click on the Reset option. Alternatively, you can hold the reset button for a few seconds to reset your router. If required, you can export the configuration so that you do not need to configure the wireless network again.
Fix 16: Disable Peer to Peer Update Feature
Windows PCs allow its users to download Windows updates with the help of peer to peer technology. This feature helps you to install Windows updates from the other users available in your area.
Despite its amazing feature, your internet can be a victim of errors such as the primary DNS server not responding error. In this case, you can simply disable it by following these steps below.
- Launch the “Settings” app on your computer by using the “Windows” + “I” keys.
- Go to “Update & Security”. Click on the “Advanced” options.
- Click on the “Choose how updates are delivered” option.
- Here, you need to make sure that the “Updates from more than one place” option is disabled.
Note: Since your update feature is turned off, you can check the internet if it causes DNS failure. If you find the error, then move to the next DNS server not responding fix.
Fix 17: Wait for ISP to Resolve the Error
Your ISP might have some problems due to technical difficulties. This does not allow you to access the internet.
If you encounter errors such as the DNS server not responding on PS4, Comcast DNS server not responding, or the DNS server not responding to Cox error, then you need to wait for the ISP to resolve the errors.
For the Comcast DNS server not responding error, you can visit GW GUI and click on Troubleshooting to hit the Reset or Restore Gateway. After resetting the WiFi router, you will find the problem solved.
Fix 18: Use Different Web Browsers
If the DNS server is not responding on Windows 10 error emerges, then the problem might be caused by your web browser. In this case, you can try using different web browsers such as Google Chrome, Internet Explorer, Opera, Mozilla Firefox, and Microsoft Edge.
If you are a Google Chrome user and receiving a DNS server error, then you can switch to some other browser. Check if your browser is causing the primary DNS server not responding error.
After changing the browser, if you access the websites normally, it indicates the issues with your web browser. And to fix it, you can reset the browser’s settings completely. Alternatively, you can reinstall the browser on your computer.
Fix 19: Automatically Detect Settings
When you allow your Windows 10 PC to automatically detect the network settings, it may help you to fix the DNS server issues. Let us know how to do this.
- On your “Chrome” web browser, go to the menu by clicking on the three vertical dots on the top right.
- Then, go to “Settings”.
- Here, you can scroll down and find the “Advanced” option at the bottom.
- Now, click on the “System” section and choose “Open Proxy Settings”.
- When you see the “Internet Properties” window, go to the “LAN Settings”. These should be under the “Connections” tab.
- On the LAN screen, you can place the checkmark next to “Automatically detect settings”. Hit the “Ok” button.
- Allowing your computer to automatically detect the network settings.
- Restart the computer. Check if the DNS server issues are resolved.
Wind-up
We hope you find our fixes effective for the DNS server is not responding error and access the internet properly. Accessing the DNS server is mandatory to access any website on the internet. However, if the DNS server is not responding on your Windows 7, Windows 8, or Windows 10 PC, then you can execute the methods we have discussed in this blog.
Changing the DNS server, downloading the latest drivers, and entering the MAC address manually often help you to fix the issue like the DNS server not responding on Windows 10.
Share your thoughts on this blog in the comment box below!
Do you also want to learn how to fix dns_probe_finished_nxdomain error in Google Chrome? The best guide is here. Check now!