![[Resolved] Windows 10 Can’t Connect To This Network](https://www.errorsdoc.com/wp-content/uploads/2020/12/124-1-89.jpg)
Most users encounter this “Windows 10 can’t connect to this network” error when they try to connect to the WiFi or hotspot network. This happens due to poor internet connection or other network-related issues. If you find the same issue when connecting to the internet then you can resolve it instantly.
In this particular guide, we will jot down a number of effective solutions. By performing these methods, you can fix the “Windows 10 WiFi can’t connect to this network” easily. Let’s get started!
In this guide, we will go through a number of solutions through which you can resolve unwanted errors on Windows.
- How to Fix “Windows 10 WiFi can’t connect to this network” Error?
How to Fix “Windows 10 WiFi can’t connect to this network” Error?
In most cases, disconnecting and reconnecting the internet solves your internet connectivity issues. However, if you are facing problems connecting to the internet then make sure that you fix your network adaptors properly.
For instance, you can reinstall the network adaptor, update the network driver, use the same security type for computer and network adapter, perform commands, disable IPv6, change wireless network mode, edit channel width of your network adaptor, and more.
Let’s understand all these methods with a manual procedure.
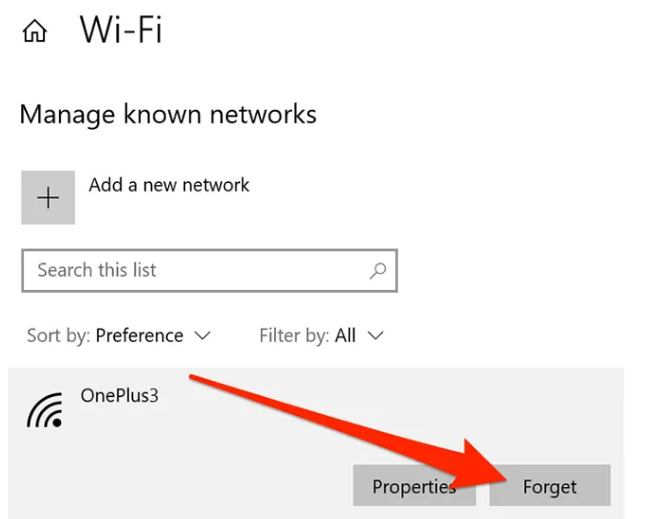
Method 1: Reconnect the Wireless Network
When you are unable to connect to the WiFi or hotspot network, the first and basic thing you can do is forget this network and reconnect it. This often solves your internet connection problems.
So, when you encounter the “Windows 10 can’t connect to this network” error, you can follow the steps mentioned below:
- Open the “Settings” app on Windows 10.
- Go to the “Network & Internet” section.
- Find “WiFi” settings and open it.
- Scroll down to find the list of available WiFi networks.
- Choose your current wireless network.
- Now, click “Forget” in order to reset the network
- .
- Then, click again on it to rejoin the same network.
Performing this method solves the network issues instantly. Yet, if you see any errors connecting the internet then you can try using the other methods.
Method 2: Switch to Airplane Mode
Another basic method is to toggle the Airplane mode on your Windows 10. Usually when your internet does not work, going Airplane mode for a while solves your internet connectivity issues.
To fix Windows 10 can’t connect to this network, you can enable Airplane mode and reconnect to the same network. Let’s know how to do this:
- Click on the “Notification” icon located on the bottom right. This will open the “Windows Action Center”.
- Here, click on the “Airplane mode” option. This will enable it and disconnect your internet.
- After a minute, click again on the “Airplane mode” to disable it.
- Then, reconnect to your internet network.
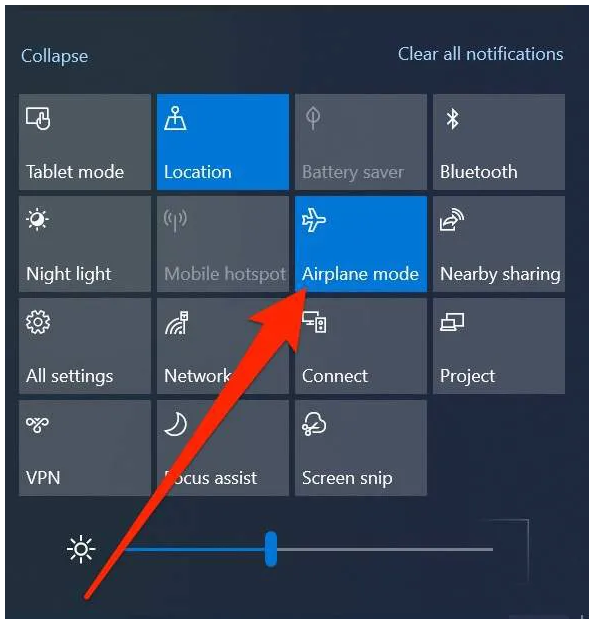
After performing these steps, your internet should be able to connect easily and work effectively.
Method 3: Reinstall the Network Adaptor
A network adaptor helps to establish the network connection. If you find this ”can’t connect to this network on Windows 10” then you should try reinstalling your network adaptor.
To reinstall the network adaptor, you can go through the following steps discussed below:
- Press the “Windows” + “X” key on your keyboard.
- Now, choose “Device Manager” from the search result.
- Look for your network adaptor in the “Device Manager” window.
- Right-click on your network adaptor and go to its “Settings”.
- Click the “Uninstall” option.
- Hit the “OK” button.
Once done, you can wait for a moment. By performing these steps, your computer will successfully remove the network adapter.
Later, you can restart your PC. While your Windows 10 restarts, it would prompt you to reinstall the drivers. You can click the OK button and your operating system will start installing the required drivers. This will also fix Windows 10 WiFi can’t connect to this network” issue. If it does not, try performing another method.
Method 4: Disable IPv6
In case, you are not able to fix IP protocol settings then you can simply disable the IPv6 network protocols. By doing so, you can fix this “can’t connect to this network on Windows 10” error. Here is what you need to do.
- “Right-click” on the network icon located in the system tray.
- Click on the “Open Network and Internet Settings” option.
- Select the “Network and Sharing Centre” option.
- Then, choose the “Change Adapter Settings” button.
- Click right on the network connection and click on the “Properties” option.
- Find the “Internet Protocol Version 6 (TCP/IP) from the menu list and uncheck this option.
- Hit the “OK” button.
This will successfully disable the internet protocol version 6 on your Windows 10. After this, you can restart your PC and apply new settings.
Method 5: Update Your Network Adapter Drivers
If you can’t connect to this network on Windows 10 HP laptop, this may happen due to the outdated network drivers. Hence, you should update your network drivers if it shows any error. Let’s know how to get this job done.
- Click on the “Start” button located on the bottom left.
- Type in “Device Manager”.
- Find the “Network adapters” drop-down in the “Device Manager” window.
- Right-click on your adapter and choose the “Update Driver Software” option.
- Then, click on “Search Automatically for Updated Driver Software” in a dialog box.
- Now, follow the on-screen instructions and finish the process.
When you are done implementing these steps, restart your PC. This will have applied your actions and updated your network adapter drivers.
Note: Make sure that you download the network adapter driver files that are compatible with your PC model. Installing the incorrect driver may cause other issues on your system.
Method 6: Disable the Wireless Adaptor
Another method to fix Windows 10 can’t connect to this network is to disable and then re-enable the wireless adaptor. To do so, you can look for the following steps:
- “Right-click” on the network icon located in the system tray.
- Click on the “Open Network and Internet Settings” option.
- Select the “Network and Sharing Centre” option.
- Then, choose the “Change Adapter Settings” button.
- Find your wireless network and right-click on it.
- Choose the “Disable” option from the right-click menu.
- Then, right-click again on the same network and choose the “Enable” option.
When you re-enable the connection, it resets your device cache and connects to the network instantly. This will surely resolve your internet connectivity issues. In case, it does not then there must be some other issues. Try using other methods.
Method 7: Network Adaptor with Same Security Type
To protect the data, wireless connections come with different security types such as WPA-PSK (AES) or WPA2-PSK (AES). You should always make sure that your PC, as well as the wireless adaptor, are using the same security type. In the following steps, we will check if both devices have similar settings.
- “Right-click” on the network icon located in the system tray.
- Click on the “Open Network and Internet Settings” option.
- In the “Manage Wireless Networks” page, find your wireless network and right-click on it.
- Choose the “properties” option. This will show the new setting page from where you can modify the security settings for the wireless network.
- Now go to the “Security Settings” and make sure that you have chosen a similar security type to the wireless router.
- In case you have no idea what security type the adaptor is using then you can choose the different one for both the devices.
- Then, click “OK” to save your settings.
This will apply a similar security type for both your network adaptor as well as your computer. After applying these settings, you can try connecting to the wireless network and check if the issue has been resolved.
Method 8: Add Connections Manually
When you can’t connect to this network on Windows 10, it may happen due to the misconfigured WiFi connection or adaptor problem. To fix this, you can try adding the connections manually. Below are the steps that one can follow:
- Open “Network and Sharing Center”.
- Then, click on the “Set Up A New Connection” or “Network” from the “Settings”.
- Choose the network you want to connect manually.
- Enter the required information such as security type, security type, and network name.
Once you provide the necessary information, you can click on the Next button and finish the process. This is how you can add the connection manually and connect to the network immediately.
Method 9: Change Wireless Network Mode
Sometimes, changing the network mode can resolve issues such as Windows 10 WiFi can’t connect to this network. To change your wireless network mode of the router, you can follow these steps.
- “Right-click” on the network icon located in the system tray.
- Click on the “Open Network and Internet Settings” option.
- Find the wireless adaptor and click right on it.
- Select the “Properties” option.
- Click on the “Configure” button in the “Properties” window.
- Now, from the configuration page, go to the “Advanced” tab.
- Now choose “Wireless mode” from the result.
- Now, you can change the value of the Wireless mode. This will match the WiFi router mode
When you are done implementing these steps, it will change the value of your wireless network mode. As a result, your WiFi connection can work uninterruptedly.
Method 10: Edit Channel Width of Network Adaptor
The width of your Network Adaptor can also cause network issues. To solve this issue, you can adjust the width of the Network Adaptor. For this, you can go through the steps mentioned below:
- Click on the “Start” button.
- Type in “Device Manager” in the search box.
- Hit the “Enter” key.
Note: If your screen prompts for the User Account Control or administrator password, you can enter the correct password and click the Continue or Yes button.
- Now, double-click on the” Network adapters” in order to expand the selection (in the “Device Manager” window).
- Click on the wireless adapter and click on the “Action” button.
- Click “Properties” in the “Action” menu.
- Now, click on the “Advanced” tab.
- In the “Property” section, click on select 802.11 channel width and change its value to 20 MHz.
- Click the “OK” button to save changes.
This will quickly fix Windows 10 can’t connect to this network error. All you are required to edit the channel width of your Network Adaptor and you are done.
Method 11: Run Command
When no manual procedure works, you can try running the Ipconfig command on your Windows 10. To run this command, you can follow these steps carefully.
- Press the “Windows” key on your keyboard.
- Type “Command Prompt” to open it.
- In the “Command Prompt” window, you can enter the following commands. Make sure you enter each command in one line (press the “Enter” key after each command).
- netsh winsock reset
- netsh int ip reset
- ipconfig /release
- ipconfig /renew
- ipconfig /flushdns
After running these commands, you can restart your PC. This will apply your changes successfully and fix your internet connectivity issues.
Method 12: Reset Network Settings
Incorrect network settings can also be the reason that you are unable to connect to the network. The best option to fix this error is to reset the network settings entirely. Let’s know how to reset network settings in the following steps:
- Go to the “Settings” app.
- Click on the “Network & Internet” option.
- Go to “Status” located on the left sidebar.
- Now, scroll down (on the right side) and choose “Network reset”.
- Click on “Reset now”.
It will help your network settings get back to the default settings. Then, you can reconfigure it when required.
Method 13: Run Network Troubleshooter
When running a number of methods is not figuring out the error then you can simply run the troubleshooter. By using this built-in network troubleshooter, your Windows 10 will find and resolve the error related to the network. Follow these steps to perform the network troubleshooter:
- Open the “Settings” app on your Windows 10.
- Click on “Update & Security” option.
- Select the “Troubleshoot” located on the sidebar.
- Search for the “Network Adapter” in the list.
- Click on the “Run the troubleshooter”.
After implementing these steps, the troubleshooter will start running on your computer. If it finds any issues with your network problem, it will fix it automatically.
In a Nutshell
Windows 10 can’t connect to this network error bothers you due to certain problems such as poor internet connectivity. However, by performing a number of methods, you can resolve this issue.
In this blog, we have talked about the best and effective solutions. This will help your internet work effectively with no interruption. These methods do not require any technical practice. So, even if you are not a tech geek, you can implement these methods with the help of step by step guide.
Most users have been requesting the following questions. To get your answers, read the following guides on Windows 10 errors: