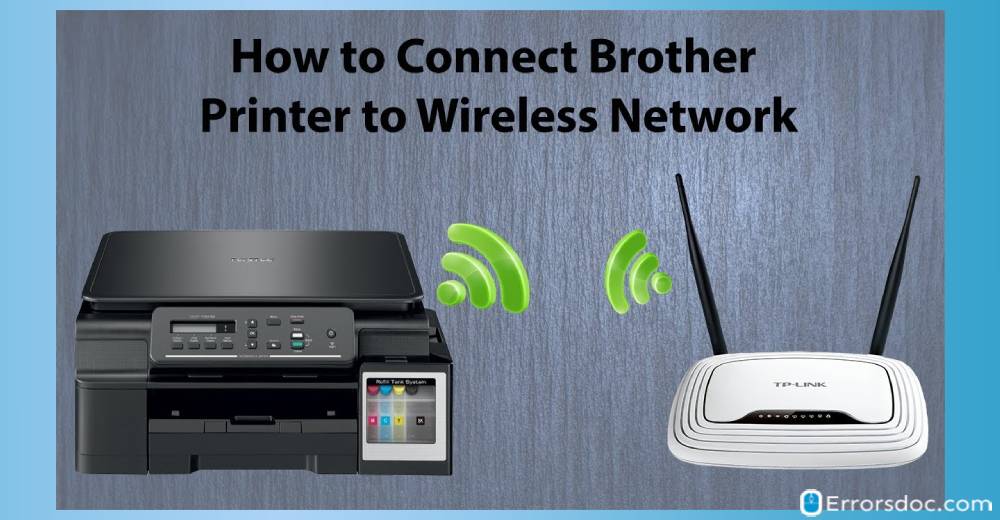
Wireless printing can be extremely useful and highly convenient. It not only allows you to generate a print command from any computer on your network, but also frees you of the limitation of staying confined to the same computing machine, operating system, or place for that matter.
Do you know how to connect Brother printer to wifi? If you’re in need of help, then we have outlined some simple ways to set up a Wi-Fi or wireless connection with your Brother printer.
Methods to Connect Brother Printer to Wifi
We have devised methods to connect Brother printer to your wifi on Windows as well as Mac. In the following sections, you can also explore model-specific methods.
Method 1: How to Connect My Brother Printer to Wifi via Setup Wizard?
Follow our 11 steps mentioned below to set up your Brother printer on a wireless network. However, before configuring the wireless settings, you must know the password and network name of your wireless network. You can usually find this at the back of your modem.
1. Connect your Brother printer to the power outlet and turn on the machine.
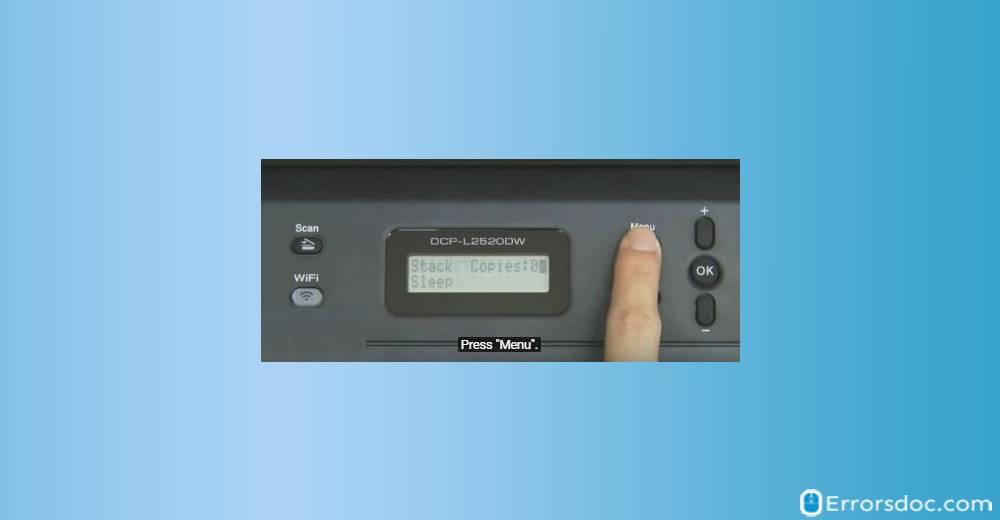
2. Press the “Menu” button.
3. Press the “Up”/“Down” arrow key to select the network and press “Ok”.
4. Now, press the “Up”/“Down” arrow key to choose “WLAN” and then press “Ok”.
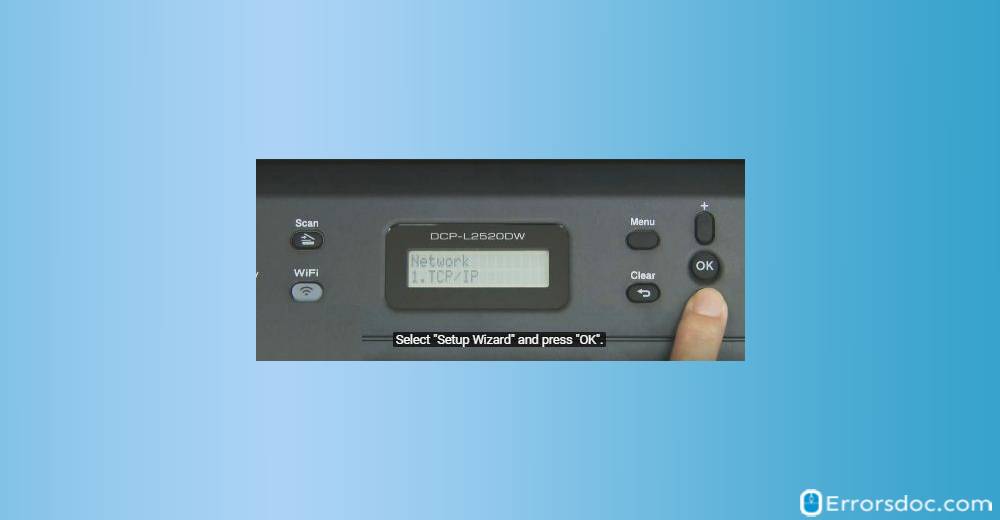
5. Similarly, select the “Setup Wizard” using the “Up”/“Down” arrow key and then press “Ok”.
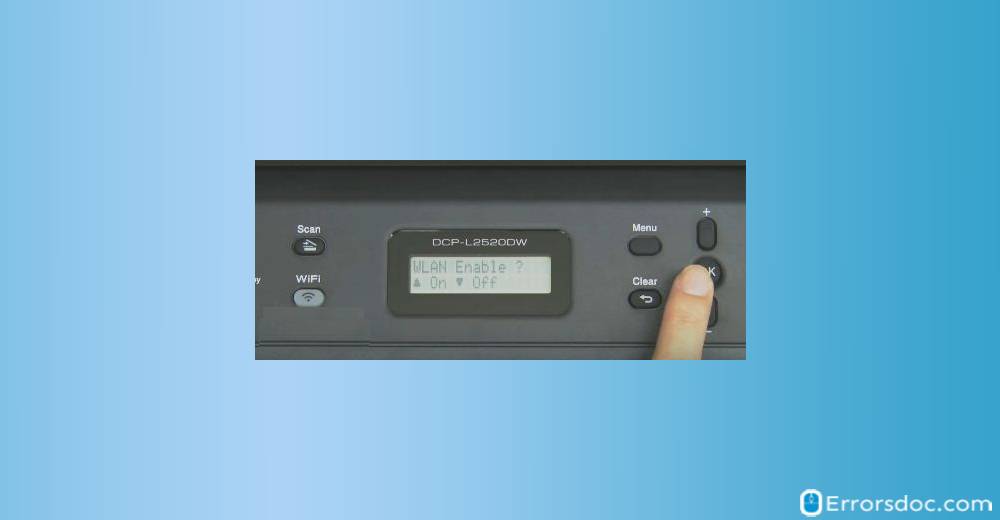
6. Once the “Enable WLAN command” appears, click to enable the wireless network.
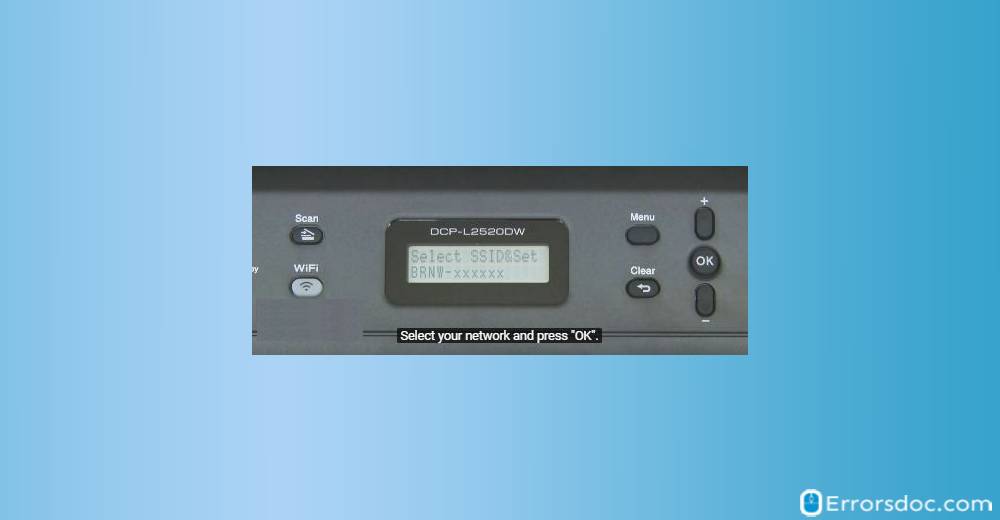
7. Now, you have to wait. Your Brother printer will search for your network and display a list of available SSIDs.
8. Next, press “Up”/“Down” arrow key to select the “SSID” of your choice and then press “Ok”.
9. Now, perform one of the following operations:
In case you are using an authentication and encryption method, enter the “Network key”. Then enter the “WEP key” and press “Ok”. Choose “Yes” to apply the settings or “No” to cancel.
In case you are using the “Open System” for authentication, your encryption mode should be “None”. So, simply move to the next step.
10. In case your “WLAN access point/router” supports WPS, the message “WPS is available” will appear. Press the “Up” arrow key to connect your machine using the automatic wireless mode. Then press the “WPS” button on your “WLAN access point/router” and press the “Up” arrow key twice.
11. Now, your Brother printer will attempt to connect to the wireless network. Once connected successfully, the machine’s LCD will display “Connected”. Try to print a test page to check if your Brother printer is printing without any error code.
Method 2: How Do I Connect My Brother Printer to Wifi via Control Panel?
Let us learn how to connect printer to wifi Brother with the help of the Control Panel. This method is quite simple to understand and can be performed in just 9 steps.
1. On your Brother printer, go to the “Control Panel”.
2. Press the “Mouse” button.
3. Next, select “All settings”.
4. Then navigate to “Network” and hit “Ok”.
5. Now, go to “Network reset” and tap “Ok”.
6. For yes, press “1”. For confirming the same, press “1” again. Then your Brother printer will begin to reboot.
7. You will be asked to set up the wifi once your printer has been rebooted. Hit “Ok” thrice to see the “Setup Wizard”.
8. From the list of wifi networks available, choose the one that is yours and fill in the “Wifi password”.
9. Now, tap “Ok” and then hit “1” for applying these settings.
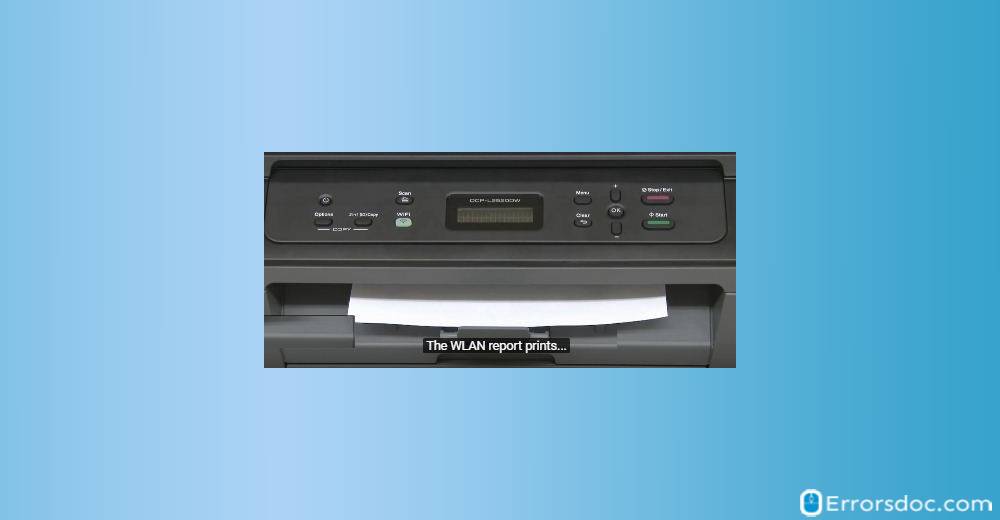
That is all! Once you have performed the above-mentioned steps correctly, your Brother will be connected to the wifi and you will receive the printed connection report.
Method 3: How to Connect Brother MFC L2700DW Printer to Wifi?
In this method, we will teach you how to connect Brother printer MFC L2700DW to wifi from the device’s Control Panel. The step-by-step instructions of this method have been shown below. Take a quick look at these.
1. Turn on your Brother MFC L2700DW Printer.
2. From the “Control Panel”, go to the “Menu”.
3. With the help of the “Up” or “Down” arrow key, select the “Network” option.
4. For selecting a “Network”, press “Ok”.
5. The next step is to access the “WIreless LAN” choice. Then tap “Ok”.
6. Now, activate “WLAN” by visiting the “Assistant setup”.
7. Choose the “Setup Wizard” with the help of the “Up” or “Down” arrow key.
8. You will be asked whether you want to enable WLAN. Press “Yes” to confirm.
9. The last step is to fill in the details of your wifi network and your Brother MFC L2700DW will be connected to the wifi.
Method 4: How to Connect the Brother Printer to the Wifi via Printer Driver?
Do you know you can also use the Brother printer driver for connecting your printer to the wireless network? The detailed steps to use the printer driver for this purpose have been outlined below. So, let us read these to know how to connect wifi with Brother printer.
1. Start your computer or laptop with the administrator credentials.
2. Turn off all the background programs that may be running.
3. Also, turn off your antivirus software as it can interfere with this process.
4. Use the “CD” received with your Brother printer to prepare the setup for the printer driver.
5. You will be asked to choose your language.
6. Then you will be asked to select the nearby network available.
7. When several windows are visible on your computer or laptop, go ahead with the “Pro-suite” for the complete driver package.
8. Tap “Next” once you have selected the suite for the printer driver.
9. Select your wireless network and then press “Next”.
Note: In case you see an antivirus window on your screen, two options will be available to you. Using the first option, you will be able to alter the antivirus port. Then you can establish the network connection and go ahead with the setup. With the help of the second option, you will be able to continue with the setup without altering the antivirus port. We will recommend you to choose the first option.
10. Ensure that the UDP (User Datagram Protocol) port or the antivirus port has been set to “54925”.
Note: In case the UDP (User Datagram Protocol) port or the antivirus port does not work when set at “54925”, you can set it to “137”. It should work then.
11. Next, go through the on-screen instructions. Press “Next” as and when required. At the end of this procedure, your Brother printer will have been connected to your wifi.
Method 5: How to Connect My Brother Printer to Wifi Network via Wireless Direct Setup?
In this method, we will be discussing with you how to connect to wifi on Brother printer using the wireless direct setup. This is one of the best methods for Windows users. Check out the 9 steps of this method right away.
1. The first step is to provide confirmation to the “Wireless Direct settings” of your Brother printer.
2. Now, with the help of a USB cable, establish a connection between your Windows computer and printer.
3. On your Windows PC/laptop, launch the “Printer setting tool”.
4. Then press the “Communication settings” button.
5. Next, go to the “General” tab.
6. For the “Selected interface”, you have to choose “Wireless direct”.
7. Tap the “Wifi button” on your Brother printer. Hold the button for a second to enable the wifi function.
8. Choose the “SSID” of the Brother printer via your computer. Then provide the “Password” for the same.
9. The wifi light on your Brother printer will flash blue. When the light stops flashing, you can be sure that the connection has been established.
Method 6: How to Connect to Brother Printer over Wifi via Infrastructure Mode Setup?
Do you know how to connect wifi in Brother printer using the infrastructure mode setup method? We are here to guide you! Follow the 8 steps given below for connecting your printer to wifi using this method.
1. The first step is to connect your Windows PC or laptop to your printer via a USB cable.
2. Tap the “Wifi” button on your Brother printer for 1 second. When the wifi function has been enabled, the wifi indicator light will start flashing blue in the gap of three seconds.
3. Now, start the “Printer setting tool” on your Windows system and press the “Communication settings” button.
4. Access the “General” tab and ensure that “Wireless LAN” has been chosen for the “Selected interface”.
5. Go to the “Wireless LAN” tab. Open the “Wireless settings”. See to it the “Infrastructure” has been chosen for the “Communication mode”.
6. Tap “Search”. Then look for the “SSID” for your printer from the list.
7. Use “Passphrase” as the password for “SSID”.
8. The final step is to press the “Apply” button.
Method 7: How to Connect a Brother Printer to the Wifi Using the WPS Method?
Now, let us check out how to connect wireless Brother printer to wifi using the WPS or wifi protected setup. Setting up the connection via this method is very less time-taking. You can do this method quickly in just 3 steps.
1. Begin with verifying the “WPS” symbol on the “Wifi access point” or “Router”.
2. Ensure that your Brother printer has been kept in your wifi router’s range.
Note: When you don’t keep your Brother printer within the range of your wifi, you may face difficulties with connecting it to your laptop or printer.
3. Tap the “WPS” button of the “Router” or “Wifi access point”. Hold the “WPS” button for at least 5 seconds and then release it.
The wifi indicator light will start to flash in blue when you press the “WPS” button. The connection of your Brother printer with your wifi network will be successful when the light becomes stable. Also, you will be able to gain access to your printer with all your devices that are on the same network.
Method 8: How to Connect Brother Printer to Wifi Mac?
Many users report the problem of Brother printer not connecting to wifi Mac. Here, we have penned down a method that will definitely fetch success in connecting your Brother printer to your Mac device. This method is short and only requires you to do 5 steps.
1. Connect your Mac to your Brother printer. Use a working USB cable for this purpose.
2. On your Mac, open the “Printer setting tool”. Ensure that the “Wireless direct” option is on.
3. Now, locate the “Wifi” button on your Brother printer. Press and hold it for just a second. This will enable the wifi function on your printer.
4. The wifi light will flash blue three times. Then you can choose your Brother printer’s “SSID” on your Mac.
5. When the wifi light stops flashing and becomes stable, your Brother printer will get connected to the wifi. Print a test page to ensure that the printer is connected and working.
Method 9: How do I Connect My Brother Printer to the Wifi on Mac via Infrastructure Mode Setup?
The infrastructure mode setup method works brilliantly for connecting your printer to wifi on your Mac. You will be required to access the printer driver package in this mode. Now, let us take a look at the 8 steps for how to connect wifi to printer Brother using this mode.
1. Start with connecting your Brother printer to your Mac with a USB cable.
2. Once connected, press the “Wifi” button. Hold it for 1 second to start the wifi function. When this function has been enabled, the wifi indicator will begin to flash in blue.
3. Now, using the “Printer driver package”, initiate the “Wireless device setup wizard”.
Note: For those of you who do not have the “Printer driver package”, you can visit its official page to download it now.
4. A set of instructions will be visible on your screen. Perform these instructions to continue.
5. A file will be downloaded. Click on the file twice.
6. Now, in the “Utilities” folder, look for the “Wireless device setup wizard”. Provide the “SSID” or you can search for it in the list available.
7. The password for the “SSID” of your Brother printer will be “Passphrase”.
8. The eighth step is to press the “Apply” button.
Note: Once your Brother printer has been successfully connected to wifi on your Mac, the wifi indicator light will stop blinking. When it gets stable, the wifi connection procedure will be complete. Then you can start using your Brother printer as usual.
Method 10: How do I Connect Wifi to My Brother Printer on Mac via Wireless Direct Setup?
Here is an excellent procedure for how to connect Brother printer wifi on Mac. The wireless direct setup can be used for connecting the Brother printer on a Mac device as well. In just 7 steps, we will be teaching you this method.
1. Give the confirmation for the “Wireless direct settings” of your Brother printer.
2. Connect your Brother printer to your Mac via a USB cable.
3. The third step is to launch the “Printer setting tool” on your Mac device.
4. Now, go to the “Wireless LAN” tab and make sure that the “Wireless Direct” has been turned on.
5. Find the “Wifi” button on your Brother printer. To turn on the wifi function, press the button for a second.
6. Choose the “SSID” of your printing device with the help of your computer or a similar device. Also, fill in its password.
7. The wifi light of the printer will flash blue and become stable. This will signal out to you that your Brother printer has been successfully connected to the wireless network on your MAC.
Note: While pressing and holding the “Wifi” button of your printer is essential for turning on the wifi function, make sure that you don’t hold it for a longer duration. Doing so will put your Brother printer in the “WPS mode”. In this mode, you will not be able to connect wifi to your Brother printer on your Mac.
Method 11: How to Connect My Brother HL L2360DW Printer to Wifi?
Do you have the Brother HL L2360DW Printer? Learn how to connect Brother HL L2360DW Printer to wifi simply from the Control Panel of this device. The procedure to do so is only 7 steps long.
1. The first thing to do is to ensure that your Brother HL L2360DW Printer has been placed near the router.
2. Then select the “Network connection” using the “Up” and “Down” arrow keys.
3. Select “WLAN”. Then press “Ok”.
4. Choose the option of “WPS” or ”AOSS”. Then press “Ok”.
5. When you are asked to enable WLAN, tap the “Up” arrow key. Now, the “Wireless setup wizard” will be launched. In case you wish to cancel its launch, you can tap “Cancel” or “Back”.
6. On the “Printer control panel”, the message “Press key on rtr” will be displayed. You will be required to tap the “AOSS” or “WPS” button. Hold the button for a couple of seconds.
7. When the “Printer control panel” shows the status as connected, hit “Ok”. Then the process will be complete.
Method 12: How do I Connect My Brother HL2270DW Printer to Wifi?
If you have the Brother HL2270DW Printer with you, then you have one of the most efficient printing devices. You can use this printer better when connected to your wireless network. So, let’s find out the steps for how to connect Brother HL 2270DW printer to wifi.
1. Get a “USB”. Use it to connect your Brother HL2270DW Printer to your laptop or computer.
2. When your laptop or computer has identified your printer, select its model from the list visible.
3. Now, press the “Next” button.
4. Next, click on the “Wireless network” visible in the list.
5. Then press “Next”. Your Brother HL2270DW Printer will be connected to your wifi.
Fixes for Brother Printer not Connecting to Wifi
The methods provided in this blog for connecting your Brother printer to wifi network have been tested. It is possible, however, that your Brother printer won’t connect to wifi due to several reasons. Use these fixes to resolve any bugs.
Fix 1: Reset Wireless Settings
If your Brother printer cannot connect to wifi, then you should try resetting the wireless settings. Resetting the wireless settings will remove any possible bug that is preventing the wireless connection. Below you can find out the 5 steps of this fix.
1. Access the “Utility” tab of your device.
2. Head on to the section of “Printer setup & software”.
3. Now, tap “Reconfigure wireless settings”.
4. Perform as per the instructions showing on your screen. Then the wireless settings will be reset.
5. Now, try connecting your Brother printer to wifi.
Fix 2: Restart Brother Printer and Wifi Network
At times, Brother printer connected to wifi but not printing is also a commonly observed problem. So, even when your printer gets successfully connected to your wifi, it may not help you print anything. In such a situation, restarting your wifi router as well as Brother printer will be a superb fix. Take a look at the 8 steps to perform this fix.
1. Turn off your Brother printer and then plug it out.
2. Now, turn off your wifi router for a few seconds.
3. Also, turn off your modem.
4. Next, plug in your Brother printer and turn it on.
5. The fifth step is to turn on your wifi router as well as modem.
6. Tap the “Power” button of your printer. Press it for at least 10 seconds.
7. Now, access the printer’s “Wireless settings”.
8. Find and select the name of your wifi network and then connect to it.
Compatible Brother Printer Models
The methods and fixes mentioned in this post for establishing the connection with wifi will work for the following models of the Brother HL Printer series.
| Brother HL 3170CDW Printer | Brother HL 3140CW Printer | Brother HL 2280DW Printer | Brother HL L2340DW Printer | Brother HL L2350DW Printer |
| Brother HL L2365DW Printer | Brother HL L2380DW Printer | Brother HL L2390DW Printer | Brother HL L2305W Printer |
You can use the fixes and methods provided here for connecting the following models of Brother DCP Printer series and other series to your wireless network.
| Brother DCP T700W Printer | Brother DCP T710W Printer | Brother DCP L2540DW Printer | Brother DCP L2541DW Printer | Brother DCP L2550DW Printer |
| Brother LC75 Printer | Brother TN 630 Printer |
The methods as well as fixes for connecting to wifi network will be useful for the following models of the Brother MFC Printer series.
| Brother MFC 9130CW Printer | Brother MFC J200 Printer | Brother MFC J475DW printer | Brother MFC J870DW Printer | Brother MFC L2740DW Printer |
| Brother MFC L2750DW Printer |
Let’s Conclude
In this blog, we learnt easy ways to connect your Brother printer to wifi. We hope these methods and fixes work excellently for you! Before you leave, do check out our other fantastic fixes for Brother printer offline and Brother printer troubleshooting.
Hi. Where can i see the password to be used?