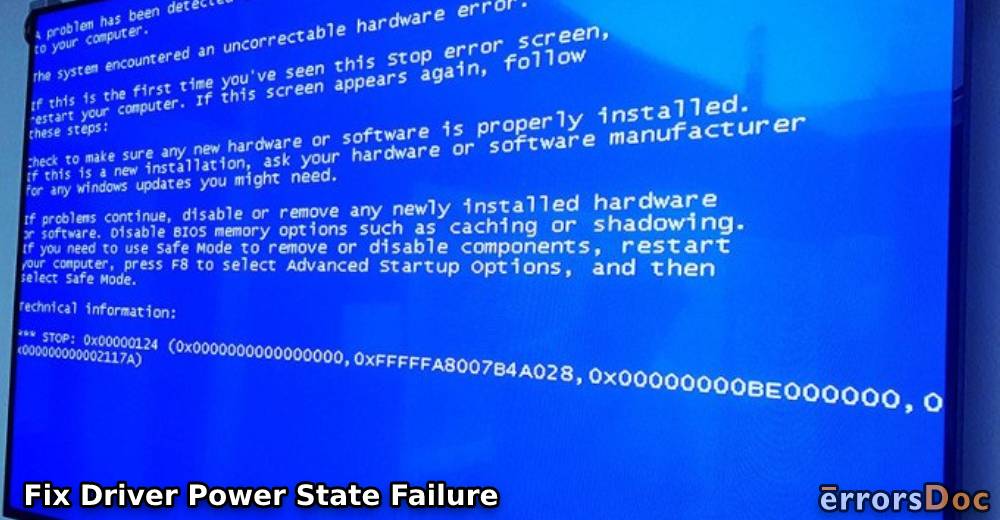
Does your PC often show the Driver Power State Failure error? Then don’t let it bring your productivity down and fix this Driver Power State Failure on Windows 10 at the snap of your fingers with this quick guide.
What is Driver Power State Failure?
Windows Driver Power State Failure is a common BSOD error, which is caused by incompatible or corrupt drivers. Booting the system can fix this blue screen’s Driver Power State Failure error sometimes. However, in some drastically different scenarios, you might have to dig deeper.
Check out the main causes of BSOD Driver Power State Failure error right here!
What are the Causes of BSOD Driver Power State Failure?
If your Windows PC has run into the Driver Power State Failure on Windows 10, the following could be the reasons:
- Outdated Driver: Windows PCs often run automatic updates due to which its drivers and other system apps become outdated.
- Sleep Mode: Windows sends a signal to your device driver to wake it up. If the device drivers do not respond, you may encounter the Driver Power State Failure ntoskrnl.exe error. In addition to this, the error may also appear when the device is in use and the device driver enters the sleep mode.
- Upgrading Windows: Another reason for this problem could be the Windows update. Upgrading the operating system to Windows 10 can result in BSOD Driver Power State Failure on your screen. This happens because the previously installed drivers are now incompatible with the latest Windows update.
Fix Driver Power State Failure on Windows 10
To fix this issue, we have got you the following guide that comprises 10 fixes. Here they are:
Fix 1: Run Commands
Running commands on your computer can work like magic. To remove the Stop Code Driver Power State Failure error, you can do the following:
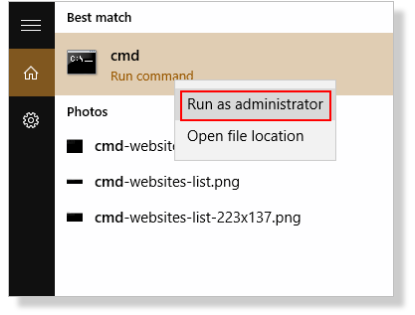
- Launch the “CMD” on your computer.
- Right click on “CMD” and click on “Run as administrator”.
- Enter the following command in the field.
- REG ADD “HKLM\SYSTEM\CurrentControlSet\Control\SafeBoot\Minimal\MSIServer” /VE /T REG_SZ /F /D “Service”
- Press the “Enter” button to execute the command.
- Now, enter another command mentioned below.
- net start msiserver
Hopefully, the command will solve the error. If it does not, then that maybe because of the Power Saving Mode being enabled. Learn more about it in the next fix.
Fix 2: Turn Off Power Saving Mode
If you use Power saving mode on your computer, then make sure that you disable it. This can be the primary reason that you are facing the Driver Power State Failure ntoskrnl.exe on Windows 10 error. To disable the power saving mode, here is what you need to do.
- Press “Windows” and “R” keys together on your keyboard. This will bring up the “Run” dialog box.
- Type “Control Panel” in the “Run” box and hit the “Enter” key.
- Search for the “View by” option (located in the top right) in the “Control Panel”.
- Click the drop-down list and choose the “Small icon” option.
- Click on the “Power Options” from the list of options.

- Check for the “Power saver” option if it is enabled. If not then you can choose the “Balanced” option.
- Then, click on the “Change Plan Settings” option.
- Click on the “Change Advanced Power Settings” option.
- Here, you can search for “Wireless Adapter Settings” and expand the window.
- Expand the “Power Saving Mode” window.
- Select “Maximum Performance” from the “Settings” drop-down menu.
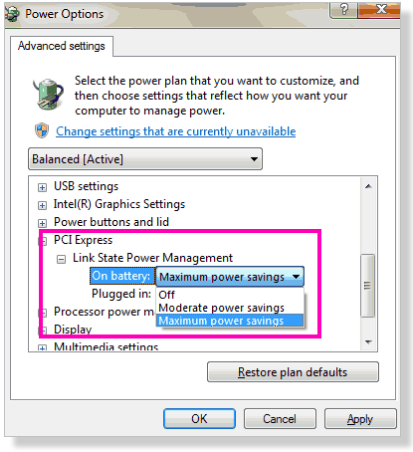
- Now, search for the “PCI Express” in the same window and expand it.
- Expand the “Link State Power Management” option.
- Select the “Maximum power savings” option from the “Settings” drop-down.
- Click the “Ok” button in order to apply settings.
When you are done following these steps, you can restart the computer. Then, you can check if the Driver Power State Failure error appears on the screen.
Fix 3: Remove Damaged Drivers
A problematic or damaged driver can cause Driver Power State Failure 0x9f error. In that case, you can simply remove the faulty driver.
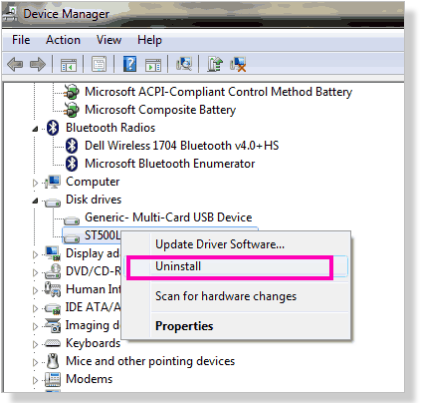
How would you recognize if your driver is problematic? To check it, you will see the drivers along with a yellow exclamation sign in the Device Manager window. If you find the driver with a yellow exclamation mark, then you can follow these steps to uninstall the drivers:
- Press “Windows” and “X” Keys together to open “Device Manager”.
- Click the “Device Manager” option. This will list down the drivers.
- Here, search for the drivers with a yellow exclamation mark.
- When you find the driver with error, right click on that to open the menu.
- Click on the “Uninstall” option. You can do the same for other problematic drivers.
- Close the “Device Manager” window.
- Go to the “Start” menu.
- Type “Settings” in the search bar to open it.
- In the “Settings” window, hit the “Update and Security” option.
- Click on the “Windows Update” section.
- Find the “Check for Updates” option and click on it.
- If you get the update, follow the instructions displayed on your screen to complete the process.
After uninstalling the drivers and updating the Windows, you can restart your computer. If the Driver Power State Failure on Windows 10 error is still bugging you then you need to update other drivers as well. Move to the next fix to understand better.
Fix 4: Update the Drivers
Updating each driver on your Windows 10 PC can solve the Stop Code Driver Power State Failure error. To do so, follow these steps.
- Open “Device Manager” by using “Windows” + “X” keys on your keyboard.
- Right click on the very first driver in the “Device Manager” window.
- Click on the “Update Driver Software” option.
- When a new window opens, click on “Search Automatically for Updated Driver Software”. This will check for the new versions of your existing drivers.
Note: If the drivers with the latest version get installed, then your PC will inform you. If it does not, then you can follow the instructions shown on your screen to update the drivers.
When all the drivers are installed, you can restart the computer and check if the Windows Driver Power State Failure errors are still there. If yes, go with the next solid fix.
Fix 5: Roll Back Graphic Driver
Graphic Card Driver often creates issues and results in Driver Power State Failure error. If you have recently updated the Graphic Card Driver then roll them back to the older version. Here are the steps that you can follow.
- Press “Windows” and “X” Keys together to open “Device Manager”.
- Search for the “Display Adapters” option and expand it.
- Now, right click on the “Graphics Driver” in the expanded list.
- Then, click on the “Properties” option.
- Click on the “Driver” tab in the “Properties” window.
- Find the “Roll Back Driver” option and click on it. Then, follow the steps displayed on your screen. This will roll back the driver to the previous version.

Note: When you see the “Roll Back Driver” option grayed out, it indicates that the Graphic Card drivers have not been updated.
Fix 6: Run SFC Scan Command
The advantage of running an SFC scan is that it scans the system files and fixes the files that are corrupted. Since the error occurs due to the corrupted drivers so running this command will surely help you.
When you see Driver Power State Failure on Windows 10 in Lenovo or other PC, you can do the following to fix the issue.
- Press “Windows” + “X” keys together on your keyboard.
- Click on the “Command Prompt (Admin)” option to run the command with administrator privileges.
- Type “sfc/scannow” in the “CMD” window.
- Hit the “Enter” key.
After entering the command, the process may time. You can wait. When the scanning process is finished, you can restart your computer. If the Windows stop code driver power state failure error still persists then you need to run a DISM scan. Let’s know more.
Fix 7: Run DISM Scan
Deployment Image Servicing and Management (DISM) can be an effective way to get rid of driver failure errors. This particular scanning process scans the Windows and fixes the issue if found.
Note: DISM command can be performed after running the SFC command to fix the Driver Power State Failure Surface 3 error.
- Launch the “Command Prompt” in the administrator mode by using “Windows” + “X” keys.
- Select the “Command Prompt (Admin)” option.
- Type the following command in the CMD window.
- DISM.exe /Online /Cleanup-image /scanhealth
- Press the “Enter” button.
- When the scan is complete, type another command.
- DISM.exe /Online /Cleanup-image /Restorehealth
- Press the “Enter” button.
When you are done entering both the commands, you can restart your computer.
Fix 8: Disable Antivirus
For fixing Driver Power State Failure on Windows 10 error, you need to remove or disable the Antivirus from your computer. Antivirus software often creates problems on your system especially Avast software.
If you are an Avast user, you can try disabling this software. Then, you can check if the issue is caused by this Antivirus software. If this does not work then remove the Avast software from your computer. You may also try installing another Antivirus software and check if you see the error.
Fix 9: Update BIOS
By updating BIOS, you may resolve the error in a snap. However, you need to be a little extra careful when updating the BIOS. First of all, you need to check the current BIOS version and see if the new update is available for BIOS.
Note: When you update BIOS, make sure your laptop is fully charged. In case you use a computer then you can connect to the power supply that is uninterrupted.
To update BIOS, you can perform the following steps on your computer:
- On your computer, click on the “Start” button.
- Type “System Information” in the search bar in order to open it.
- Search for the “BIOS Version” in the “System Summary” section.
- Now, you can visit your computer manufacturer’s website and search for the latest BIOS to download.
Note: If the BIOS version is similar to your installed BIOS then you can switch to the next fix. If the latest BIOS is different and compatible with your device then you can download it. Also, make sure that no Antivirus is running when you download BIOS on your computer.
- After this, run the BIOS file that you just downloaded.
Note: Before downloading BIOS, you will see an option to back up the (current) BIOS. First back up and then start BIOS installation.
After the installation, you can wait for a while. Then, you can check if the problem has been solved. In most cases, this solution works effectively. However, if it does not, you can then restore the system. Know about it in the next fix.
Fix 10: System Restore
System Restore is a process wherein you return the system back to its previous state. For that, you will have to have a System Restore Point on your computer. In case you don’t have it then you can skip this step. If you do have, then follow the steps mentioned below.
- On the Desktop, right click on “This PC” icon.
- Click on “Properties” from the menu.
- Select the “System Protection” option located on the left panel. This will open another window.
- Click on the “System Restore” option. Then, you can choose the restore point to which you wish to roll back.
- Thereafter, you can run the restore and wait until the process finishes.
Note: It will be helpful to know that “System Restore” wipes out the data available on your computer. So, you need to make sure that you backup the essential files on the external drive.
Fix Driver Power State Failure on Windows 8, 7, Vistas
Till now, you have been reading the best solutions to remove driver_power_state_failure on Windows 10. Henceforth, you will find the solutions for Windows 7, 8, or Vistas. If you own any of the Windows version then the upcoming techniques are for you.
Blue Screen Driver Power State Failure error can be encountered on other versions of Windows. If you encounter this Driver Power State Failure on Windows 7, 8, or Vistas, then below we have listed some effective solutions. Let’s try them one by one:
Fix 1: Update the Driver Software
- Click on the “Start” menu (Windows 7) or “Start” screen (Windows 8) and go to the “Windows update”.
- Now, open the “Update” application.
- Click on “Check for Updates”.
- Here click on the “Optional Updates” section and choose any hardware driver updates. You can select all of them too.
- Alternatively, you can directly go to the “Motherboard”, choose “System”, and open the manufacturer’s website. Then, you can find the driver updates and install them.
When the installation process is complete, you can restart your computer. This method will surely fix the problem. Yet you see the blue screen error, you can then try using the Driver Verifier.
Fix 2: Use Driving Verifier
Using the Driver verifier, you will be able to recognize the driver that is causing blue screen driver_power_state_failure on Windows 7, 8, Vistas.
Note: Before you implement this method, make sure you create the system restore point. If using the Driver verifier causes problems then you can take your computer to the previous state if things go wrong.
Follow these steps to run the Driver verifier on your computer:
- Click on the “Start” menu (Windows 7) or “Start” screen (Windows 8).
- Type “Verifier” and hit the “Enter” button.
- Click on the “Create Custom Settings” option (for the code developers) and go “Next”
- Choose “Individual Settings” from a full list and go “Next”.
- Here, you need to check the following boxes from the list.
- Pool Tracking
- Special Pool
- Deadlock Detection
- Force IRQL Checking
- Concurrency Stress Test (Windows 8)
- Security Checks (Windows 7)
- DDI compliance checking (Windows 8)
- Miscellaneous Checks
- Now, click on the “Select Driver Names from a List”.
- Then, go to the “Provider” option.
- Select each driver that is not from Microsoft.
- Hit the “Finish” button.
- When you are done implementing the above-mentioned steps, you can restart your computer.
Note: It is recommended that you run this Driver verifier for 24 to 34 hours at least.
Fix 3: Set the Power Options
Another solution to fix the BSOD error is to set the power options. Below are the following steps for this fix.
- Press the “Windows” + “R” keys on your keyboard to open “Control Panel”.
- Now, select “Power Options”.
- Click on “Choose What the Power Buttons Do”.
- Then, click on “Choose Settings that are Currently Unavailable”.
- Here, you need to scroll down and uncheck “Turn on Fast Start-up”.
- Then, you can click on the “Save Changes” option.
Fix 4: Enable Advanced Boot Menu
By enabling the Advanced Boot Menu, you can resolve the Driver_Power_State_Failure on Windows Vista, 7, or 8 error. Here is what you need to do:
- Reboot your operating system and enter into the “BIOS” setup.
- Configure the system to boot from DVD/CD Drive and save your settings.
- Now, reboot the system again.
- Then, insert the Windows 7 or 8 DVD.
- Here, you will be asked to put the key to boot from the DVD or CD driver. Then, use any key for DVD support.
- Click on “Next” and choose the “Repair Your Computer” option.
- Now, go to “Troubleshoot”.
- Select “Advanced Options” and choose “Command Prompt”.
- In the “Command Prompt” window, enter “C” and hit the “Enter” button.
- Enter the following command.
- bcdedit /set {default} bootmenupolicy legacy
- Hit the “Enter” button.
- Here, you will see the “This Operation Completed Successfully” message.
- Then, you can enter “EXIT” to close the CMD interface.
- When you are done implementing these steps, you can go to the “Choose an Options” window and restart your computer.
Summing up
That was all about solving the driver_power_state_failure Windows 10 error. In this blog, we have talked in detail how you can fix the problem of driver power state failure Windows 10. In addition to it, you also have the solutions for older Windows versions such as Windows 7, 8, or Vista.
Do you also want to know more in detail about how to update Graphics Drivers in Windows 7, 8, and 10? Read here.