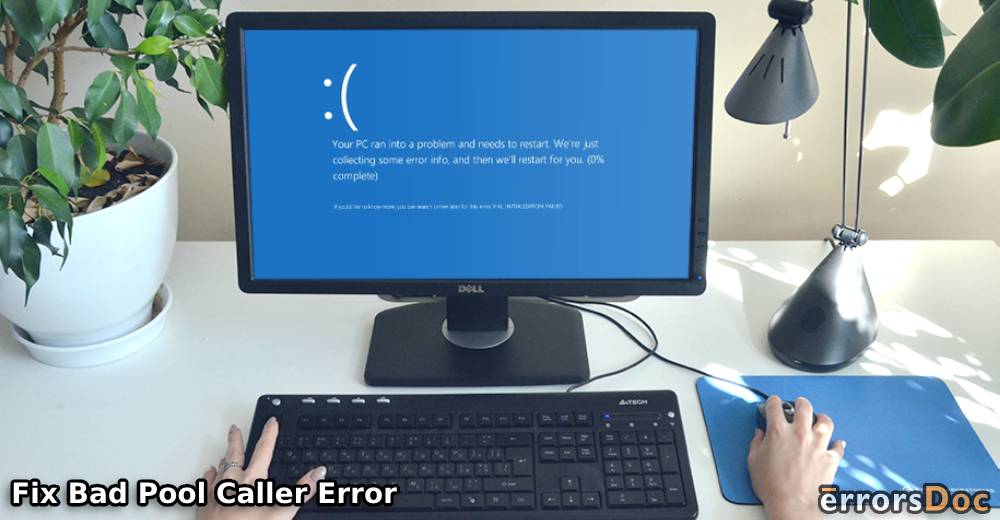
The error of Bad Pool Caller can affect the performance of a user’s system. It may be needless to inform that such an error can have an unexpected impact on that user’s computer as well. If you too are experiencing the Bad Pool Caller error on your Windows PC, then you should know what it means. We will be happy to define it for you. Additionally, we will also help you in troubleshooting this error. Our fixes will work great for the users of Windows 7, Windows 8.1, and Windows 10 who are facing this problem.
- What is the Error of Bad Pool Caller Windows 10, 7 or 8.1?
- Fixing Bad Pool Caller Error on Windows 7
- Fix 1: Check Dump File on Windows 7
- Fix 2: Use Memory Diagnostic Tool on Windows 7
- Fix 3: Remove Recent Software on Windows 7
- Fix 4: Restart Your Windows 7 Computer
- Fix 5: Perform an Antivirus Scan on Windows 7
- Fixing Bad Pool Caller Error on Windows 8.1
- Fixing Bad Pool Caller Error on Windows 10
- Fix 1: Use BSoD Troubleshooter on Windows 10
- Fix 2: Use DISM Tool on Windows 10
- Method 1: Use DISM Tool on Windows 10 via Standard Method
- Method 2: Use DISM Tool on Windows 10 via Windows Installation Media
- Fix 3: Turn off or Delete Firewall or Antivirus on Windows 10
- Fix 4: Try Resetting Windows 10
- Fix 5: Update the Windows of Your System
- Fix 6: Use SFC Scan on Windows 10
- Fix 7: Ensure Hard Drive is Not Corrupted on Windows 10
- Fix 8: Remove Faulty Applications from Windows 10 System
- Fix 9: Remove the Recently Made Changes on Windows 10
- Fix 10: Try Updating Drivers on Windows 10
- Fix 11: Ensure Your Modem has Not been Set as Network Adapter on Windows 10
- Fix 12: Try Running Memory Check on Windows 10
- Fix 13: Ensure Your Windows 10 System’s Hardware is Not Faulty
What is the Error of Bad Pool Caller Windows 10, 7 or 8.1?
The bad_pool_caller Windows 10 error is a problem that can cause the Windows of your system to crash. It will have an effect on the performance of your system. And for stopping damage to your computer, you will be required to restart it.
This error is also called the blue screen of death. Not only on Windows 10 but it can also be found on Windows 7 and Windows 8.1 computers.
Fixing Bad Pool Caller Error on Windows 7
5 fixes have been provided in this blog to fix the error of the blue screen Bad Pool Caller on Windows 7. These fixes are short and can be executed without much effort. These are inclusive of running the Memory Diagnostic Tool, restarting your system, checking the dump file, etc.
Fix 1: Check Dump File on Windows 7
There can be instances wherein your computer may crash. It then forms a dump file. This file gets created in the system root folder or “C:\Windows\minidump” location. You can see the contents of the file with the help of debugging tools. Then you can scan the files. Afterwards, you can remove the Bad Pool Caller Windows 7 error.
Fix 2: Use Memory Diagnostic Tool on Windows 7
The Bad Pool Caller Windows 7 error can be simply cleared by using the Memory Diagnostic Tool. Using this tool is very convenient. Via Start, you can find this tool and start over your machine afterwards.
1. Access the “Search Box” via “Start”.
2. Type in “Windows Memory Diagnostic”. You can also type in “mdsched”.
3. Tap “Windows Memory Diagnostic”.
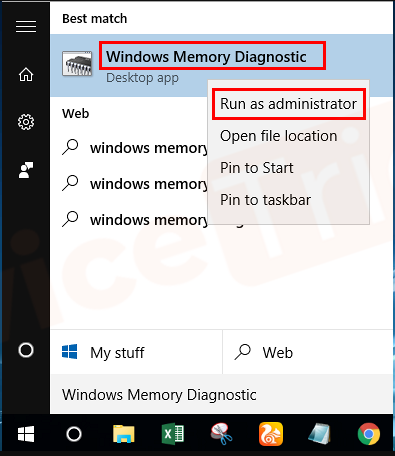
4. Now, restart your Windows 7 system for running the “Windows Memory Diagnostic” tool.
Please Note: You can restart your computer now or at a later point. This tool will automatically begin as your computer restarts. The results of the tool will be shown on your screen.
Fix 3: Remove Recent Software on Windows 7
“How can I remove the bad_pool_caller win7 error message?” Before we answer your question, allow us to ask if you have recently installed any software on your Windows 7 computer. In case you have, then that may be the source of this error. To remove the recent software, you can go to Programs and Features via Run. Here, you can uninstall the software.
1. Open “Run” via the “Start” menu.
2. Enter “appwiz.cpl” in the “Run” dialog box. Now, tap “Enter”.
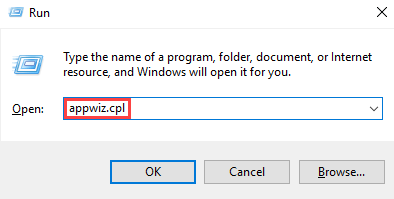
3. When the “Programs and Features” window opens, find the recently installed program.
4. Right-click on the program to delete it. Select “Uninstall”.
5. Now, check your Windows 7 computer. The error will not exist.
Fix 4: Restart Your Windows 7 Computer
An expert Bad Pool Caller Windows 7 fix includes restarting your computer. While this fix is simple and you already know its steps, we have mentioned them right here. You can take a look at these steps if required.
1. Save all the work you are doing on your Windows 7 computer.
2. Shut all the programs or applications running on your computer.
3. Now, go to “Start”.
4. Press the button for “Shut Down”.
5. From the menu, choose “Restart”.
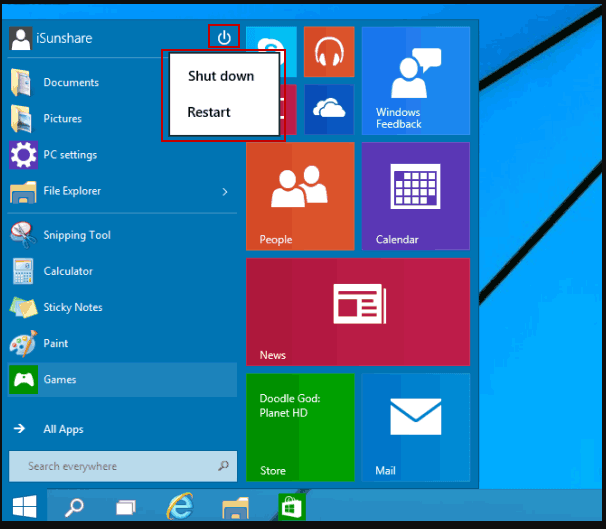
6. Now, sit back and wait till your computer shuts down and starts again.
7. Lastly, ensure that your computer is error-free.
Fix 5: Perform an Antivirus Scan on Windows 7
Windows 7 computers may get affected by a virus or malware. The chances of this can increase when the data or files of the system are affected. In cases like these, the Bad Pool Caller Windows 7 can emerge. The same may be true for your Windows 7 computer as well.
As a suggestion, you can perform an antivirus scan on your system. You will be able to detect the errors. After detecting the errors, you can fix them easily.
Fixing Bad Pool Caller Error on Windows 8.1
Look at the 2 fixes shown below to remove the problem of the blue screen Bad Pool Caller from your Windows 8.1 computer. They will guide you in updating the drivers of your computer as well as repairing any corrupted files. These fixes are well-researched and will surely work.
Fix 1: Update Drivers on Windows 8.1
The first solution for resolving the bad_pool_caller Windows 8.1 error includes updating the drivers. You can head to the Device Manager to find the option to update it. Your system will auto-search the available updates and download them.
1. Press together the “Windows” key and “X” key.
2. Open the “Device Manager”.
3. Right-click on the device in the window of “Device Manager”. Choose “Update Driver Software”.
4. Tap “Search Automatically for Updated Driver Software”.
5. Wait until the driver gets downloaded. Then use your computer without any error.
Fix 2: Repair Corrupt Files on Windows 8.1
The second fix for the bad_pool_caller Windows 8.1 error requires you to repair the corrupt files on your system. In order to repair such files, you can launch the Command Prompt using the administrative rights. Then you can enter a command for scanning the files and repairing them.
1. Tap the “Windows” and “X” keys.
2. Open “Command Prompt” as the administrator.
3. Type in “sfc/scannow” and hit “Enter”.

4. When the command finishes working, the error will get fixed.
Fixing Bad Pool Caller Error on Windows 10
In the following sub-sections, you can find multiple ways of fixing the error of Windows Bad Pool Caller. These ways will be best-suited for the users of Windows 10. These fixes will require you to administer certain tools like the DISM tool. Additionally, you’ll learn to reset your system, update it, check the hard drive, etc.
Now, let’s go through them all.
Fix 1: Use BSoD Troubleshooter on Windows 10
Do you know that the BSoD Troubleshooter gives you an efficient way of fixing the error of the blue screen Bad Pool Caller? In case you have never used it before, you might require help. You can go through the 5 steps shown as follows for using the BSoD Troubleshooter on Windows 10.
1. On your Windows 10 system, launch the “Settings” app.
2. Go to the section of “Update & Security”.
3. Choose “BSoD” on the right.
4. Press the button for “Run the Troubleshooter”.
5. Do as directed by the on-screen instructions. The troubleshooter will fix the Windows Bad Pool Caller error at the end of this method.
Fix 2: Use DISM Tool on Windows 10
Next on our list of bad_pool_caller fixes is running the DISM tool. This tool can be run via 2 methods – the standard method and the Windows installation media method. As you keep reading, more information about these methods will be revealed to you.
Method 1: Use DISM Tool on Windows 10 via Standard Method
In the first method, we will show you how to run the DISM tool in the standard way for removing the error of Windows 10 crash Bad Pool Caller. For launching the tool, please head to the Command Prompt and input the command for opening it. As it opens, you can start the scanning process.
1. Open “Start” on your computer.
2. Launch the “Command Prompt”. See to it that it is running as the administrator.
3. Type in the command given below. Then tap the “Enter” key.
“DISM /Online /Cleanup-Image /RestoreHealth”
4. Entering the following command will make the Windows scan your Windows 10 computer. Allow the scanning process to finish. Then restart your system.
5. Now, you can install the updates for your system.
Method 2: Use DISM Tool on Windows 10 via Windows Installation Media
If you have the Windows Installation Media with you, then you can prefer the second method for running the DISM tool. This method is shorter than the first one. It can clear the Win 10 Bad Pool Caller problem in 4 steps only. These steps will provide you with the needed commands for using the DISM tool.
1. First, the “Windows Installation Media” needs to be inserted.
2. Now, go to the “Start” menu and open the “Command Prompt” as the administrator.
3. Enter the commands given below one after the other. Remember to tap “Enter” after every command.
“dism /online /cleanup-image /scanhealth”
“dism /online /cleanup-image /restorehealth”
“DISM /Online /Cleanup-Image /RestoreHealth /source:WIM:X:SourcesInstall.wim:1 /LimitAccess”
Please Note: In the third command, the letter “X” needs to be replaced with the letter of the drive that has been mounted with the installation of Windows 10.
4. When the commands have successfully performed their function, you can restart your system.
Fix 3: Turn off or Delete Firewall or Antivirus on Windows 10
Some users shared that with the firewall or antivirus enabled on their system, they faced the Windows Bad Pool Caller Windows 10 error. And when it was turned off, the error did not bother them any longer.
You can also give this fix a try by opening the Settings and clicking on Update & Security. Navigating to Windows Security, you will find the option to turn off the firewall.
1. Click on “Start”.
2. Click on the “Settings” icon.
3. Tap on “Update & Security”.
4. Select “Windows Security”.
4. Choose “Virus & Threat Protection”.
5. Click on “Manage Settings”. This option may also be listed as “Virus & Threat Protection Settings”.
6. Turn off “Real-time Protection”. Now, the antivirus will get disabled. Check if the error is still present.
Fix 4: Try Resetting Windows 10
Resetting Windows 10 has worked for many for removing the issue of the blue screen Bad Pool Caller. To execute this, you can select Update & Security in Windows 10’s Settings. After selecting Recovery and Advanced Startup, you can press Restart Now. After this, you can head to reset your system.
Warning: This is an effective method for removing the Bad Pool Caller problem. However, your personal files will get removed in the process. Additionally, the applications, drivers, changes in the settings, applications installed by the manufacturer will get removed. Preparing a backup of the things that you will require will be recommended by us.
1. Go to the “Settings” via the “Start” menu.
2. Tap “Update & Security”.
3. Click on “Recovery” on the left.
4. Below “Advanced Startup”, click on “Restart Now”.
5. On the next page, wait for some time. Then select “Troubleshoot”.
6. Tap “Reset This PC”.
7. Choose “Remove Everything”.
8. Insert the recovery drive or Windows 10 installation media in case you are prompted to do so.
9. On the Windows 10 disk, in case your system has more than 1 drive partition, choose the option of removing all the files only from “All Drives” or “Windows Driver”.
10. Tap “Just Remove My Files”. Alternatively, you can tap “Fully Clean the Drive”.
Please Note: When you choose “Just Remove My Files”, a quick format will be performed. If you choose “Fully Clean the Drive”, your drive will be completely cleaned. Recovering your files may be a time-taking process in case of this option.
11. Click on “Reset”. Your PC will restart multiple times.
12. Choose your preferences. Then press “Next”.
13. Tap “Accept”.
14. On the left, click on “Customize Settings”. Or, on the right, click on “Use Express Settings”.
Now, this method will be over and your Windows 10 system will have been reset. The bad_pool_caller Windows 10 error will have been successfully wiped out of your computer.
Fix 5: Update the Windows of Your System
In case the software or hardware of your system is incompatible, you can see this error. Getting the latest updates for your system’s Windows can resolve the incompatibility problems as well as this error.
Now, let us learn how to remove the Windows 10 crash Bad Pool Caller problem by updating it. In the Update & Security option of the Settings, you can check for the available updates.
1. Tap the “Windows” key together with the “I” key to access the “Settings”.
2. In the “Settings” app, click on “Update & Security”.
3. Press the button for “Check for Updates”.
4. In case any updates are available, then they will be automatically installed.
5. After the installation, check whether the Bad Pool Caller Windows 10 error got resolved.
Fix 6: Use SFC Scan on Windows 10
Running the SFC scan is the next Windows stop code Bad Pool Caller fix. When you do this fix, the corrupt system files will be cleared. Eventually, you will stop seeing this error on your Windows 10 computer.
For this fix, you can consider the 5 steps given here.
1. Go to the “Start” menu.
2. Launch “Command Prompt”. Ensure that it is run as the administrator.
3. Type in “sfc/scannow” in the “Command Prompt”. Then press “Enter”.
4. Let the command perform its function. Afterwards, you can exit the “Command Prompt”.
5. Restarting your computer will complete this solution.
Fix 7: Ensure Hard Drive is Not Corrupted on Windows 10
Checking that the hard drive of your computer is not corrupted is the next Windows 10 Bad Pool Caller fix. To check it, you can first enter Advanced Startup by restarting your machine. In Troubleshoot, you can pick Advanced Options and then do the remaining instructions.
1. Begin with restarting your Windows computer. Keep the “Shift” key pressed while you do this. Now, “Advanced Startup” will be accessible.
2. Click on “Troubleshoot”.
3. Select “Advanced Options”.
4. Choose the option of “Command Prompt”.
5. Type in the following commands one by one. Keep pressing “Enter” after every command.
“bootrec.exe /rebuildbcd”
“bootrec.exe /fixmbr”
“bootrec.exe /fixboot”
“chkdsk /r c:”
“chkdsk /r d:”
Please Note: In the 4th and 5th commands, replace “c” and “d” with the letters that represent the hard drive partitions of your computer.
6. End this method by restarting your computer. The error will stop persisting now.
Fix 8: Remove Faulty Applications from Windows 10 System
Have you recently installed any third-party applications on your Windows 10 system? These applications may be the cause of this error.
So, if you are still figuring out how to fix Bad Pool Caller on your computer, the solution will be to remove such faulty applications. Once these apps have been deleted from your computer, your system will become as flawless as it was prior to this error.
Fix 9: Remove the Recently Made Changes on Windows 10
Many of you may have recently made some changes on your Windows 10 computer. You may have installed new hardware. Or you may have made changes to your system’s software. These changes may be responsible for this error.
To stop the code Bad Pool Caller issue, you can undo these changes. Then you can check whether or not the problem got fixed.
Fix 10: Try Updating Drivers on Windows 10
Our experts have found out that updating the drivers can also help in fixing the bad_pool_caller Windows 10 error. You can access the Device Manager on your system for updating the drivers. To know the complete method of doing this, the following 6 steps will be beneficial.
1. Open the “Search Box” via the “Start” menu.
2. Type in “devicemng”.
3. Click on the “Device Manager” from the results.
4. In the “Device Manager”, view the list of hardware.
5. For checking the driver updates, right-click on a component. Then select the “Update Driver Software” option.
6. In case the updates for the driver are available, they will get automatically installed. The Bad Pool Caller error will get fixed.
Fix 11: Ensure Your Modem has Not been Set as Network Adapter on Windows 10
The Bad Pool Caller Windows 10 error can also occur when your modem has been set as the network adapter. You can try changing the connection. Change it to “RAS” from “NDIS”. Now, you can use your computer just like before. This error will not show up on your system.
Fix 12: Try Running Memory Check on Windows 10
Another fix you can try to stop code Bad Pool Caller problem on Windows 10 involves running a memory check. This can be started using the Run dialog box. You can input “mdsched.exe” in this box. Soon, the memory check will begin.
1. Press the “Windows” key along with the “R” key.
2. Type in “mdsched.exe” in “Run”. Then tap on “Enter”.
3. Click on the option of “Restart Now and Check for Problems (recommended)”. This option will enable you to view the memory card’s status.
Please Note: In case you are working on something urgent at the moment, you can select the option of “Check for Problems the Next Time I Start My Computer”.
The checking process will begin when your computer restarts. It may require 10 minutes to complete. In case the check shows no error, then the problem may not really be with the memory card. You can try the next fix to eliminate the bad_pool_caller Windows 10 error.
Fix 13: Ensure Your Windows 10 System’s Hardware is Not Faulty
Do you suspect any problems with your system’s hardware? When there are problems occurring with the hardware, you are likely to face the Bad Pool Caller Windows 10 problem.
To be sure of this cause, you can check the hardware. Ensure that the motherboard or RAM has no errors. If you find any hardware issues, get them immediately fixed. Afterwards, when you use your computer, this error will not annoy you again.
Conclusion
This blog was helpful in troubleshooting the Bad Pool Caller issue on Windows 7, Windows 8.1, and Windows 10. For all the fixes, we hope that we guided you very well. Just in case you’re looking for more help, you can reach us via the comment section.