There can be endless reasons to capture a screenshot on your Windows system. You might want to show someone a screen with an error. Or you may want to preserve an image. So, getting a screenshot will be an excellent idea. You may be wondering how to screenshot on Windows and save it.
From capturing a screenshot to saving it on your Windows system, you can know everything in this space. Here, you can explore the best methods to capture a screenshot on your Windows 7, Windows 8, Windows 8.1 or Windows 10 system.
Take a quick look at what all we will be learning in this blog.
- How to Screenshot on PC on Windows 7?
- Method 1: Taking Screenshot via Print Screen Key on Windows 7
- Method 2: Taking Screenshot via Alt and Print Screen Keys on Windows 7
- How to Screenshot on Windows 8?
- Method 1: Taking Screenshot via Windows and Print Screen Keys on Windows 8
- Method 2: Taking Screenshot via Alt and Print Screen Keys on Windows 8
- Method 3: Taking Screenshot via Snipping Tool on Windows 8
- Method 4: Taking Screenshot via Print Screen Key on Windows 8
- How to Screenshot on Windows 8.1?
- Method 1: Taking Screenshot via Windows and Print Screen Keys on Windows 8.1
- Method 2: Taking Screenshot via Print Screen Keys on Windows 8.1
- Method 3: Taking Screenshot of a Page via Alt and Print Screen keys on Windows 8.1
- Method 4: Taking Screenshot via Snipping Tool on Windows 8.1
- How to Take a Screenshot on Windows 10?
- Method 1: Taking Screenshot via Windows and Print Screen Keys on Windows 10
- Method 2: Taking Screenshot via Snipping Tool on Windows 10
- Method 3: Taking Screenshot via Game Bar on Windows 10
- Method 4: Taking Screenshot via Snip & Sketch Tool on Windows 10
- Method 5: Taking Screenshot via Print Screen Key on Windows 10
- How to Take a Partial Screenshot on Windows 10?
- How to Screenshot on Windows Surface?
How to Screenshot on PC on Windows 7?
In the upcoming sections, 3 methods for how to screenshot on Windows laptop have been provided. These methods will teach you to use various combinations of keys as well as tools for taking a screenshot on your Windows 7 system.
Method 1: Taking Screenshot via Print Screen Key on Windows 7
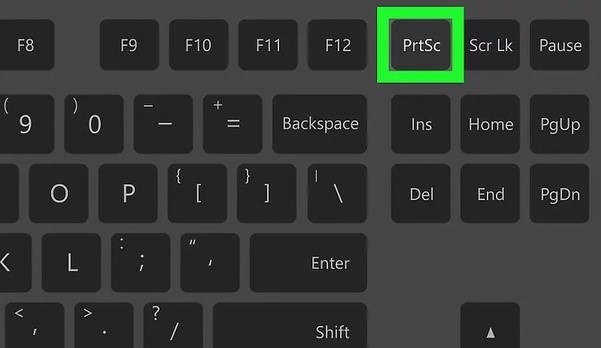
In the first method, we will learn how to do a screenshot on Windows 7 by pressing the Print Screen or “PrtScn” key. In just 4 steps, you can use this method and capture the screen.
1. Go to the page or screen on your Windows 7 PC which you want to capture.
2. Press the “PrtScn” key. Alternatively, you can press the “Ctrl” key together with the “PrtScn” key.
2. The screenshot will be saved on the clipboard. Go to the “Start Menu” and open “Paint”.
3. Paste the screenshot here in “Paint”.
4. Make any changes to the screenshot, if you wish to. Then save the file.
Method 2: Taking Screenshot via Alt and Print Screen Keys on Windows 7
Along with the “PrtScn” key, the “Alt” key on your system’s keyboard can also be used for capturing a screen. This method for how to take a screenshot on Windows 7 has been explained in 6 steps below. Let us read these steps.
1. On your Windows 7 system, open the screen that needs to be captured.
2. Now, tap the “Alt” key together with the “PrtScn” key.
3. Next, open “Paint” from the “Start Menu”.
4. Paste the screenshot that you just took.
5. Make changes to the screenshot, if any, using the Paint tools.
6. Lastly, save the screenshot and the process will be complete.
Method 3: Taking Screenshot via Snipping Tool on Windows 7
In the third method, we will show you how to use the Snipping Tool for taking a screenshot. This tool is present in your system and can be easily used. Now, head on to read the 7 steps given below for how to do a screenshot on Windows 7.
1. Press the “Windows” key on your keyboard.
2. Choose “All Programs” from the “Start Menu”.
3. Next, click on “Accessories”.
4. Click on “Snipping Tool”.
5. Open “Snipping Tool” and click on “New”.
6. Choose the area of the screen that needs to be captured.
7. Then click on “Save” for saving the screenshot.
How to Screenshot on Windows 8?
Let’s now head on to discover 4 methods of taking a screenshot on Windows 8 computers and laptops. Through these methods, you will learn to use different shortcut keys and tools for taking a screenshot on your Windows 8 system.
Method 1: Taking Screenshot via Windows and Print Screen Keys on Windows 8
Take a quick look at how to screenshot on PC Windows 8. This can be done by pressing the Windows and Print Screen keys together. The exact steps to capture and save the screenshot are mentioned below.
1. The first step involves switching to the screen that needs to be captured.
2. Now, tap the “Windows” key along with the “PrtScn” key on the keyboard.
3. Next, tap the “Windows” key together with the “E” key to access the Explorer.
4. Click on “Pictures” library.
5. Look for the “Screenshots” folder.
6. Access the folder to view the screenshot.
Method 2: Taking Screenshot via Alt and Print Screen Keys on Windows 8
The second simple way for how to screenshot on Windows desktop includes the use of Alt key and the Print Screen key. This method will work best for the users of Windows 8. Find the detailed steps below.
1. Go to the window that you want to save.
2. Tap the “Alt” and “PrtScn” keys in combination.
3. The screenshot will be taken and saved to the clipboard. Open image editor and paste the screenshot.
4. Lastly, save the screenshot like a file.
Method 3: Taking Screenshot via Snipping Tool on Windows 8
“How to make a screenshot on Windows 8 with the help of the Snipping Tool?” Let’s answer your query right away. Go through the 4 steps given here to learn the usage of this tool for making a screenshot on your Windows 8 system.
1. Look for the “Snipping Tool” in the “Start Menu”.
2. Open the “Snipping Tool” and click on “New”.
3. Using the cursor, choose the area of the screen that you want to capture. You can also select the complete screen if you wish to.
4. Now, save the screenshot to any location you would prefer.
Method 4: Taking Screenshot via Print Screen Key on Windows 8
One of the most common methods for how to take a screenshot on Windows PC is just through the Print Screen key. On your Windows 8 PC as well, this method will work like a charm. Here is how you can use the Print Screen key for this purpose.
1. When you are on the screen that you wish to save, press the “PrtScn” key.
2. Then the screenshot will be available on the clipboard. Open the “Paint” or “Word” application.
3. Paste the screenshot in the application and save it to the desired folder.
How to Screenshot on Windows 8.1?
Using the Windows and Print Screen keys, Snipping tool, as well as the Alt and Print Screen keys, are some of the great methods to take a quick screenshot on your Windows 8.1 system. Read more to find the details of these methods.
Method 1: Taking Screenshot via Windows and Print Screen Keys on Windows 8.1
Learn how to capture a screenshot on Windows 8.1 in just 4 steps. You will be using the Windows and Print Screen keys in this method. Now, let’s go through the steps shown as follows.
1. Simultaneously press the “Windows” and “PrtScn” keys on your keyboard.
Note: In case of a Windows 8.1 laptop, if the above combination of keys does not work, then try using the combination of “Windows”, “Fn”, and “PrtScn” keys.
2. Your device’s screen will become dim for a second. Once it is normal, open “This PC”.
3. Then click on “Pictures”.
4. Now, click on “Screenshots”. Here, you can view the screenshot that you just took.
Method 2: Taking Screenshot via Print Screen Keys on Windows 8.1
Now, we will tell you how to get a screenshot on Windows 8.1 using the Print Screen key only. All you have to do is press this key and then save the screenshot using the Paint application. Follow these steps to perform this method correctly.
1. Simply tap the “Print Screen” key on your keyboard.
2. The second step is to open “Paint”.
3. Press “Ctrl” and “V” keys to paste the screenshot on “Paint”.
4. The final step is to save the file.
Method 3: Taking Screenshot of a Page via Alt and Print Screen keys on Windows 8.1
You can easily take the screenshot of a page and then save it on your Windows 8.1 system. You can use the Alt and Print Screen keys for this purpose. Read the steps to know how to screenshot a page on Windows 8.1 using these keys.
1. Press the “Alt” and “PrtScn” keys simultaneously.
Note: In case the above combination of keys does not work, then you can press the “Fn”, “Alt”, and “PrtScn” keys simultaneously. This combination of keys should work.
2. Once the screenshot of the page gets copied to the clipboard, you can save it via an image editing application.
3. Save the screenshot in the desired location and then view it easily.
Method 4: Taking Screenshot via Snipping Tool on Windows 8.1
In the last method, you will learn how to take a screenshot on Windows desktop using the Snipping tool. Quickly read the 4 steps provided below to perform this method on Windows 8.1.
1. Launch the “Snipping Tool” from the “Start Menu”.
2. Click on the “New” option.
3. Select the area of the screen that has to be captured. You can choose the option of the whole screen, window or custom area screenshot type.
4. Then save the screenshot to complete the procedure.
How to Take a Screenshot on Windows 10?
6 simple methods can be utilized for taking a screenshot on systems with Windows 10. Methods like the Print Screen key method, Snipping tool method, Game Bar method, etc., are really easy to carry out. Keep reading to get the details of these methods.
Method 1: Taking Screenshot via Windows and Print Screen Keys on Windows 10
As compared to Windows 7, taking a screenshot on Windows 10 is quicker. Here, we will show you how to screenshot on PC on Windows 10 via the “Windows” and “PrtScn” keys. You can complete this method in only 3 quick steps.
1. On your Windows 10 computer, access the screen or page that you would like to save.
2. Press the “Windows” key along with the “Print Screen” key.
3. The screenshot will be saved in the “Pictures Library”. You can open the “Pictures Library” on your computer and view the screenshot anytime.
Method 2: Taking Screenshot via Snipping Tool on Windows 10
Let’s find out how to screenshot on Windows laptop or computer via the Snipping tool. For trying out this method on your Windows 10 system, you can refer to the steps provided below.
1. Go to the “Start Menu” on your Windows 10 system.
2. Find and open the “Snipping Tool”.
3. Click on the “Mode” drop-down menu.
4. Select the type of screenshot shape that you would like to capture.
5. The fifth step is to tap on “New”.
6. Use your mouse to capture the screenshot.
7. In the window of the “Snipping Tool”, the screenshot will be visible. You will have the option of including the tooltip. This will be available after the mouse movement. The time for waiting before capturing the screenshot can be mentioned here via the “Delay Menu’.
8. For annotating the screenshot, you can consider the drawing tools provided.
9. In case you wish to copy the screenshot on the clipboard, you can press the “Copy” button.
Method 3: Taking Screenshot via Game Bar on Windows 10
The Game Bar presents you with an interesting way of taking a screenshot of the screen. So, in this section, we will teach you how to do a screenshot on Windows 10 via the Game Bar in only 5 steps.
1. Click on “Start”.
2. Click on the “Xbox Console Companion” program.
3. Now, play the game. Tap the “Windows” key together with the “G” letter key for the Game Bar overlay.
4. Tap the icon of “Camera” for capturing a screenshot. As an alternative, you can press the “Windows” key, “Alt” key, and “PrtScn” key at the same time.
5. The screenshot will be captured and saved in the “Videos” folder. You can open the “Captures” subfolder in the “Videos” folder to view the screenshot.
Note: In case you are using “Steam” to play a game, press the “F11” key and the screenshot will be captured. Then you can open the folder of screenshots on “Steam” and view it.
Method 4: Taking Screenshot via Snip & Sketch Tool on Windows 10
The Snip & Sketch tool gives you the third way for how to screenshot on Windows computer. The steps for using this tool to take the screenshot have been shown here.
1. Open the “Snip & Sketch” tool on your Windows 10 PC.
2. Click on “New”.
3. A small-sized menu will appear on your screen. Pick the kind of screenshot as per your preference.
Pro Tip: You can also press the down-arrow button beside “New”. This too will help you in capturing the screenshot. Using this option, the screenshot can be delayed by 3 seconds or 10 seconds.
4. Take the screenshot. It will load in the “Snip & Sketch” tool. You can use the various options of this tool to annotate the screenshot. The annotated screenshot will also get copied to the clipboard.
Method 5: Taking Screenshot via Print Screen Key on Windows 10
Simply using the Print Screen key is one usual way of doing a screenshot on your Windows 10 laptop. Let’s take a look at the following 3 steps to find out how to take a screenshot on Windows laptop.
1. Land on the screen you want to save.
2. Press the “PrtScn” key.
3. The screenshot will get copied to the clipboard. Access any image editing tool on your system. Paste the screenshot there and then save it as a file.
Method 6: Taking Screenshot via Alt and Print Screen Keys on Windows 10
Method 6 will reveal to you how to screenshot on laptop Windows 10 using the Alt and Print Screen keys of your keyboard. The 3 steps of this method are as follows.
1. Press the “Alt” key and “PrtScn” key at the same time.
2. A screenshot of the active window will be taken and saved to the clipboard. Paste the screenshot on any image editing tool.
3. Then save the screenshot in the form of a file.
How to Take a Partial Screenshot on Windows 10?
In this blog, you will also find an interesting method for doing a partial screenshot on your system. The method that we have will work excellently for systems with Windows 10.
Method 1: Taking a Partial Screenshot via Windows, Shift, and S Keys on Windows 10
Do you know how to take a screenshot on a Windows computer or laptop partially? You can know it here. In 4 simple steps, we have explained the procedure to capture a partial screenshot on Windows 10.
1. On the keyboard of your Windows 10 system, press the “Windows”, “Shift”, and “S” keys together.
2. The active window screen will be grayed out. Using your cursor, click and then drag on the screen. Choose the area that needs to be captured.
3. The chosen area will get copied to the clipboard as a screenshot. Click on “Edit” and select any image editing tool.
4. Paste the partial screenshot here and save it as a file.
How to Screenshot on Windows Surface?
We have turned up with 1 good method to help you get a screenshot on your Windows Surface system. To know what this method is, we will suggest you to read the following section.
Method 1: Taking Screenshot via Windows Logo and Volume Down Button on Windows Surface
This method for how to take a screenshot on Windows Surface is the fastest one. You will be using the Windows Logo and Volume Down button for this. This method’s steps are as follows.
1. Press the “Windows Logo”.
2. Now, press the “Volume Down” button.
3. Your device’s screen will become dim for a moment. Then you can open the “Pictures” library in “This PC” and access the “Screenshots” folder. Here you can view the screenshot.
How to Screenshot on Windows XP?
In the last part of the blog, we will go through the method for capturing a screenshot on a Windows XP computer. Now, quickly move to the section given below.
Method 1: Taking Screenshot via Print Screen on Windows XP
Taking a screenshot on your Windows XP system is also an effortless task. Using a simple combination of keys, you can do this method in just 7 steps.
1. Open the screen you would like to capture.
2. Tap the “PrtScn” key. The screenshot will be captured and copied to the clipboard.
Note: Press the “Alt” key along with the “PrtScn” key for capturing only the chosen window.
3. Open “Paint” on your PC.
4. Click on “Edit” in the menu and tap on “Paste”.
5. Click on “File” and press “Save”.
6. Enter the file name and type.
7. Then again press “Save”.
All in All, We can Say…
With so many easy methods, you would have become a pro now at capturing a screenshot on your Windows system. Which method did you find the easiest? Tell us now by dropping a comment.
Is your system with Windows 10 not detecting second monitor? Or is the driver power state failure Windows 10 error preventing you from using your system? Read our blogs to see what you can do for fixing these errors.