We all love to keep our systems up with the updated version of Windows. Accessing the new features of the updated Windows feels great. However, the Windows installation error code 0x80070017 can occur unannounced on the computer. Is the error code message “Windows cannot install required files Windows 10 0x80070017” surfacing on your PC too? Try our 11 fixes to do away with this error quickly!
What is Windows Installation Error Code 0x80070017?
The 0x80070017 error code on your computer is a usual installation problem that occurs when you are installing Windows 10. When you are installing the latest software version on your system, you will encounter this error code. This error code may be accompanied by the message “Windows cannot install required files Windows 10 0x80070017”.
This installation error also means that the structure of the files you are copying from cloud or disk to the hard drive has changed or become corrupt.
What Causes the Install Windows Error Code 0x80070017?
Some of the most usual causes of the Windows installation error 0x80070017 are mentioned here.
1. When you are installing a new software version on your system, you will require certain files. If you are not having these files, this Windows 7 installation error will be caused.
2. You can face this error even when the files needed have become corrupt.
3. Sometimes, the security features of a software in your computer can also halt the process of installation. This is the third cause of the 0x80070017 on your Windows computer.
How to Fix Windows Installation Error Code 0x80070017?
We have 11 fixes for the installation error 0x80070017 to help you troubleshoot this error on your PC. Our 11 fixes will be the most helpful for the users of Windows 7, Windows Vista, Windows XP, Windows 8, Windows 8.1, and Windows 10 computers. For all these fixes, we have provided easy-to-follow instructions in the following sections. So, let’s read ahead!
Fix 1: Re-burn ISO File via Integrity Check
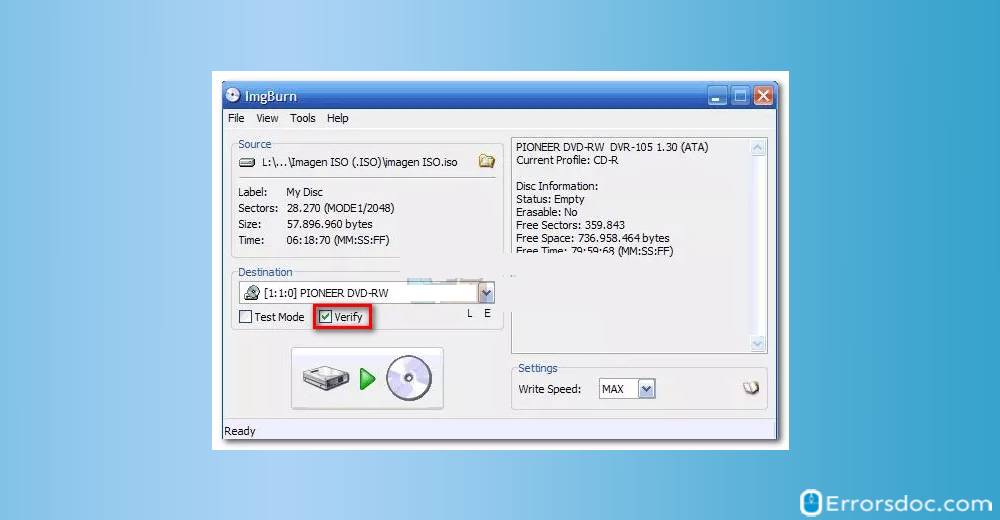
In case you have a bad Windows installer DVD, you can burn the ISO to remove the 0x80070017 on your computer. It will be advisable to burn the Windows installer DVD using a reliable burner like the ImgBurn. Also, you can go to the official website of Microsoft and enter the product key received with the Windows 7 ISO file provided that you own a Windows license.
Fix 2: Install Windows via Flash Stick
This fix will be helpful for you when the optical drive causes the installation error followed by the message “Windows cannot install required files Windows 7 error code 0x80070017”. At times, the optical drive may not be able to read the contents of the media disk for Windows installation. You can install the Windows via flash disk to troubleshoot this installation error. This can be done by two means, that is, via the Media Creation tool and Universal USB Installer tool. More details about these have been provided in the following sections.
1. Using Media Creation Tool to Install Windows from Flash Stick
Below, we have discussed how to install Windows via the flash stick with the help of the Windows Media Creation tool. This method will be helpful for the users of Windows 8.1 and Windows 10 who are encountering the error 0x80070017 Windows 10 or 0x80070017 Windows 8.
1. Visit the official website of Microsoft.
2. Next, you have to download the “Media Creation Tool”.
3. Launch this tool once the download is complete.
4. You will be asked to agree with the license terms of the tool. Click on “Accept”.
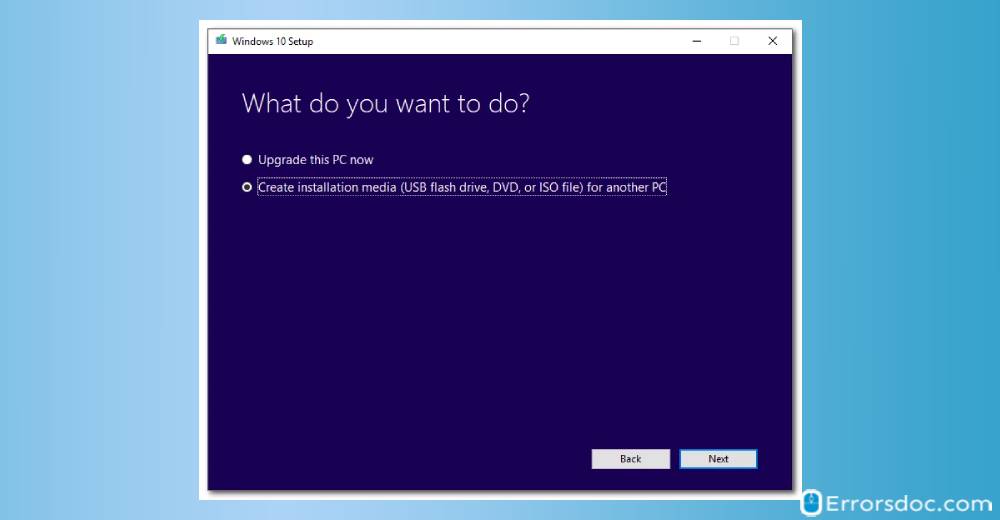
5. Choose the option “Create installation media for another PC”.
6. Click on “Next”.
7. Choose your “Language”.
8. Select the “Windows version”.
9. Choose the “Architecture”.
Note for Readers: When you are asked to select the “Language”, “Windows version”, and “Architecture”, you can tick “Use the recommended options for this PC” as an alternative. This will set the edition to Windows 10. For Windows 8, you will be required to manually set it.
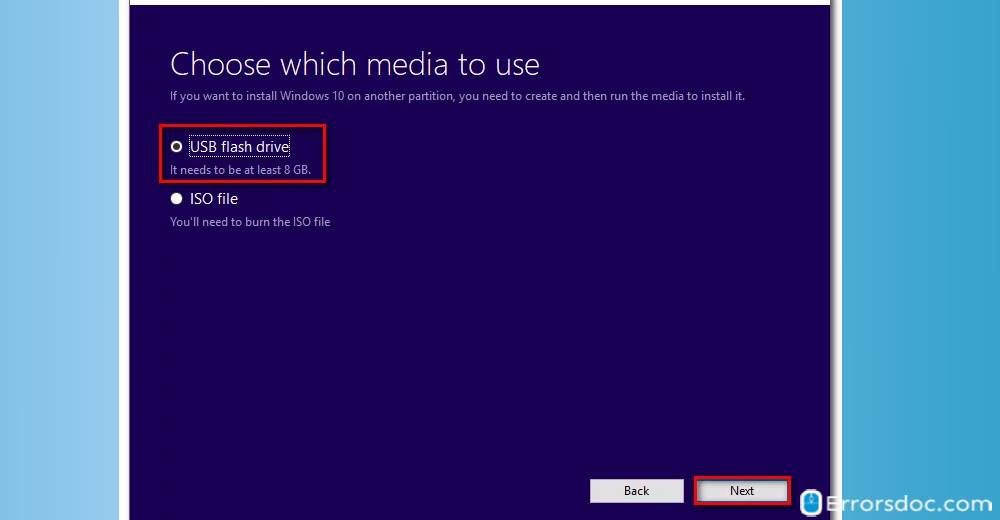
10. Choose the option “USB flash drive” and press “Next”.
11. The next step is to insert the flash USB disk in the Media Creation Tool and press “Next”. If it does not show up, refresh it.
Note for Readers: Any previous content of the USB flash drive will be removed. Keep a backup of any important content prior to using the Media Creation Tool.
12. Now, the USB flash drive will be formatted by the software. You will be required to download the Windows image. Also, ensure that it is bootable.
13. The USB flash drive will become bootable when the process is complete. Then install the Windows again after restarting the device.
2. Using Universal USB Installer to Install Windows from Flash Stick
For those of you who are facing the Windows Vista, Windows XP, or Windows 7 installation error code 0x80070017, here is a simple method that will work. We will use the Universal USB Installer tool in this method.
1. First, ensure that you have the official ISO file.
2. Next, download the “Universal USB Installer”.
3. Launch the “Universal USB Installer”.
4. Under “Step 1”, click on the dropdown menu.
5. Depending upon the Windows version, choose the installer.
6. Under “Step 2”, press “Browse”.
7. Select the “ISO file” and click on “Open”.
8. Under “Step 3”, click on the dropdown menu. Then choose your flash drive. Make certain that the flash drive chosen can easily accommodate the ISO image.
9. Then tick “We will Fat32 format”.
10. Finally, press the “Create” button.
11. Then install the Windows and boot from the USB drive.
Note for Readers: Using the Universal USB Installer to install the Windows from the flash drive is a third party solution. There is no official way provided by Microsoft to make Windows 7 or older versions bootable via the flash drive.
Fix 3: Use Windows Update Troubleshooter
The message “An unspecified error occurred during system restore 0x80070017 Windows 10” can occur on your system when there is some issue with the update files. You can use the Windows Update Troubleshooter to fix this error code message. You will require a good internet connection for this fix.
1. First, press the “Windows” key and type in “Troubleshoot”.
2. Click on the “Troubleshoot” tool.
3. Click on “Windows update”.
4. Tap the option of “Run the troubleshooter”.
5. The tool will take some time to identify the problem. When the problem has been identified, you will be asked to restart your computer.
6. After restarting your computer, go to the “Windows update menu”. Apply the update again.
Fix 4: Use Windows Update Catalog to Update Manually
The Windows Update Catalog tool will help you to install and apply the Windows update manually. Using this method will ensure that you do not see the error code message “Windows cannot install required files Windows 7 0x80070017” on your computer. This fix has been discussed in 9 steps below.
1. Open “Windows update” on your system.
2. Copy the “KB number” of the update that is not getting installed.
3. Now, go to the website of Windows Update Catalog.
4. In the “Search box”, paste the “KB number” you copied earlier.
5. Press the “Download” button for the version that is suitable for your system’s architecture. Ensure that the “Internet Explorer” is enabled to initiate the download.
6. Open the “.msu” file once the download is complete.
7. Go through the instructions on your screen to install it.
8. The next step is to restart your computer.
9. Again go to “Windows update”. Ensure that the update has now been applied.
Note for Readers: In the Windows Catalog Update, when you download the version depending on your system’s architecture, ensure that you do not select the x64 version in case the architecture of your computer is 32-bit. This will cause problems with the installation.
Fix 5: Use Online Troubleshooter by Microsoft
Another brilliant suggestion to fix the feature update to Windows 10 version 1903 error 0x80070017 is to run the Online Troubleshooter by Microsoft. This tool has helped many users to clear away this error code on their Windows systems. Let us see how to run this tool in 7 steps.
1. Go to “Microsoft.com” on your computer’s browser.
2. Choose the version of Windows running on your computer.
3. The next step is to run the “Windows Update Troubleshooter”.
4. The update will have to be installed manually. Afterwards, go to the “Update history site” of Windows 10. Locate the “KB number”. Then find the installer for the same by visiting the “Microsoft Update Catalog site”.
5. Now, launch the “DISM” tool.
6. Now, open the “SFC” tool to fix any problem with the corrupted files.
7. Lastly, reset/reinstall the Windows on your computer.
Fix 6: Empty SoftwareDistribution Folder
Clearing the files from the SoftwareDistribution folder can troubleshoot the Windows 10 update error code 0x80070017 in less time. Do you know how to delete the files from this folder? In case you don’t, you can check the 7-step procedure given here.
1. On your keyboard, hold the “Windows” and “R” keys together to open Run.
2. Type in “cmd” and press “Ok”. Run it as administrator.
3. To stop the “Windows update service” as well as the “Background intelligent transfer service”, type in “net stop wuauserv” and “net stop bits” one by one. Then press “Enter”.
4. Then open the folder “C:\Windows\SoftwareDistribution”.
5. Remove all the files from this folder.
6. You will be required to restart your computer after emptying the “SoftwareDistribution” folder.
7. Then open “cmd” and type in the commands “net start wuauserv” and “net start bits” one by one. Press the “Enter” key. Doing so will restart the Windows update services.
Note for Readers: While removing the contents of the “SoftwareDistribution folder”, if you see that some files are in use and are not getting deleted, then restart your computer. Then try deleting these files once again.
Fix 7: Disable Antivirus in Your System
At times, the Windows 10 installation error code 0x80070017 may result due to some problem or interference by the antivirus in your system. The antivirus can interfere with the process of installing updates on Windows 10 computers. So, to troubleshoot this Windows installation error, you can try disabling your system’s antivirus/firewall.
1. Press together the “Windows” key and “R” key.
2. Type “Control Panel” in the “Run dialog box” and press “Ok”.
3. Choose the option “Windows Defender Firewall”.
4. Click on the “Turn Windows Defender Firewall on or off” option on the left.
5. Then click on the “Turn off Windows Defender Firewall” option for private and public network settings.
6. Press “Ok” and restart your computer.
7. Install the updates once your computer restarts.
Fix 8: Reset Windows Update Components in Your System
The Windows update components not working correctly can also trigger the Windows 10 version 1903 error 0x80070017 on your computer. When you reset the Windows update components, the chances of seeing this error code are less likely. To reset the Windows update components, follow the 3 small steps given here.
1. Hold the “Windows” and “X” keys together.
2. Click on “Command prompt (admin)”. You can also open “Powershell (Admin)”.
3. Paste the commands given below in the “Command prompt” one by one and press “Enter”. Running the following commands will restart the Windows update services and fix the installation error code.
“net stop wuauserv”
“net stop cryptSvc”
“net stop bits”
“net stop msiserver”
“Ren C:WindowsSoftwareDistribution SoftwareDistribution.old”
“Ren C:WindowsSystem32catroot2 Catroot2.old”
“net start wuauserv”
“net start cryptSvc”
“net start bits”
“net start msiserver”
Fix 9: Update Drivers on Your System
Some of the users reveal that because the system drivers were outdated, they faced the error code 0x80070017 Windows 10 while installing the updates on their systems. For this reason, we will advise you to check that your system drivers are not out of date. In case they are, you should update the drivers right away to avoid seeing such an error on your PC.
Fix 10: Perform Chkdsk Scan on Your System
As you would know, file corruption is the usual cause of this Windows installation error. Running a chkdsk scan on your computer can help you do away with the Windows Vista error 0x80070017. Below you can find the steps to perform this solution in 4 easy steps.
1. The first step involves running the “Command prompt (administrator)” on your computer.
2. Type in “chkdsk/f X:” in the “Command prompt”. Write the letter associated with your system’s drive in the place of “X”.
3. For scheduling a “chkdsk scan”, press “Y”.
4. Then restart your Windows computer.
Fix 11: Do a Clean Boot on Your System
Do you know that performing a clean boot on your Windows computer can easily settle this Windows installation error? When your system shows you this installation error accompanied by the message “Windows cannot install required files error code 0x80070017”, all you have to do is opt for a clean boot. Let us look at the 10 steps here to do so.
1. Press the “Windows” key together with the “R” key.
2. When the Run dialog box opens, enter “msconfig.” and hit the “Enter” key/”Ok” button.
3. Click on the “Services” tab in the “System configuration Window”.
4. Tick the checkbox for “Hide all Microsoft services”.
5. Then press the “Disable all” button.
6. Next, visit the “Startup” tab.
7. Tap “Open task manager”.
8. Right-click on the application you wish to disable. Tap “Disable” in the menu.
9. Return to the “System configuration Window”. Then click on “Apply” and press “Ok”.
10. Lastly, restart your computer and try downloading the updates once again.
On the Whole
From updating your system drivers and performing a clean boot to re-burning the ISO file and using multiple tools, we taught you plenty of ways to deal with the Windows installation error code 0x80070017. Now that this blog has come to an end, we are sure this error on your system will have been resolved. So, install the latest Windows updates and make the best use of them!
Also, read How to Update Graphics Drivers in Windows. See how our solutions can help you!