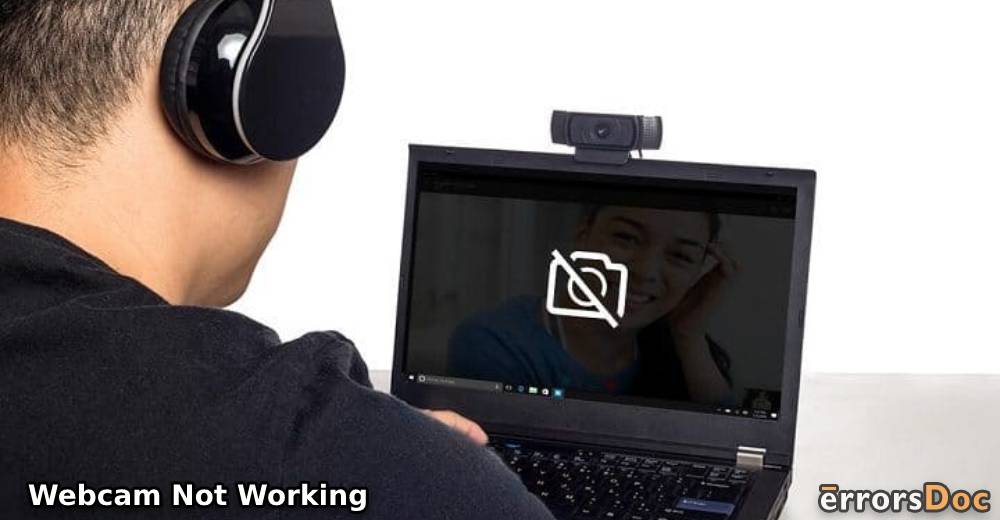
In this blog, we have attempted to help you fix the webcam not working problem. You will find multiple sections in this blog. In each section, you will learn the fixes for this issue on Windows 7, Windows 10, Mac, Lenovo, Dell, HP, Zoom, and Logitech. These fixes come with instructions as well.
Here, we will guide you about the following.
- Why is My Webcam Not Working?
- Troubleshooting Webcam Not Working on Windows 7
- Troubleshooting Webcam Not Working on Windows 10
- Fix 1: Ensure Your Webcam is Getting Detected on Windows 10
- Fix 2: Enable Camera Accessibility to Apps via Privacy Settings on Windows 10
- Fix 3: Install Camera Driver Updates on Windows 10
- Troubleshooting Mac Webcam Not Working
- Fix 1: Check the Settings for Screen Time and App Limit on Mac
- Fix 2: Enable Access to Camera on MacBook
- Fix 3: Force-quit Applications on MacBook Pro
- Troubleshooting Lenovo Webcam Not Working
- Fix 1: Turn off Privacy Mode on Lenovo
- Fix 2: Enable Lenovo Camera and Update it
- Fix 3: Set Lenovo EasyCamera as Default Camera
- Troubleshooting Dell Webcam Not Working
- Troubleshooting HP Webcam Not Working
- Fix 1: Provide Access to Apps for Camera on HP
- Fix 2: Update Camera Driver on HP
- Fix 3: Install Camera Driver Again on HP
- Troubleshooting Webcam Not Working on Zoom
- Troubleshooting Logitech Webcam Not Working
Why is My Webcam Not Working?
An integrated webcam not working issue can arise when access to apps for using it has been denied. It may also not work in case of camera drivers not being updated, incorrect screen time, app limits, and faulty camera drivers.
Troubleshooting Webcam Not Working on Windows 7
Your webcam may not work on Windows 7 at times. Here, you can check the right fix for clearing the problem.
Fix 1: Update Driver for Webcam on Windows 7
Is your webcam driver updated? If not, then you should do it now. Once it gets updated, your webcam will start working on Windows 7. Opt for entering the Device Manager and find your camera. Then you can download and install the updates on your computer.
See the steps to update it down below.
1. Click on “Start”.
2. Search for “Device Manager” and open it.
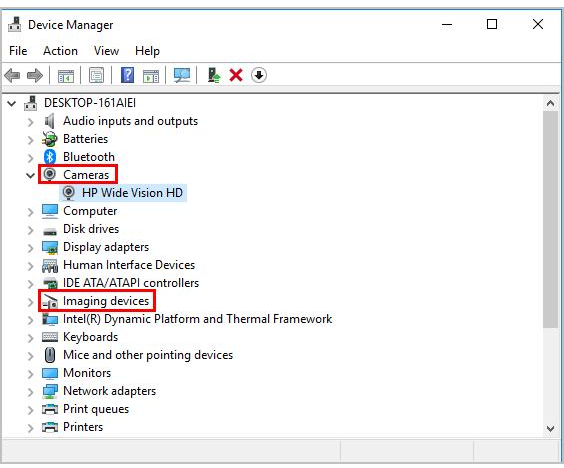
3. In the “Device Manager”, locate your webcam.
4. An exclamation mark in yellow may be seen. It means that the driver needs to be updated. Head to your manufacturer’s site.
5. From the site, download the required drivers as per the version of Windows.
6. Then restart the system.
7. As it restarts, the driver will be detected and installed.
Troubleshooting Webcam Not Working on Windows 10
By administering 5 fixes, you can fix your webcam on Windows 10. Let’s read more about these fixes below.
Must Read: Update Drivers Automatically in Windows 10 ?
Fix 1: Ensure Your Webcam is Getting Detected on Windows 10
“My webcam is not working. I have restarted my system as well. It still does not work”. You may have restarted your computer a number of times. You may not have, however, checked that your webcam is getting detected.
To check the same, you can open the Device Manager on your Windows 10 computer. You can then scan and get your webcam detected. For the complete steps, read here.
1. Tap on “Start”.
2. Type in “Device Manager” followed by opening it.
3. In the “Device Manager”, “Imaging Devices, Cameras or Sound, Video, and Game Controllers” need to be expanded.
4. See to it that your camera is being detected now.
5. You can access “Actions” in case the camera is unavailable. You will find this option in the menu on the top. Also, remember that this step is optional.
6. Now, select “Scan for Hardware Changes”.
7. Check whether your webcam is working.
8. If your webcam works as usual, then you do not need to perform the steps any further. In case the webcam doesn’t work even now, then the peripheral needs to be detached.
9. Start your computer again.
10. After it has restarted, repeat steps 1 to 7. This time, you can choose to use another USB port.
Fix 2: Enable Camera Accessibility to Apps via Privacy Settings on Windows 10
If your webcam is not working on Windows 10, it may be the case of lack of camera accessibility to apps which require it. For providing the access to these apps on your computer, you can rush to the settings.
From there, you can access the Privacy settings. Using these settings, you can make the necessary changes and access to the apps will be granted.
1. Run to the “Settings”.
2. Select the option of “Privacy”.
3. “Camera” needs to be selected now.
4. Hover your mouse to the section of “Allow Access to the Camera on this Device”.
5. Click on “Change”.
6. Press the toggle to turn on “Camera Access for this Device”.
7. Press the toggle to enable “Allow Apps to Access Your Camera”.
8. Go to the section named “Choose which Microsoft Store Apps can Access Your Camera”.
9. Here, you will find several apps. You can press the toggle for each app to which you wish to allow camera accessibility.
10. Check that your webcam is functioning now.
Note: The above method will be the best for allowing camera accessibility to apps which you have downloaded via the Microsoft Store.
Fix 3: Install Camera Driver Updates on Windows 10
The best solution for the problem of webcam not working on PC with Windows 10 is to install the camera driver updates. You can open the Device Manager for this. There you can look for the camera option and update the drivers for it. With the newest updates, such a problem should stop arising on your computer.
1. Press the “Windows” key to access the “Search Box”.
2. Write “Device Manager”. Then open it.
3. “Imaging Devices, Cameras, or Sound, Video, and Game Controllers” have to be expanded.
4. Right-click on your webcam to choose “Update Driver”.
5. Tap “Search Automatically for Updated Driver Software”.
The available updates will get installed on your computer.
Note: If no updates are found for the camera driver, then you can open your manufacturer’s website. From there, you can get the latest updates and install them. The instructions will be shown on your screen.
Fix 4: Roll Back Drivers for Camera on Windows 10
Issues relating to the compatibility of the camera driver may be preventing it from working. It could also be that the driver has bugs. Rolling back the driver can fix the issues.
For rolling back the camera driver, the Device Manager needs to be accessed. In it, you can expand the camera option to find the properties of the webcam. From the properties, you can roll it back. A simple set of directions has been laid here. You can take a quick glance at it.
1. From “Start”, access the “Device Manager”.
2. In the manager’s window, expand the option of “Imaging Devices, Cameras, or Sound, Video, and Game Controllers”.
3. On your webcam, you have to right-click.
4. From the pop-up, choose “Properties”.
5. Hover the mouse to the “Driver” tab.
6. Press the button labelled “Roll Back Driver”.
7. You will be asked to choose the reason for rolling back.
8. Then click on “Yes”.
9. Click on “Yes” once again.
10. Restart your Windows 10 PC.
Fix 5: Install Camera Driver Again on Windows 10
Sometimes the camera driver may generate certain errors. These errors may prevent the webcam from working. So, here is what to do when webcam is not working. You can open the Device Manager and uninstall the webcam driver. You can also delete the software for it. Then you can download the camera driver again along with the required software.
You can also follow this step-by-step approach.
1. In the “Start Menu”, you can look for “Device Manager”. Open it.
2. Click on “Imaging Devices, Cameras, or Sound, Video, and Game Controllers” to expand.
3. Right-tap on your webcam.
4. Click on “Uninstall Driver”.
5. Select “Delete the Driver Software for this Device”. Selecting this option will force your PC to download it again. In case the same does not happen, you can visit your manufacturer’s website to download it.
6. Choose the option of “Actions”.
7. Now, tap “Scan for Hardware Changes”.
8. Open an app to ensure that the camera is working.
Troubleshooting Mac Webcam Not Working
If your webcam is not working on your Mac, MacBook, or MacBook Pro, then you can resolve the problem in 3 ways. These have been elaborated below.
Fix 1: Check the Settings for Screen Time and App Limit on Mac
The problem of Mac webcam not working can be resolved by correcting the settings for Screen Time as well as App Limit on Mac. For checking the settings for these, the user first needs to open the Apple Menu. In it, System Preferences will be provided. Going further, you will find Screen Time and App Limit.
To know the complete procedure, please read here.
1. Open the “Apple Menu”.
2. Head on to the “System Preferences”.
3. Tap on the “Screen Time” option.
4. You will find “Content & Privacy” available on the sidebar. Click on it.
5. In the fifth step, click on “Apps”.
6. You will see a checkbox next to “Camera”. Select it.
7. Go to “App Limits”. This will also be found on the sidebar.
8. For utilizing the camera with a certain app provided in the list, the checkbox next to “Limit” need not be chosen.
Fix 2: Enable Access to Camera on MacBook
“Why is my MacBook webcam not working?” Not providing access to the webcam is one big reason that it may not be working. To enable access to it for several apps, you can launch the System Preferences from the Apple Menu. As you move to Security and Privacy, you will find an option to enable access to the webcam for several apps.
1. Rush to the “Apple Menu”.
2. Look for “System Preferences”. Click on it.
3. Head to “Security & Privacy”.
4. Click on “Privacy”.
5. On the sidebar, you will find “Camera”. Select it.
6. For the apps for which you wish to use the camera, place a tick next to them.
Note: For carrying out the sixth step, you may be required to get the padlock unlocked. This can be found at the bottom in the left. You may also be required to enter the administrator’s password for initiating the changes.
Fix 3: Force-quit Applications on MacBook Pro
MacBook Pro webcam not working is a problem that can be resolved by force-quitting applications. On your device, there are multiple applications that require using the camera. Due to any bug, if these apps fail to use the camera, you can open the Terminal on your MacBook Pro. You can write a command in it for force-quitting these applications. The needful will be done.
1. Click-open “Applications” on your MacBook Pro.
2. Tap on “Utilities”.
3. Search for “Terminal” in “Finder” and open it. Then launch it.
4. In “Terminal”, enter the command mentioned as follows.
“sudo killall VDCAssistant”
5. Press the “Enter” key now.
Note: Once the command has been entered, it will force-quit every application that uses the camera. Then the application will be reset on your MacBook Pro.
6. In the pop-up, provide your password.
7. Now, open an app that requires the camera on your MacBook Pro.
Troubleshooting Lenovo Webcam Not Working
For a webcam failing to work on Lenovo devices, you can try the following troubleshooting measures.
Fix 1: Turn off Privacy Mode on Lenovo
Lenovo webcam not working error can show up when the privacy mode has been enabled. You can turn off this mode and the problem should stop appearing. The camera settings on your Lenovo system gives you the option of doing so. The complete steps of this fix are presented as follows.
1. In the “Search Box” of Windows, type “Camera”.
2. Click on the “Camera Settings”.
3. Press the toggle button for “Turn Privacy Mode on/off”. You have to turn it off.
4. Test the webcam.
Fix 2: Enable Lenovo Camera and Update it
Lenovo laptop’s webcam not working problem can be easily fixed by enabling it. Having it disabled will not allow the programs or apps to use it. Therefore, you can run the Device Manager where you will find Imaging Devices. The option to enable the camera lies here. You can enable it and then install the updates for the camera driver.
As you read ahead, you will find the detailed set of directions for performing this fix on your Lenovo laptop.
1. Go to “Start”.
2. Click on the “Device Manager”.
3. Choose the option of “Imaging Devices”.
4. Now, select “Lenovo EasyCamera”.
Note: In case there is a problem with the Lenovo EasyCamera, you will see the yellow triangle of warning next to the icon. In case you find a little down arrow next to the icon, the Lenovo EasyCamera may not have been enabled.
5. In case the camera is enabled, right-click on “Lenovo EasyCamera”.
6. Click on “Update Driver”.
7. Click on “Automatic”.
8. When a driver is found, install it.
9. The final step is to check that the webcam of Lenovo is working.
Fix 3: Set Lenovo EasyCamera as Default Camera
The issue of the laptop’s webcam not working can easily emerge when it has not been set as the default camera option. So, when you are running a program or app which requires the use of a webcam, you will find difficulty. The settings of the program or app will provide you with an option to choose Lenovo EasyCamera as the default one. Once set, you will find no issues.
1. Open a program that is not letting you successfully use the webcam.
2. Go to the “Settings” menu of this program.
3. In the settings, you need to set “Lenovo EasyCamera” as the default camera option.
4. Now, try to use the webcam on this program.
Once you have set it as the default camera option, you should be able to run it without any difficulty coming in your way.
Troubleshooting Dell Webcam Not Working
To settle the issue of Dell integrated webcam not working, you can find a test fix below.
Fix 1: Remove and Reinstall Webcam Software on Dell Laptop
Dell laptop webcam not working can present itself as a major issue when all your work depends on it. While the problem may not really be with the webcam, it could be its software. Uninstalling and reinstalling the webcam software should give relief.
For doing so, you can run a command via the Device Manager on your Dell laptop. The command will remove the software. Then you can reinstall it.
1. On your keyboard, the following combination of keys has to be pressed.
“Windows” key + “R” key
2. In “Run”, provide the command shown as follows.
“devmgmt.msc”
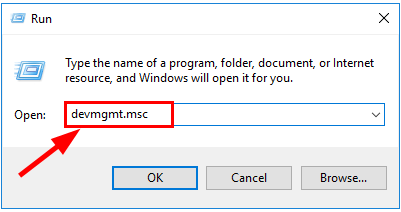
3. The “Device Manager” will open. In it, “Imaging Devices” has to be searched for and opened.
4. Expand “Imaging Devices”.
5. Locate “Integrated Webcam”. Then right-click on it.
6. Press “Uninstall”.
7. Press “Ok”.
8. After it has been uninstalled, restart your laptop.
9. Now, install the software for the webcam once again.
Troubleshooting HP Webcam Not Working
HP webcam may not be working in case of no access or no updated drivers. Below, you can learn to resolve it.
Fix 1: Provide Access to Apps for Camera on HP
Your HP laptop with Windows 10 provides you with Privacy settings. These settings have an option to provide or not to provide access to apps for using the webcam. From the Start Menu, you can open these settings and press the toggle button to give access to the camera.
A step-by-step set of directions has been given here for your convenience.
1. Tap the “Windows” key.
2. Write “Camera” in “Search”.
3. Open “Camera and Privacy Settings”.
4. You will find “Allow Apps to Access Your Camera”. Press the toggle to turn on this option.
5. Scroll ahead to find “Choose Which Apps can Access Your Camera”. Press the toggle to turn it on.
6. Now, you can exit the window.
7. Check the webcam of your HP laptop.
Now, the HP laptop webcam not working issue will not be seen.
Fix 2: Update Camera Driver on HP
The webcam of your HP laptop not working can occur when the camera driver hasn’t been lately updated. Therefore, we will suggest you to update it as soon as possible. Just like this solution has helped other HP users, it can help you as well.
Fix 3: Install Camera Driver Again on HP
In the third fix for an issue like the HP laptop webcam not working, we will be installing the camera driver again. Any flaws in the driver will get removed.
The camera driver on HP laptop can be removed by entering a command via Run. It will open your camera device. Then you can select the device and choose to uninstall it. After a while, you can install it again. Your camera will function without disappointing you.
1. First, open “Run” on your HP laptop.
2. Type the following in “Run”.
“devmgmt.msc”
3. Entering the above is followed by pressing “Enter”.
4. Click twice on “Imaging Devices” or “Cameras”. This will display the camera device.
5. Right-click on the camera device and press “Uninstall Device”.
6. Then tap “Yes”.
7. Restart your HP system now.
8. Open “Run” again.
9. Fill in this command.
“devmgmt.msc”
10. Then press “Enter”.
11. Select “Action”.
12. Click on “Scan for Hardware Changes”.
13. Ensure that your webcam is properly working.
Troubleshooting Webcam Not Working on Zoom
Find out how to troubleshoot Zoom webcam not working in this part of the blog. We will be enabling the camera for this. More details can be explored below.
Fix 1: Enable Camera for Zoom on Windows
Here, we have mentioned certain tips to fix the problem when your webcam does not work on Zoom. These include enabling the camera for the app while using it and other such tips. Let’s go through them one by one.
1. On your Windows system, there may be several apps which use the camera. While using Zoom, if any other app is using the camera, then it might not work on the said application. Therefore, you can turn off the camera on the other app and then use it on Zoom.
2. Try starting your computer again. And then test the camera.
3. Ensure that you have the latest version of Zoom running on your system.
4. Lastly, make certain that your device’s camera driver is up to date.
Troubleshooting Logitech Webcam Not Working
You can fix your Logitech webcam by enabling access to it and removing any interference with the connection. Detailed fixes have been provided here.
Fix 1: Turn on Access to Logitech Webcam Hardware on Windows
If you are using a Logitech webcam on your Windows computer, and it doesn’t seem to work, then you should check whether the access has been disabled. To check the same, you can enter the Privacy settings of the camera on your computer. Then you can enable access within a second.
1. Access the “Settings” of your Windows system.
2. Click on “Privacy”.
3. Click on “Camera”.
4. In the “Camera” settings, on the right, turn on “Let Apps Use My Camera Hardware”.
Fix 2: Remove Wireless Mouse and Reconnect Logitech Webcam
Certain users prefer using a wireless mouse. So, while this mouse is being used along with Logitech webcam, an interference may get generated. To make the webcam work, you can prefer removing the mouse. And then reconnect the webcam.
Conclusion
Hopefully, these fixes worked for you. While your webcam has been fixed with this blog, see how to check PC specs on Windows 10. Learn how to clear printer queue on Windows 10 as well.