Do you want to change the DNS server on your device? You will need to know the right settings and steps. We will be delighted to help you out. Learn to change DNS on Windows 10, Windows 7, Mac, Android devices, iPhone, PS4 console, router device, and Linux. Every piece of information needed to change the DNS on the devices will be provided here.
The following methods will be elaborated upon in this post.
- How Can I Change DNS Settings on My Device?
- Methods to Change DNS Settings on Windows 7
- Methods to Change DNS Server Windows 10 Settings
- Method 1: How to Change DNS Windows 10 Settings via Control Panel?
- Method 2: How to Change DNS Windows 10 Settings via Settings?
- Method 3: How to Change DNS Server Windows 10 Settings via Command Prompt?
- Methods to Change DNS Mac Settings
- Methods to Change DNS Android Settings
- Method 1: How to Change DNS on Android via Settings?
- Method 2: How to Change DNS Settings on Android 8?
- Method 1: How to Change DNS Server on Android 9 (Pie)?
- Methods to Change DNS iPhone Settings
- Methods to Change DNS on PS4
- Methods to Change Router DNS
- Methods to Change DNS Linux Settings
How Can I Change DNS Settings on My Device?
Whether you own a Windows computer, Mac, Android phone, iPhone, or any other such device, changing the DNS settings on it can be done via several methods. Scrolling below, you can browse through all the methods in this blog.
Methods to Change DNS Settings on Windows 7
Are you trying to change the DNS settings on your Windows 7 system? The following method should be considered by you. Here, you will learn to use the Notifications Panel on your system for changing the settings of the DNS.
Method 1: How to Change DNS Windows 7 Settings via Notifications Panel?
Take a look at how to change Windows DNS settings by using the notifications panel. The Notification Panel can be found on your computer’s taskbar(To hide the taskbar follow the guide). In it, you can see Network Connection. Through this you can choose to open the center for network and sharing. Then you can open the Change Adapter Settings and DNS Settings.
The further steps for changing them have been written here. Go through them right now.
1. On the taskbar of Windows 7, you will find the notifications panel. Here, you have to press the symbol of “Network Connection”.
2. Click on the “Open Network and Sharing Center” option.
3. A menu will be available. Choose the “Change Adapter Settings” option from the menu.
4. The connection for the “DNS Settings” you want to change has to be selected.
5. Right-click on it to pick “Properties”.

6. Click twice on “Internet protocol version 4 (TCP/IPv4)”.
7. You will see a menu from which you can change the DNS server.
8. “Use the Following DNS Server Addresses” has to be activated.
9. Type the following in case of the public DNS servers.
“Preferred DNS server: 8.8.8.8”
“Alternative DNS server: 8.8.4.4”
Methods to Change DNS Server Windows 10 Settings
Learn how to change your DNS server on Windows 10 by executing 3 methods. These methods will make use of the Control Panel, the settings of your computer, and by running the Command Prompt. These have been greatly explained below.
Method 1: How to Change DNS Windows 10 Settings via Control Panel?
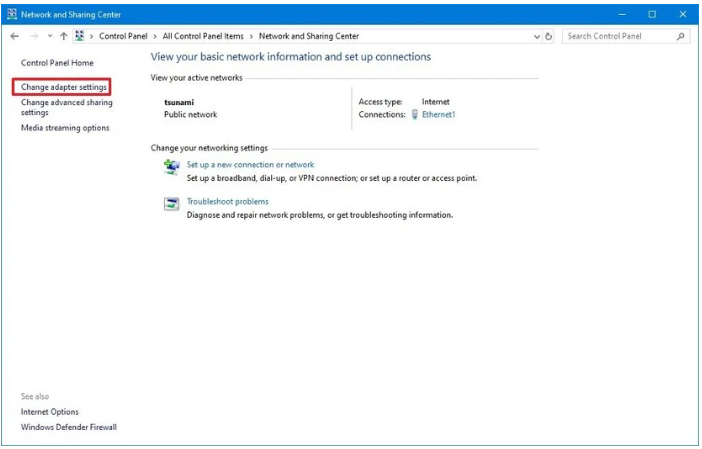
Learn how can the users of Windows change DNS server using the Control Panel. You will find Network and Internet in the Control Panel. From there you can access the Network and Sharing center. Going ahead, you can click on Change Adapter Settings. You can open the properties of the interface. Then you can open the properties of IPV4 and make the changes to the DNS settings.
For this, the set of instructions can be found as follows.
1. To start, go to the “Control Panel”.
2. Select “Network and Internet”.
3. Choose “Network and Sharing Center”.
4. Tap on “Change Adapter Settings” on the left.
5. You will find an interface for the network which connects the internet to Windows 10. Right-click on it to pick “Properties”.
6. Choose the option of “Internet Protocol Version 4 (TCP/IPv4)”.

7. Now, press the button for “Properties”.
8. Choose “Use the Following DNS Server Addresses”.
Note: In case the option for specifying the DNS settings has been manually chosen, your device will keep receiving the “TCP/IP” address via “DHCP” server.
9. Enter the “Preferred” DNS address.
10. Type in the “Alternate” DNS address.
Note: For using “Google Public DNS”, “Cloudflare” or “Cisco OpenDNS”, you can use the settings shown below.
“Google Public DNS: 8.8.8.8 and 8.8.4.4”
“Cloudflare: 1.1.1.1 and 1.0.0.1”
“OpenDNS: 208.67.222.222 and 208.67.220.220”
11. Press the “Advanced” button.
12. Access the “DNS” tab.
13. Click on “Add”.
14. Next, the “Alternate DNS Server Address” needs to be specified.
15. Click on “Add” again.
Note: Along with adding further addresses in the tab, you can edit the resolvers and remove them. In case the priority has to be changed, an option for this will be available on the side.
16. Now, press “Ok”.
17. Then press “Close”.
Method 2: How to Change DNS Windows 10 Settings via Settings?
Here, you can check how to change DNS settings on Windows 10 from the settings. In your system’s settings, you can click on Network & Internet where you will find ethernet or wifi. You can choose either of them . Then in the IP settings, you can select Edit. A dropdown menu will be seen here. Using this menu, you can complete the further procedure.
1. On your system, go to the “Settings”.
2. Select the “Network & Internet” option.
3. Choose either “Wi-Fi” or “Ethernet” as per your connection.
4. Now, pick the connection used for connecting Windows 10 to your network.
5. In the section of “IP Settings”, click on “Edit”.
6. From the dropdown menu of “Edit IP Settings”, choose “Manual”.
7. Press the toggle button for “IPv4”.
8. Type in your “Preferred” DNS address.
9. Then type in your “Alternate” DNS address.

Note: You may wish to use “Cisco Open DNS”, “Google Public DNS” or “Cloudflare”. For this, the settings shown here will be needed.
“OpenDNS: 208.67.222.222 and 208.67.220.220”
“Google Public DNS: 8.8.8.8 and 8.8.4.4”
“Cloudflare: 1.1.1.1 and 1.0.0.1”
10. Then press “Save”.
Method 3: How to Change DNS Server Windows 10 Settings via Command Prompt?
To know how to change DNS on PC with Windows 10, you can go through another method. In this, we will use the Command Prompt and enter certain commands in it. These commands have been mentioned and explained as follows.
1. Click on “Start”.
2. Look for “Command Prompt” using the “Search Box”.
3. Right-click on “Command Prompt”. You need to choose “Run as Administrator”.
4. Write the command shown below. It will run the tool needed for changing the settings. Then hit “Enter”.
“netsh”
5. Then write this command for identifying the network adapters’ names. Hit “Enter” afterwards.
“interface show interface”
6. For setting the “Primary DNS IP Address”, you will have to write the command given here. Then hit the “Enter” key.
” interface ip set dns name=”ADAPTER-NAME” source=”static” address=”X.X.X.X” “
Note: When you are writing this command, the “ADAPTER-NAME” needs to be changed to the network adapter’s name that was identified in the fifth step. Also, “X.X.X.X” needs to be changed to the DNS server’s IP address which you will be using. Among “Cloudflare”, “Cisco OpenDNS”, and “Google Public DNS,”, whichever one you are opting for, the settings will be as shown below.
“Cloudflare: 1.1.1.1 and 1.0.0.1”
“OpenDNS: 208.67.222.222 and 208.67.220.220”
“Google Public DNS: 8.8.8.8 and 8.8.4.4”
7. For adding the alternative DNS IP address, this command will be needed. Then you can hit “Enter”.
“interface ip add dns name=”ADAPTER-NAME” addr=”X.X.X.X” index=2″
Note: While writing the command shown above, the “ADAPTER-NAME” needs to be replaced with your network adapter’s name. This name was identified in the fifth step. Additionally, replace “X.X.X.X” with the secondary address you will be using.
8. If you would like to add DNS addresses even further, then the steps listed above can be repeated. However, the “Index” option in the command needs to be increased by “1”.
Methods to Change DNS Mac Settings
The users of Mac do not have to worry about following a complicated procedure to change the DNS server settings. If you too are a Mac user, then you can discover how to change DNS server in a simple way provided in the next section.
Method 1: How to Change DNS on Mac?
Change DNS server on Mac in only 12 steps. You will have to open the System Preferences on your system. You can select Network. and pick the network connection service as per your preference. In Advanced, you will find DNS. You can click on Add and make the changes you wish to.
1. You need to visit the “Apple Menu” on your Mac.
2. Click on “System Preferences”.
3. Now, choose “Network”.
4. Choose the service of network connection that is to be used from the left.
5. Press the “Advanced” button.
6. Tap on “DNS”.
7. Press the button for “Add”.
8. For DNS server, type the “IPv4″/”IPv6” address. The details of this have been shown here.
For Primary DNS Server:
“Google: 8.8.8.8”
“Dyn: 216.146.35.35”
“OpenDNS Home: 208.67.222.222”
“Verisign: 64.6.64.6”
“Level3: 209.244.0.3”
For Secondary DNS Server:
“Google: 8.8.4.4”
“Dyn: 216.146.36.36”
“OpenDNS Home: 208.67.220.220”
“Verisign: 64.6.65.6”
“Level3: 209.244.0.4”
9. Below the list for “Search Domain”, press the “Add” button.
10. Type the search domain.
11. Click on “Ok”.
12. After the valid name has been searched for, the process will be over.
Methods to Change DNS Android Settings
How do you change your DNS server on Android? We can help you with 3 methods for doing this. These methods can also be used by the users of Android 8 and Android 9.
Method 1: How to Change DNS on Android via Settings?
“How to change my DNS server on my Android device?” To do so, you can simply access the settings of your Android phone or any other such device. There you can access the wifi settings and make certain changes. The detailed steps have been presented here.
1. Go to the “Settings” on your Android device.
2. Now, visit the “Wi-Fi Settings”.
Time-saving Tip: You can also swipe your screen downwards and tap the “Wi-Fi” icon for a few seconds. Its settings will open.
3. Access the network options.
Note: This function can vary as per the Android device being used. In some models, pressing the name of the “Wi-Fi” for long may be required. Then you can select “Modify Network”. Or an arrow may be provided on the side.
4. Tap the “IP Settings” in the details of the network. In place of this, you may also see “Advanced”. You can tap on this for the “IP Settings”.
5. Set it to “Static”.
6. Now, make changes to “DNS1” and “DNS2”.
Method 2: How to Change DNS Settings on Android 8?
“I need help to change my DNS settings on Android 8”. You can get help for changing them in this section. You can unlock your device to find the gear-shaped icon. From here, open Wifi and long-press the wireless network. In Modify Network, you can choose Advanced Options and carry out the further steps.
1. Press the “Gear” icon in the notification shade.
2. Tap on “Wi-Fi”.
3. The wireless network’s name which you want to modify needs to be long-pressed.
4. Choose “Modify Network”.
5. Go to the “Advanced Options”.
6. Now, you have to press “DHCP”.
7. A pop-up will appear. You have to choose “Static”.
8. Now, press “DNS 1”.
9. Enter the “DNS Address”.
10. The last step is to press “Save”.
Method 1: How to Change DNS Server on Android 9 (Pie)?
“Can I change my DNS server on Android 9 (Pie)?” Yes, it is possible to change it. You can press the gear-shaped icon on your Android 9 phone. You can access the Gear icon and open Network & Internet. In Advanced, Private DNS can be seen. That is all you need for making the changes.
Further steps have been given below.
1. Swipe down to access the notification shade on your Android device.
2. Press the “Gear” icon.
3. Select “Network & Internet”.
4. Tap on “Advanced”.
5. Select “Private DNS”.
6. Choose “Private DNS Provider Hostname”. In the required field, you can enter either a “CleanBrowing URL” or “CloudFlare URL”.
7. Now, press “Save”.
Methods to Change DNS iPhone Settings
Learn how to change DNS server on iPhone with our method. In this method, we will show you how to access your device’s settings for making the changes. Scroll down for more information.
Method 1: How to Change DNS on iPhone?
Users of iPhones can change DNS server can open the Settings and click on “i” shaped icon. From here, the Wifi Network can be opened and in its DNS section, the changes can be made.
1. Visit the “Settings” on your iOS device.
2. Press the “i” icon. You will find this beside the “Wi-Fi Network” for which the DNS server is being changed.
3. In the “DNS” section, choose “Configure DNS”.
4. Choose “Manual”.
5. “Google IP” addresses need to be added.
“IPv4: 8.8.8.8” and/or “8.8.4.4”
“IPv6: 2001:4860:4860::8888” and/or “2001:4860:4860::8844”
In case you wish to, you can remove every default “DNS Server” from the list.
Note: When you select “Automatic”, the specified “DNS Server” will be restored.
Methods to Change DNS on PS4
You can change DNS on PS4 by opening its settings. You can find a manual approach to changing the DNS server, along with the complete details, in the method given as follows.
Method 1: How to Change DNS on PS4 via Manual Procedure?
Check out the manual procedure to change DNS PS4 server. This has been made possible via the Settings. Here, you will find Network. Click on it to see Set up Internet Connection. Then choose either Wifi or LAN. Press Custom. Input the IP Address and DHCP settings. Soon, the DNS Settings will be seen. You can change them now.
1. Launch the “Settings” menu of your PS4.
2. Click on “Network”.
3. Choose the option of “Set up Internet Connection”.
Note: Even when an internet connection has been set up on your console, you will be required to select this option.
4. As per your choice, you can select “LAN” or “Wi-Fi”.
5. Click on “Custom”.
6. Set the “IP Address” as well as “DHCP” settings. In case of no choice, you can pick the default option for both of them.
7. In “DNS Settings”, select “Manual”.
8. The value of “Primary DNS” needs to be entered.
9. Now, write the values for “Secondary DNS”.
Let the setup process be over. Afterwards, your PS4 will use the chosen DNS in place of the automatic one.
Methods to Change Router DNS
Find out how to change your router DNS server with an excellent method. In this, you can open your browser, enter your router’s IP address, and then access the DNS server settings. More information about this method can be acquired as you read ahead.
Method 1: How to Change DNS on Router?
Let us explore how to change DNS server on router in 8 steps. First, you have to enter your IP Adress in the browser. Then write your password. The DNS Server Settings will be made available. You can add the changes and then save them.
1. Launch your browser.
2. Type your router’s “IP Address”. This will help in knowing the administration console of your router.
3. Type your password for editing the network settings.
4. Open the “DNS Server Settings”. Note the specified “IP Addresses” for “Primary DNS Server” and “Secondary DNS Server”. These will be required later.
5. The IP addresses need to be replaced with the following.
“IPv4: 8.8.8.8” and/or “8.8.4.4”
“IPv6: 2001:4860:4860::8888” and/or “2001:4860:4860::8844”
“IPv6-only: Use Google Public DNS64” in place of the one being used above.
6. Save the addresses. Then you can exit.
7. Start the browser again.
8. In the next step, you have to test the setup for correct functioning.
Note: In the case of certain routers, you will find separate fields for every part of the “IPv6 Address”. You can use the following for such routers.
“2001:4860:4860:0:0:0:0:8888”
“2001:4860:4860:0:0:0:0:8844”
In case of the hex digits, “0” can be expanded to “0000”.
Note: To configure the settings of the DNS server, the user interface of different routers can vary. If the following steps do not apply to your router, then you can check its manual for the exact steps.
Methods to Change DNS Linux Settings
Get the assistance you need to change DNS Linux settings easily. You can find the most suitable method for this in the upcoming part.
Method 1: How can Users of Linux Change DNS Server Settings via Terminal?
You will need to open the Terminal to change DNS Linux server. Then you will have to type some commands in the Terminal. Entering them successfully will help you in changing the DNS server. To find the detailed steps, you can read below.
1. Tap the “Ctrl” key along with the “T” key. This will run the “Terminal”.
2. Provide the command shown below.
“sudo nano /etc/resolv.conf”
3. Provide the sudo password. Then hit the “Enter” key.
4. Enter the following in the “Text Editor” for Google DNS Server Addresses.
“nameserver 8.8.4.4”
“nameserver 8.8.8.8”
5. You can exit after the file has been saved. For this, press the “Ctrl” and “X” keys. Then press the “Y” key.
6. Write the following in the “Terminal”.
“sudo chattr +i /etc/resolv.conf”
7. Now, use the command shown below.
“sudo /etc/init.d/networking restart”
8. You can ping the name of the domain to check the functioning of the new settings. To ping “Google.com”, you can use the following.
“ping -c3 Google.com”
9. In case a host message that is unknown is received, the IP addresses which have been set as the DNS servers will have to be cross-verified.
Note: In case the DNS needs to be reset at any time, you can perform the above steps. “nameserver 8.8.4.4″ and “nameserver 8.8.8.8” will have to be removed.
Conclusion
Changing the DNS server has been much simpler in this post. On devices of various kinds, these methods will smoothly work. You only need to ensure that the settings entered are correct. The DNS server will get changed.
You might like to read our other posts as well. In our recommendation, you should check out our posts on how to fix DNS server not responding and different ways to fix dns_probe_finished_nxdomain error.