
Windstream Communications furnishes both residential and business customers with Internet, landline telephone and DISH Network benefits in a few states around the United States. Windstream Communications’ broadband Internet bundles incorporate an individual email account that clients can set up to make access to and send email in an easy manner.
Clients who need to make Windstream email account can utilize different platforms to do as such. For them, there is Outlook, Android and Apple phone devices and different platforms are there, where they can setup their Windstream.net account. For each platform, there is an alternate set of settings. You should simply to take after the settings painstakingly and appreciate smooth correspondence with the Windstream.net email account.
How to Setup Windstream Email Account for Outlook?
Here below are the setting defined to setup account in different versions of Outlook.
OUTLOOK 2010
Looking for Windstream Email setting for Outlook? Follow these steps to set up your Windstream.net email in Outlook 2010:
- Open Microsoft Outlook and click the orange “file” menu tab on the top of the page.
- Click on “Account Settings” from the drop menu.
- On the “Email Accounts” screen, click on the button named ‘New’.
- Look at the bottom and check out for the box stating, ‘Manually configure server settings or additional server types’. Click ‘Next’.
- Open the “Choose Service” screen and select “Internet Email” and click “Next.”
- Enter in the comparing settings in the “Internet Email Settings” screen. See the picture below.
- Click on the “More Settings” button to one side and afterward select the “Outgoing Server” tab. Put a check in “My outgoing server (SMTP) requires verification” and ensure “Utilize same settings as my incoming mail server” is chosen.
- Click on the “advanced” tab at the top.
- Click the ‘OK’ button and then ‘Finish’ button.
Your Windstream email account is currently setup in Outlook 2010 and you ought to have the capacity to send and get emails.
OUTLOOK 2007
Follow the following steps to setup the Windstream Email account in Outlook 2007.
- Open Outlook 2007 and switch to tools menu. Select “Account Settings.”
- In the account settings, select the Email tab. Click “New.”
- Put a check mark adjacent to “Manually configure server settings or additional server types.” Click “Next.”
- Select Internet Email. Click “Next.”
- For this progression, fill in the spaces like:
- Your Name: Fill in your first and last name
- Email Address: Your Windstream email address
- Incoming (POP3): pop.windstream.net
- Outgoing (SMTP): smtp.windstream.net
- User Name: Your Windstream email address
- Password: Your Windstream Email password
- Click “More Settings.” Click on the Outgoing Server tab and place a checkmark on “My active server (SMTP) requires validation.” Click “OK.”
- You ought to be back on the screen with your setup data. Click “Next” and click “Finish.”
How to setup Windstream email account on Mobile phones?
Want to know the Windstream Email settings on Android & iPad? Check the steps below.
APPLE DEVICES
Follow the steps to setup Windstream email account on the Ipad devices.
- On the Home screen, tap on “Settings“.
- Then tap “Mail, Contacts, and Calendars.”
- Go to account section and tap on ‘Add account’.
- Tap “Other.”
- Tap “Add Mail Account.”
- Enter in your name, email address, password, and account description; at that point tap “Next.”
- Tap on “IMAP.”
- Enter “imap.windstream.net” for the Incoming Mail Server host name; at that point enter your full email address and password in the assigned fields.
- Enter “smtp.windstream.net” for the Outgoing Mail Server host name, at that point enter your full email address and password in the assigned fields and tap “Next.”
- You will see a message that says “Verifying IMAP account data.” If you get the message, “Do you want to try up setting up the account without SSL?” tap “Yes.”
- Your mail setup is complete. To get to your email, go to your Home screen and tap on ‘Mail’ button.
ANDROID MOBILE DEVICE
Follow the below-mentioned steps to setup Windstream Email account on Android devices.
- Go to the home screen, tap on the applications and then tap “Email.”
- Select “Add Account.”
- In the “Email Address” and “Password” fields, enter your Windstream.net email address and password and tap “Next.”
- Select “IMAP” as your email account compose.
- Enter the “Incoming server settings” at that point tap “Next” and enter the “Outgoing server settings.”
- See beneath for reference:
- Server Settings
- Username: Your windstream.net email address
- Password: Your windstream.net email password
- Incoming Server: (IMAP) mail.windstream.net (Port 143/465 with SSL)
- Outgoing Server: (SMTP) mail.windstream.net (Port 25/587 without SSL/465 with SSL)
- Place a checkmark in the coveted account choices and tap “Next.”
- Enter a name for your account and after that your name and tap “Done.”
- Your account is currently active and you can send and get email.
What are the Windstream Email POP and IMAP Server Settings?
Here are the Windstream Email POP & IMAP server settings. These settings can help you setup your email account on any of the prevalent email customers. Please find the settings below.
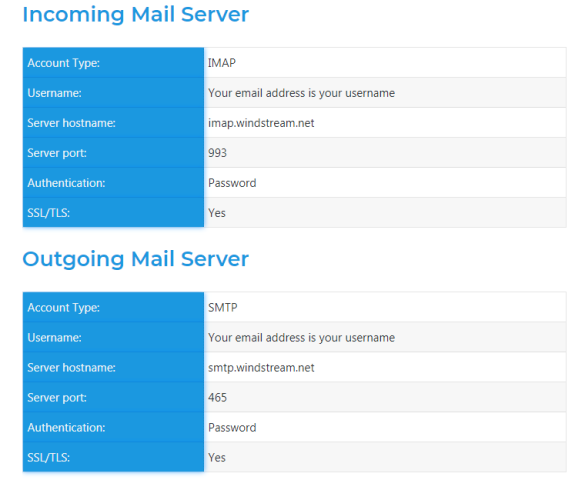
WINDSTREAM INCOMING MAIL SERVER
- Account Type: IMAP
- Username: type your email address as your username
- Server hostname: imap.windstream.net
- Server port: 993
- Authentication: Password
- SSL/TLS: Yes
WINDSTREAM OUTGOING MAIL SERVER
- Username: Insert your email address as your username
- Server hostname: smtp.windstream.net
- Server port: 465
- Authentication: Password
- SSL/TLS: Yes
The above settings are used to create a Windstrean.net email account. Follow the steps carefully and you can enjoy great communication via your Windstream Email account.