Do you want to import accountant’s copy in QuickBooks? If yes, you landed on the right platform. Here, we will enlighten you on how to import an accountant’s copy of QuickBooks in easy ways.
The blog demonstrates how to create, transfer, and set the limitation for the accountant’s copy. Then, you will learn how to import an accountant’s copy of QuickBooks using the following ways:
Learn about Important an Accountant’s Copy
If you have been using QuickBooks for a long time, it is very likely to happen when you need to share the data with your accountant or any other third party. Also, there are times when the other user needs to make some changes to the QuickBooks file. However, this is not practical to give them a copy of a file and wait till they return it after making changes. Therefore, QuickBooks provides this feature called the Accountant’s Copy.
QuickBooks Accountant’s Copy feature will allow to keep your QuickBooks file and input the transactions for the current period and at the same time, your accountant is free to make changes to the file. In other words, you can easily merge the two files (your file and accountant’s copy) by importing the accountant’s changes into your QuickBooks company file.
Therefore, in this article, you will know how to import an accountant’s copy of QuickBooks following a few ways. Before you proceed with it, know the importance of the accountant’s copy.
What You Need to Know About Accountant’s Copy?
Before moving forward, you need to keep a few things into consideration. This will help you to understand how to import accountant’s copy into QuickBooks 2015 or 2017.
- Before you create the accountant’s copy, you need to decide what will be the dividing date.
- You will be only able to enter transactions in the current period (which can be any date after the dividing date when the accountant’s copy is created).
- Your accountant can enter transactions before or on the dividing date.
- There can be restrictions for you when the accountant’s copy is active.
- Do not remove restrictions without importing the changes that your accountant has made to the file.
Once you take care of the aforementioned ideas, you can proceed with the procedure of QuickBooks import accountant’s copy.
How to Create an Accountant’s Copy?
To create an accountant’s copy, you are required to follow the steps mentioned below.
To create an accountant’s copy, one has to select the dividing date and enter the required information. Let’s know how to create an accountant’s copy in the following steps:
- Firstly, you can click the File option, click on the Accountant’s Copy then click on Client Activities and Save File.
- After this, you can confirm that you want to create an Accountant’s Copy and click on the Next button.
- At this point, you need to pick a dividing date and click Next.
- Then there is an optional step where you can change the file location and filename that QuickBooks suggests for an accountant’s copy. The file extension should be .qbx.
- After saving the details, provide the accountant’s copy transfer file to your accountant and continue working.
After following these steps, your accountant’s copy will be created. Thereafter, you can transfer the accountant’s copy. Continue reading to know more.
How to Transfer Accountant’s Copy?
When you are done creating an accountant’s copy, you need to decide how you want to provide this file to your accountant. It can be delivered through email, on a storage device or Intuit web service can also be used.
Below are the following instructions that you can follow to send the file to the accountant in QuickBooks.
- First of all, navigate to the File menu then choose the Accountant’s Copy and hit the Client’s Activities.
- Next to this, you can click on the Send to Accountant option.
- After that, your screen prompts you for confirmation. You can confirm and then hit the Next button.
- At this point, you can choose a dividing date and click on the Next button.
- Thereafter, you are required to enter the email address of your accountant and go Next.
- Now you need to set a password in order to encode the transfer.
- After that, you can provide the password for the accountant so that the user can access the file.
- As the last step, transfer this file to your accountant by hitting the Send button.
When you successfully transfer the file to your accountant, QuickBooks shows the status “Accountant’s Changes Pending” in the title bar.
What are the Limitations for the Current Accountant’s Copy?
After creating the accountant’s copy, you might encounter a few restrictions. These restrictions do not allow you to work well. In addition, there can be other conflicts with your accountant’s work. In this scenario, what you can do is mentioned below.
Transactions
- The user can act on transactions but after the dividing date only.
Accounts
- The user can create a different account but unfortunately, there will be no option to enter a different sub-account to the former account.
- For the existing or previous accounts, one should have the right to merge, edit, or remove them.
- For the fresh accounts, the user can also update or remove the account if the accountant has a copy.
Lists (apart from Chart of Accounts)
- You can edit, sort, or idle the list items.
- The users have no access to merge or delete the list details.
Reconciling
- Reconciling the account is possible when your accountant has the accountant’s copy.
- After the diving date, all reconciliations having transactions in the current period are saved permanently. This cannot be changed or deleted.
- To avoid any conflicts with the changes that the accountant has made, reconciliations along with the transaction on or before dividing the date will be unsaved when you import the accountant’s changes.
Till now, you have learned about creating the accountant’s copy, transferring it to the user, and set limitations to avoid restrictions.
Most users are concerned about how do I import accountant’s copy in Quickbooks. If you have the same concern, the upcoming information is for you.
How to Import Accountant’s Copy in QuickBooks?
When the accountant sends you the accountant’s change file (.qby), you can save the file on your computer. Make sure that you are logged into your QuickBooks accounts as Administrator so that you can import accountant’s copy of QuickBooks.
To import accountant’s copy QuickBooks, you can take different ways such as importing accountant changes through the web or from a file. If required, you can also analyze the changes, removing restrictions for the accountant’s copy. Now, we will understand all these ways to import the accountant’s copy.
Import Accountant’s Copy through Web
As mentioned earlier, your accountant can share the accountant’s changes copy through the web. In this case, you will get an email that says to import your accountant changes within 30 days. To download the accountant’s changes file, you can go through the following steps.
- Firstly, open a QuickBooks account and go to the File option.
- Next to this, you can click on the Open or Restore Company option and then select Open a Company File.
- In the next step, you can click on the Browse option and start selecting the company file that you want to open.
- Thereafter, you can hit the Open and then enter your sign-in credentials if asked.
- Once done, click on the File option again and select the Accountant’s Copy.
- Now, you can click on the Import Accountant’s Changes from the Web option
- In case you have the Premier Accountant edition or Enterprise Solutions, then you can go to File menu-> Client Activities-> Import Accountant’s Changes from Web.
- At last, you can save your current accountant’s copy.
After you are done importing the changes from the web, you can save a copy of your accountant.
Import Accountant’s Copy through File
When the accountant shares his accountant’s changes file, make sure that you save it on your computer. Thereafter, you can perform the following steps mentioned below.
- As the first step, launch your QuickBooks and go to the File option.
- Then, you can select the Open or Restore Company option.
- Once done, click the Open a Company File.
- Next, you can select the Browse option and select your company file.
- Thereafter, click the Open and enter the login credentials.
- Now, return to the File menu and then select the Accountant’s Copy.
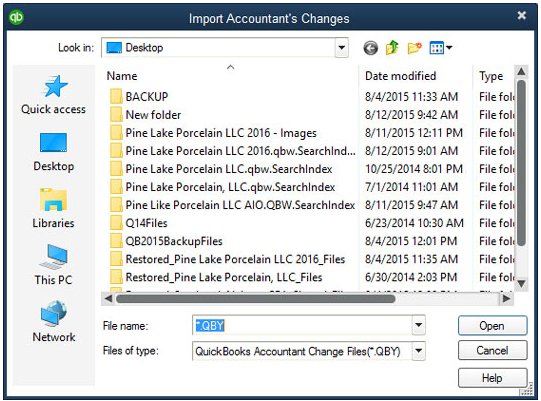
- This time, choose the Import Accountant’s Changes from the File option.
- If you have Premier Accountant edition or Enterprise Solutions, then you need to go to File menu-> Client Activities-> Import Accountant’s Changes from File.
- Thereafter, you can revise your accountant’s copy available in .qby file extension and then open the file.
This is how you can import the accountant’s copy in two different ways. If it is required, you can also analyze the changes or remove the restrictions for the accountant’s copy.
Analyze the Changes
In case you prefer to analyze the changes or integration, you can go through the steps mentioned below.
- To review the accountant’s changes, hit the Plus icon to view the instructions and other details.
- Then, you can select the Save as PDF or Print option in order to create a duplicate copy of the accountant which has been amended.
- Next to this, select the Incorporate Accountant’s Changes option in order to recover your accountant’s copy.
- Thereafter, you can hit the Ok button and close the QuickBooks.
- You can then again click on Ok to take the backup of the file.
- After that, you can pick a location in order to save the file and hit the OK button.
- Now, on the Incorporate Accountant’s Changes page, you can evaluate the changes and follow other prompts to resolve any issues.
- In the end, you can close the window once done reviewing changes.
Remove the Accountant’s Copy Restrictions
There may be circumstances when you want to remove the Accountant’s copy restrictions. However, if you remove the restrictions, you would be unable to import all your accountant’s changes. To deal with this situation, you can apply changes manually by taking out a printout or PDF file.
If you want to remove the accountant’s copy restrictions then you need to follow the steps mentioned below.
- Select the File menu and go to the Accountant’s Copy.
- Then, you can select the Remove Restrictions option.
- Now, you can select the checkbox in order to confirm your action and click Ok.
Closing Up
If you want to import accountant’s copy of QuickBooks 2017 then these aforementioned steps would guide you. You can learn how to create, transfer, and import accountant’s copy QuickBooks in different ways. Besides importing the changes, you can review the changes and remove the accountant’s copy restrictions.
Apart from this, if you want to learn how to add accountant access to QuickBooks Online, you can read this guide.