The users of Defender have registered some issues every now and then. The most common issue faced is that the users are not aware of how to disable Windows defender Windows 10. Apart from Windows 10, you will also get to know the steps to disable Windows Defender on Windows 7 along with 8 and 8.1
Steps To Fix Permanently Disable Windows Defender Windows 10
Solution No. 1
“Disable Windows 10 Defender” by Settings:
- Step 1: Turn ON your system
- Step 2: Now make a selection on the Start option that is on the extreme bottom left of the screen
- Step 3: Click on the Windows defender by searching it in the search box available. Type “Defender” there and hit enter
- Step 4: Once you open the Defender you will have to go to the Home tab
- Step 5: Then make a selection on the “Virus and Threat Protection”
- Step 6: Now go for the option of “Virus and Threat Protection Settings”
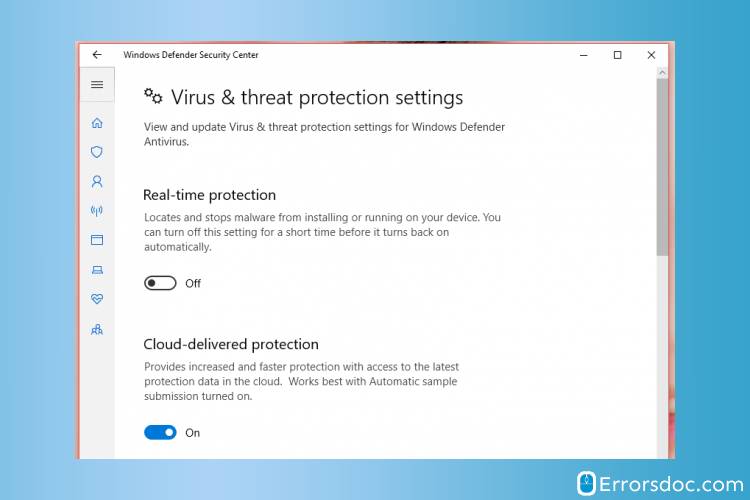
- Step 7: Make sure you turn OFF the Real-time protection status
Move to the next solution if this one was not helpful.
Solution No. 2
“Disable Defender Windows 10” Antivirus by using Local Group Policy
- Step 1: Turn ON your system
- Step 2: Press the Windows Key and the R key together in order to launch the Run command
- Step 3: Once the window of the Run command opens up, you will have to type “gpedit.msc” and then hit the Enter key
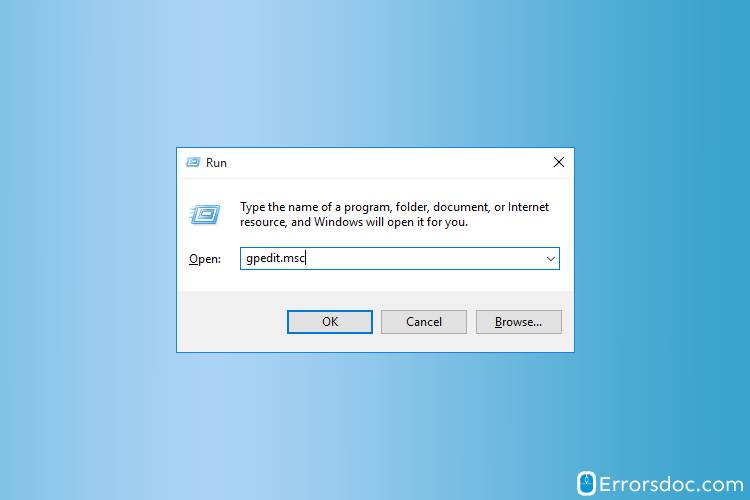
- Step 4: This will open up the Local Group Policy Editor window
- Step 5: After the Local Group Policy Editor window opens up you will have to make the selection according to the following order
- Step 6: Hit on the Computer Configuration
- Step 7: Now select the Administrative Templates
- Step 8: Go for the Windows Components
- Step 9: Choose Windows Defender
- Step 10: On the Windows Defender you must select on the Disabled radio button in order to disable the Windows Defender
- Step 11: Make a selection on “Apply”
- Step 12: Now hit “ok” on screen
The solution mentioned below can be helpful if the one mentioned above was not.
Solution No. 3
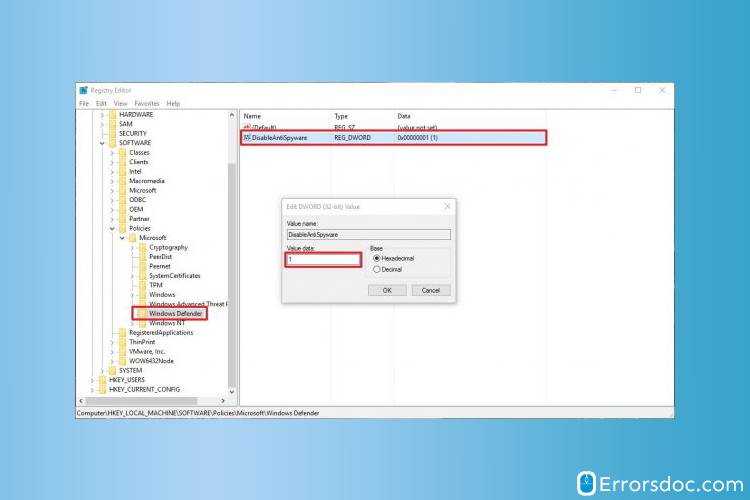
Disable Windows Defender Windows 10 by Registry Editor
- Step 1: Turn ON your system
- Step 2: Press the Windows Key and the R key together in order to launch the Run command
- Step 3: Type “Regedit” in the search box and hit the Enter key. You may click “OK” in order to open the Registry.
- Step 4: You have to navigate to the key mentioned below on the Registry window
- HKEY_LOCAL_MACHINESOFTWAREPoliciesMicrosoftWindows Defender
- Step 5: In case the DWORD DisableAntiSpyware is becoming difficult to find then you must right-click on any empty space following it up by making a selection on New > DWORD (32-bit) Value.
- Step 6: Now you can name that new key as DisableAntiSpyware
- Step 7: Now just double click on the new key you just made in order to make a selection
- Step 8: After that under the Value Data, you must set the Value data frame from 0 to 1
- Step 9: n the end, you simply need to reboot the system and wait for the changes to be saved
Give a shot to the solution mentioned below if you were not able to disable Windows 10 Defender with this solution
Solution No. 4
“Disable Windows Defender Windows 10” with the help of Notepad:
- Step 1: Turn ON your system
- Step 2: Now make a selection on the Start option that is on the extreme bottom left of the screen
- Step 3: Type “Notepad” in the search box and hit the Enter key on the keyboard
- Step 4: Open Notepad and type or copy the following text there. Make sure the text is exactly as the one mentioned below:
Windows Registry Editor Version 5.00
[HKEY_LOCAL_MACHINE\SOFTWARE\Policies\Microsoft\Windows Defender]
“DisableAntiSpyware”=dword:00000001
[HKEY_LOCAL_MACHINE\SOFTWARE\Policies\Microsoft\Windows Defender\Real-Time Protection]
“DisableBehaviorMonitoring”=dword:00000001
“DisableOnAccessProtection”=dword:00000001
“DisableScanOnRealtimeEnable”=dword:00000001
- Step 5: Once you have entered the text as mentioned above you must save the file and to do so press the CTRL key and S key at the same time
- Step 6: Now while saving this file make sure you save the file in by typing g the name in double quotes (“ ”) and not without it. Save it as “Disable Defender.reg”. In this case, the file will be saved in “*.reg” extension and not *.reg.txt.
- Step 7: Make sure you double click the *.reg file. created by you.
- Step 8: Now you must confirm the UAC prompt by hitting the option of Ok or Yes in order to merge it into the Registry
- Step 9: Simply Restart Windows 10
The solution mentioned below is also worth a shot.
Solution No. 5
Exclude Your System from Windows Defender
- Step 1: Turn ON your system
- Step 2: Now make a selection on the Start option that is on the extreme bottom left of the screen
- Step 3: Type “Settings” in the search box and hit the Enter key on the keyboard
- Step 4: Make a selection on the option of “Choose settings”
- Step 5: Hit the option of “Update and Security”
- Step 6: You will be able to locate the option of Windows security, just click on it to open
- Step 7: Once the Windows Security opens up you will have to select the option of “Windows Defender Security Center.”
- Step 8: Hit the option of “Add an Exclusion”
- Step 9: Then go for the option of ‘Exclude a folder’
- Step 10: Make a selection on the entire “C:/” drive folder in order trio exclude the folder
- Step 11: Just make sure to repeat the process in case there are some other folder you are willing to exclude from the Windows Defender’s Antivirus scans
How To Disable Windows Defender Windows 7
If you are wondering how to disable Windows Defender Windows 7 then the solutions mentioned below be helpful. You just need to execute the steps mentioned in each solution for a hassle-free procedure.
Steps to Disable Windows Defender On Windows 7
Sol ution No. 1
Disable Windows Defender on Windows 7 with the help of Administrative Tools:
- Step 1: Turn ON your system
- Step 2: Now make a selection on the Start option that is on the extreme bottom left of the screen
- Step 3: Type “services.msc” in the search box in front of you
- Step 4: Go to the Control Panel from here by clicking on it on the right-hand side
- Step 5: Go for the option of “Administrative Tools”
- Step 6: Hit the option of Services
- Step 7: You must locate the option of “Windows Defender” in the list of services
- Step 8: Make a double click in order to view the properties window
- Step 9: Now you will have to click on the Stop button in order to disable the service
- Step 10: Make a selection on the Startup Type and this will help you witness the Dropdown menu
- Step 11: Hit the Disabled option and go for the OK button
The solution mentioned below is known to be helpful to disable Windows Defender Windows 7 effortlessly.
Solution No. 2
Temporarily or Permanently disable Windows defender Windows 7:
- Step 1: Turn ON your system
- Step 2: Now make a selection on the Start option that is on the extreme bottom left of the screen
- Step 3: Type “Control Panel” in the search box in front of you
- Step 4: Open the Control Panel by making a double click on it
- Step 5: Go to the option of Windows Defender now
- Step 6: In case the Windows Defender is running under Vista you can just double click on the tray icon and open it
- Step 7: Hit the option of Tools
- Step 8: Make a selection on “Options”
- Step 9: (For Windows Vista) You must scroll to the bottom right in the Windows Vista and you will be able to witness the “Use Windows Defender” that is under the Administrator options
- Step 10: The checkbox in front of the option “Use Windows Defender” must be unchecked
- Step 11: Make a selection on the option of Save now and the Defender will be turned off by then
- Step 12: (For Windows 7) Make a selection on the Administrator that is on the bottom left side
- Step 13: Now simply uncheck the checkbox in front of the option “Use this program”
- Step 14: Hit the option of “Save”
We hope that you were able to disable windows defender windows 7 successfully.
How to disable Windows Defender in Windows 8.1/8
Disable Windows defender Windows 8 with the help of the solutions mentioned below. Execute the steps mentioned in the solutions in order to disable defender Windows 8:
Steps to Fix disable Windows defender Windows in 8.1/8
Solution No. 1
Disable Windows Defender in the app’s Settings.
- Step 1: Turn ON your system
- Step 2: Now make a selection on the Start option that is on the extreme bottom left of the screen
- Step 3: Type “Windows Defender” in the search box in front of you
- Step 4: Open the Windows Defender by making a double click on it
- Step 5: Locate the Settings option that is on the left-hand side of the software. Click on it to make a selection
- Step 6: Make a selection on the “Administrator and make sure you uncheck the checkbox that is in front of the option of “Turn on Windows Defender”
- Step 7: Hit the option of “Save Changes” that is on the bottom of the screen
Execute the solution mentioned below in case this one was not helpful.
Solution No. 2
Disable the app in Group Policy
- Step 1: Turn ON your system
- Step 2: Now press the Windows key along with the X key on the keyboard
- Step 3: Type “gpedit” in the search box in front of you
- Step 4: Open the Group Policy by making a double click on it
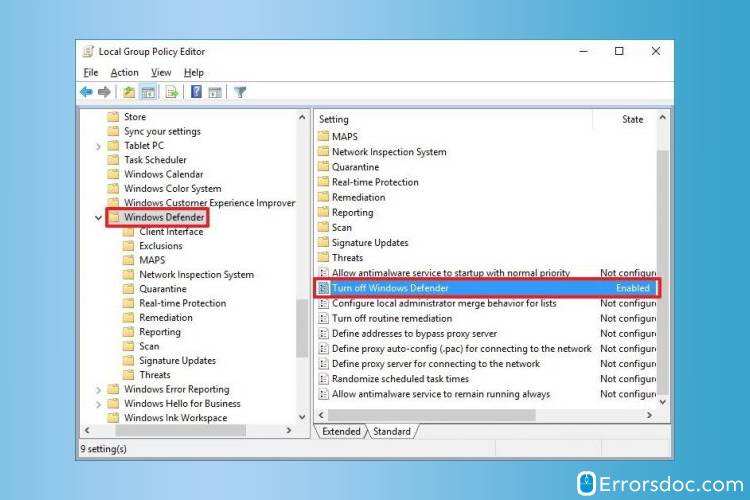
- Step 5: Locate the Windows Defender folder that is located in Computer Configuration/Administrative Templates/Windows Components. Open the folder once you find it.
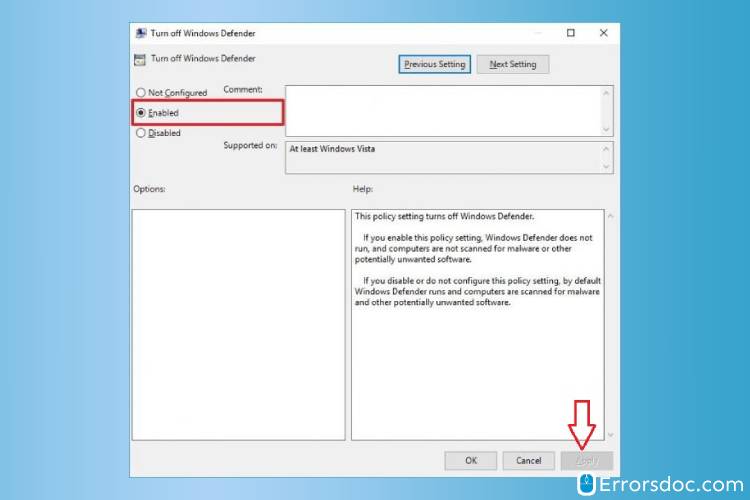
- Step 6: Under the Settings tab you must hit the option of Turn off Windows Defender
- Step 7: Turn off Windows Defender Make a selection on the option of Enabled and click the Ok button. This will enable the settings now
In case you were not able to disable Windows defender on Windows 7 with this solution, you can give a shot to the next one.
Solution No. 3
Disable the Windows Defender in Services
- Step 1: Turn ON your system
- Step 12: Press the Windows key along with the F key in order to open the Run dialog box.
- Step 3: Type “services.MSC” in the search box and hit the OK button. Now you will be able to enter Services.
- Step 4: Right-click on the Windows Defender Service option now that is in the services window
- Step 5: Select on the option of “Properties” that is present in the context menu
- Step 6: Once the Windows Defender Service Properties dialog is visible on the screen go to the General settings
- Step 7: Now you may make a selection on the small downward arrow and hit the option of “Disable” for Startup type.
- Step 8: Hit the Ok button to save the changes you just made
- Step 9: Now ideally you should restart the system in order to make the procedure effective
The aforementioned solutions are not exhaustive but are known to be very effective and efficient. Just in case you were not able to disable the windows defender on your windows then you must get in touch with a professional. The experts at ErrorsDoc are well-versed with such issues and can provide quick solutions via chat. The entire process is both time and money-saving.