For a speedy and seamless printing experience, opting for the Canon PIXMA TR7520 Printer is a thoughtful decision. The printer can assure a promising experience to the users. For using it, you will be required to set it up. The first-time users of this printer may require assistance for doing so. On this page, we have prepared a brief guide on Canon TR7520 setup methods for wifi and wireless direct. We will also cover the methods to establish the Canon printer setup for Windows and Mac. The steps provided with these methods will make use of easy language for correctly carrying them out.
This insightful reading on Canon TR7520 setup will explain the following topics:
How to Setup Canon PIXMA TR7520 Printer?
Gathering the simplest of steps, we have formed this method for the Canon TR7520 Printer setup. To carry it out, you can plug in and turn on the printing machine. Then you can check whether or not the wifi network has been turned on. When the wifi network is available, you can head to the LAN Settings of the Canon TR7520 Printer and further select the option of Wireless LAN. This will provide you with the option of LAN setup. To proceed, you can manually connect your device and set it up.
- Turn on your Canon PIXMA TR7520 Printer.
- Ensure that the wifi network has been enabled on your printer.
- Now, press the icon of “Wifi”.
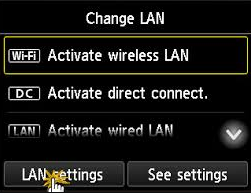
- Then access the “LAN Settings”.
- You have to choose the “Wireless LAN” option.
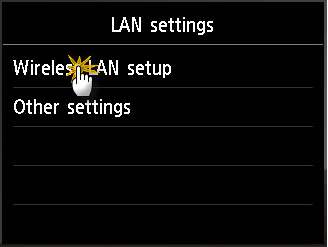
- Then select “Wireless LAN Setup”.
- Now, choose the option of “Manual Connect”.
- Your Canon TR7520 Printer will search for the wireless networks that are available. Afterwards, you can choose your wireless router. Then provide the “Passphrase” and press “Ok”.
- Your Canon printer will now be connected to your wireless network. You can install the printer driver for it and then your device will be all set for use.
What is the Procedure for Canon TR7520 Wireless Setup for Mac?
This section has been created to help Mac users with the Canon PIXMA TR7520 wireless setup. To give you an overview of the setup, you will have to visit the LAN Settings when your device is on. From there, you can navigate to LAN and LAN Setup. As soon as you see Wireless Connect, choose it. Then you will be closer to setting up your Canon printer on Mac.
Now, let us glance at the set of instructions presented here.
- Power on your printer. Press the “Power” button.
- Access the “LAN Settings”.
- Tap “Wireless LAN”.
- Tap “Wireless LAN Setup”.
- Tap “Wireless Connect”.
- Tap your “Wireless Network” when it is visible on your screen.
- Enter your “Passphrase” when you are prompted to do so. For this, tap the field of the passphrase, enter it, and then tap “Ok”.
- Now, press “Ok” again.
- To continue with the Canon printer setup, download the printer driver on your Mac.
- Click twice on the Canon printer driver for installing it on your Mac.
- On the “PIXMA Installer” screen, press the button for “Start Setup”.
- Perform as per the prompts on your screen.
- When you see the screen for “PIXMA Installer Connection Method”, press “Yes”.
- When the “Add” screen shows up, select your Canon device. Then press “Add”.
- Put some sheets in the paper tray of your Canon printer.
- Press “Start” for carrying out a test print.
- Do as per the prompts appearing on your screen.
What is the Procedure for Canon TR7520 Wifi Setup on Windows?
In case you are using a Windows computer and you wish to perform the wifi setup on your Canon TR7520 Printer for printing documents from the system, you will have to use the Network Status button for the purpose. This button will be available on your printer. After pressing it, you can go to LAN Settings and make a selection for Wireless LAN. Afterwards, you can use the setup option to proceed.
- Turn on your Canon printer.
- In case your printer is running the cleaning process or any other process, then wait until it is over.
- Now, press the “Network Status” button.
- Select “LAN Settings”.
- Click on “Wireless LAN”.
- Select “Wireless LAN Setup”.
- Choose “Easy Wireless Connect”.
- Then press “Yes”.
- You will be guided with further instructions on your screen. Carry them out to complete this process.
When the process for the Canon TR7520 setup for wifi is complete, you can try printing a page or performing any other printer-related task to ensure that the process has been successfully done.
How to Setup Canon PIXMA TR7520 for Wireless Direct?
In this part of the blog, a method for enabling wireless direct on your Canon PIXMA TR7520 Printer has been introduced. Those of you who would like to follow this method can open the Settings of the printer using the Gear-like icon on the LCD. Heading to the Device Settings, you can choose LAN Settings and pick Wireless Direct. The steps followed by this one have been mentioned below. Following them will help you in going ahead with the Canon PIXMA TR7520 setup.
- Power on your printer and tap the “Gear” icon provided on the “LCD”.
- Tap on “Settings”.
- Now, select “Device Settings”.
- Select “LAN Settings”.
- Choose “Wireless Direct”. Then press the button for “Wireless DirectActive/Inactive”.
- Double-tap “On”. Now, you can see the information regarding “Wifi Direct”. Then press “Ok”.
- Connect your smart device to the printer’s wifi network.
- Use the “Canon Print Inkjet” app for printing.
- Use the “IJ Network Device Setup Utility Software” for modifying the network settings.
- Check that your Canon PIXMA printer is on. On its panel, select “Network Status”.
- When a message appears, press “Yes”.
- Press the “LAN Settings” button.
- Choose “Wireless LAN”.
- Select “Wireless LAN Setup”.
- A message will be displayed. Press “Yes”.
- To continue, do as directed by the prompts on your screen.
- You will also find the option to change the basic settings for LAN. Utilize this option if needed.
What is the Procedure for Canon PIXMA TR7520 Fax Setup?
For communicating quickly in an office setting, the option of faxing should be preferred. Prior to using this option, administering Canon TR7520 fax setup will be essential. In order to initiate this option, you can load certain documents in Auto Document Feed when your printer is working. Using the Control Panel of the device, you can choose the Landline Phone option and provide the required information for sending or receiving a fax.
- Begin the Canon printer fax setup by checking that your Canon printer has been powered on.
- In the “Auto Document Feeder”, you have to load the documents.
- Now, on your printer’s “Control Panel”, press the icon of “Landline Phone”.
- Tap the blank field and provide the phone number of the fax recipient. Then press “Ok”.
Note: You can use the keyboard shown on the screen for providing the phone number of the fax recipient.
- Select the “Black” icon if you want a black and white transmission. Select the “Color” icon if you want a coloured transmission.
Note: In case you wish to cancel the fax, you can press the “Stop” button. This button can be found near the “Black” button.
After All is Said and Done
We covered 5 methods in this reading for explaining to the readers how the setup for Canon TR7520 is done. These methods helped you identify the steps for performing wireless setup, wifi setup, wireless direct setup as well as fax setup. We believe that the steps defined above for every Canon TR7520 setup method were easily understood by you. In case you have any queries with respect to setting up the Canon TR7520 printer, you can get in touch with us. We have created a comment section below for easy communication with our readers.
If you are a user of the Canon PIXMA TR4522 printer, then you will have to follow slightly different methods to set up the device. Additionally, you can also read the methods for Canon TR4500 Setup in case you are planning to purchase it.