Most users have been asking how to enter bills in QuickBooks? If you have the same query, you landed on the right page.
Bills management in QuickBooks is completely fundamental to run a small business successfully. To keep your bills organized, you are required to follow various methods. Therefore, in this article, we will teach you how to enter and pay bills in QuickBooks Online.
To manage and pay bills in QuickBooks, we will discuss a number of methods. These methods are as follows:
How to Enter Bills in QuickBooks?
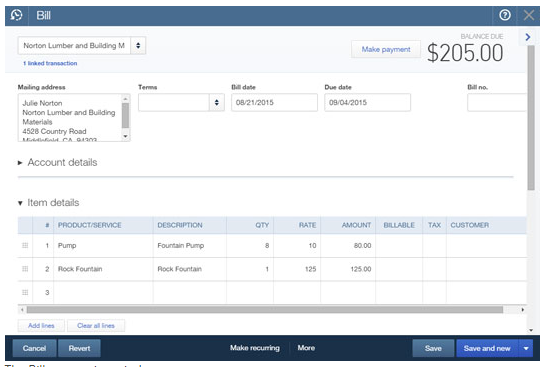
To enter bills in QuickBooks, you can the expense account you have just created. To understand better, you can go through the following steps mentioned below.
- Firstly, you need to click on Suppliers and select Enter Bills.
- Under the Supplier title, you can click Enter Bills.
- Next to this, from the drop-down menu, you can select Suppliers.
- Now, you can select Terms along with Bill Date and Due Date.
- From the drop-down menu, choose the expense account.
- This will also provide you a brief description of the bill.
- Thereafter, you are required to enter a specific amount as well as the accompanying tax rate.
- In the end, you can click on Save and Close the window.
After following these methods, you will have entered the bills into your expense account. The next step is to pay these bills in QuickBooks online.
How to Pay Bills in QuickBooks Online?
Since you have entered the bills in QuickBooks, now you can learn how to pay bills in QuickBooks 2018. To pay bills in QuickBooks, you can either make payments with the expense form or by using print checks which are given in the QuickBooks application.
Besides that, you can also make payments using suppliers’ or vendor’s pages. QuickBooks Online Bill Pay is one more useful feature to pay bills online.
There are other options available in QuickBooks through which you can make payments for the bill. Below are the following options you can go through.
Pay Bills from Suppliers or Vendors Page
The first option is to make payments directly from the suppliers or vendors page. To proceed with it, you can go through the following steps.
- As the first step, you can click on Suppliers.
- Click Pay Bills: On the top of the Supplier’s page, you will see two options that allow you to filter the bills so that you can make payment.
- Now, you can select the Supplier’s bill for which you are supposed to make payment.
- At this point, the QuickBooks Desktop screen shows the information that contains the Supplier’s name, invoice number, and due amount of the bill.
- Next to this, you can enter the amount for payment.
- Thereafter, you are required to select the account for which you are supposed to make payments.
- Lastly, you can click on the Pay Selected Bills. Then, Save and Close the window.
Once you are done making payments, you can fill in the required details. QuickBooks completes the bill payment form immediately if the following fields are filled.
- Payee: The Supplier name
- Account: By default, it allows you to create a primary account in QuickBooks. For instance, you have a couple of accounts so you can select a particular account with the help of a drop-down menu to make payments.
- Ref. no.: In the field of ref. no. QuickBooks assigns the cheque number.
- Amount: By default, the application assumes that you are paying the amount in full. However, if you want to make partial payments then you can put a different amount.
- Outstanding Transactions: QuickBooks lists the outstanding pending bills for suppliers so if you want to make payments for certain bills then you can check or uncheck the boxes located on the left of a bill description.
This way you can pay bills from the Vendors or Suppliers page. After that, you can fill in the required details to complete your payments in QuickBooks.
Set Reminders for Bill Payments
By setting the reminder, you can get alerts for unpaid or overdue payments. To do so, you can jump to the following instructions:
- To set reminders for overdue or unpaid bill payments, you can go to the Edit menu.
- Then, you can select Preferences located in the Edit menu. This will open a new window.
- Below the Preferences option, you can click on Reminders.
- Next to this, you can go with the Under My Preferences menu. Then, check the box that says; ‘show reminder list when opening a company file’.
- Thereafter, you can click on the Company preferences menu and go with Bills to Pay.
- At this point, you need to verify the button whichever is suitable for you. Then, you can enter the number of days to receive the reminder so that you can get the reminder from QuickBooks on a certain day.
- After this, you can click on the Ok button. Once the window is closed, QuickBooks helps you to remember unpaid or overdue bills when the setup is done.
- As the last step, you can click on Reminders and Alerts to see the current reminder on the homepage of QuickBooks.
Check Reports Related to Bills Payments
It is also important to check your reports related to your bill payments. This way you can manage your bills well in QuickBooks. To check the reports, you can do the following:
- First of all, click on Reports.
- Choose Supplier/ Vendors and Payables.
- At this point, you will receive a number of key reports which help you to manage your business.
- A/P Aging detail
- A/P Aging summary
- Supplier balance detail
- Supplier balance summary
- Pending bills detail
- Transaction list by supplier
These are the best and easy ways to enter and pay bills in QuickBooks. All you have to do is create an expense account, enter bills to that account, and pay them through the vendors or suppliers page.
What to do to Make a Bill Payment List in QuickBooks?
To manage and pay bills in QuickBooks, you are required to follow certain methods which are as follows:
- Receive and enter bills in QuickBooks
- Pay Bills in QuickBooks
- Bill payment through Suppliers or Vendors page
- Make partial payments
- Set payment reminders for future bills
- Review financial statements after the new transactions
To apply all these methods, you will have to set up various accounts where the cash amounts will be recorded to use QuickBooks and result from the above transactions. You can enter any number of cost accounts as per the requirement.
To create the expense account, you can follow the steps mentioned below.
- Go to Lists and then the Chart of Accounts sections in the menu.
- Under the Account option, you can click on New.
- Now, on the new account window menu, you can click on the Expense type of account and click on Continue.
- At this point, you can enter the name and description to save it.
Once you understand the criteria of managing bills and creating an expense account, you can move forward to enter and pay bills.
Conclusion
If you want to be organized and manage your payment bills in QuickBooks, then the aforementioned methods would make your task easy. By knowing the right guidance, you can enter bills in QuickBooks, pay bills in QuickBooks with different options such as Supplier or Vendor page.
Besides that, you can set the reminder so that you do not miss out on any bill payment. Also, you can easily check the reports related to bill payments and receiving.
Do you want more such guides? Read our most viewed guide about how to merge vendors in QuickBooks and why QuickBooks could not create PDF.