Learn the easiest ways to turn off touch screen on Windows 10, Windows 8, and Windows 7.
In the era of smart technology, manufacturers are launching Windows laptops with touch screen services. The touchscreen feature on your laptop is a great function as you can operate your system with fingers instead of using mouse.
Despite its advantages, there are a few drawbacks associated with a touch screen. For instance, you can touch your screen by mistake and end ruining your presentations or data on your Worksheet. While taking care of such scenarios, users prefer to disable touch screen service for a while. Luckily, Windows laptops allow you to do so.
Therefore, in this blog, we will show you how to turn touch screen off on Windows 10, 8, or 7. Let’s get started!
In this blog, we will go through the different methods (for different Windows versions) to turn off the touchscreen. Along with this, we will discuss a number of methods to fix the touchscreen (in case it’s not working).
- How to Turn Touch Screen off on Windows 10?
- Method 1: Use Device Manager to Disable Touch Screen Temporarily
- Method 2: Use Windows Registry Editor to Disable Touch Screen Permanently
- How to Turn off Touch Screen on Windows 8.1?
- How to Turn off Touch Screen on Windows 7?
- What If Touch Screen is Not Working?
How to Turn Touch Screen off on Windows 10?
Most users have been asking how to turn off touch screen on Dell on Windows 10 or how to turn off touch screen on HP on Windows 10. If you have the same query, the upcoming instructions are you.
To turn off touch screen on Windows 10 laptop, you can follow two different ways. Either you can access the Device Manager to disable the touch screen or use Windows Registry Editor to disable the touch screen permanently.
Below we will understand both the ways with a step by step guide. Let’s go through these methods and learn how to turn off touch screen on HP on Windows 10. If your HP laptop has black screen issue fix it now.
Method 1: Use Device Manager to Disable Touch Screen Temporarily
This method requires you to launch Device Manager so that you can temporarily turn off the touch screen feature on your Windows 10 laptop. To understand how to turn off touch screen on Dell on Windows 10, you can follow the steps mentioned below:
- Use the “Windows + X + M” key combination in order to launch “Device Manager”.
- Now, expand the “Human Interface Devices”.
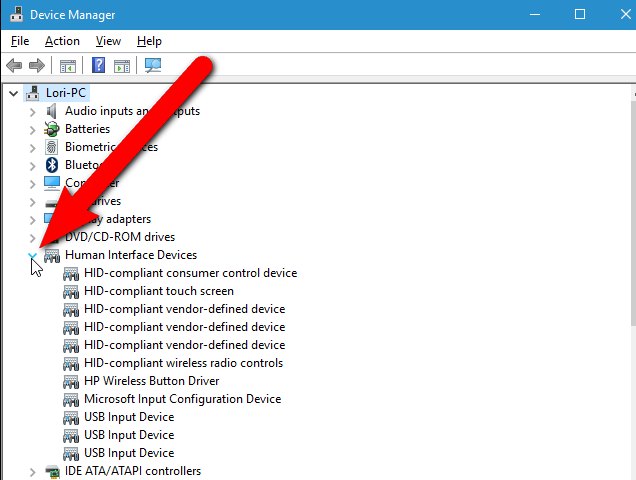
- Click right on the “HID-compliant touch screen” option.
- Choose the “Disable” option.
- Click “Yes” when you see a confirmation pop-up.
By following these few simple steps, you will disable the touch screen service on your Windows 10 computer. In case, you wish to enable it again, you can follow the same steps but this time choose the Enable option in the right-click context menu.
Must Read: Windows 10 Shortcut Keys for Rotate Screen, Shutdown
Method 2: Use Windows Registry Editor to Disable Touch Screen Permanently
In this method, we will run the Windows Registry Editor to enter the registry key. For that, you can follow the steps instructed below to turn off touch screen on Windows 10:
- Press the “Windows” key.
- Launch the “Run” box.
- Enter “regedit” in the text field.
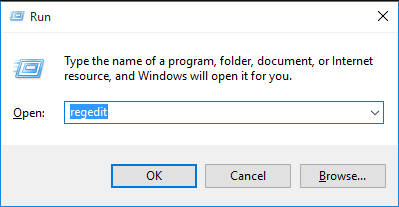
- Press the “Enter” key. This will open the “Windows Registry Editor”.
- Then, go through the registry key specified below:
- Computer\HKEY_CURRENT_USER\Software\Microsoft\Wisp\Touch
- On the right, create “DWORD 32-bit entry” using the “TouchGate” name.
- Here, the entry should be “0”.
Once you are done following these steps, you can restart your device. When your device is restarted properly, you will notice the touch screen stops working. This is how you can turn off touch screen on Windows 10 laptop.
In case, you wish to enable the touchscreen again, you can follow the same steps but this time enter the TouchGate value as 1. Alternatively, you can remove the TouchGate entry.
Must Read: How to Record Your Screen on Windows 10?
How to Turn off Touch Screen on Windows 8.1?
Those who use Windows 8.1 or 8 versions can also disable touch screen service on their computer. This can be done via the Control Panel. To know how to turn off touch screen on Windows 8.1, you can follow these steps to understand better.
- Click on the “Start” menu.
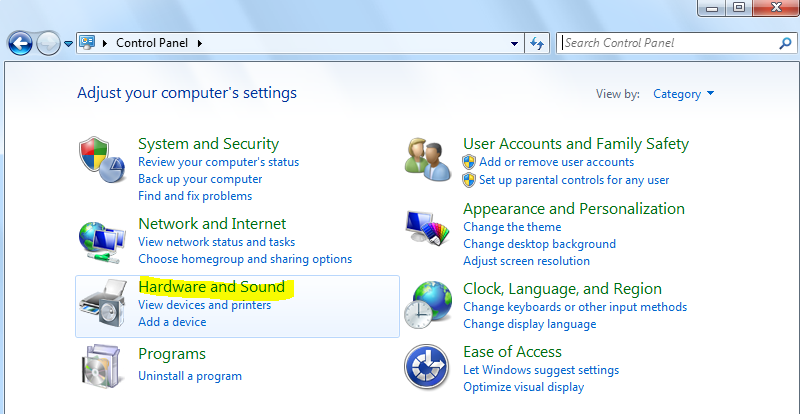
- Open the “Control Panel”.
- Click on the “Hardware and Sound” option.
- Select the “Pen and Touch” option.
- When a new window opens, switch to the “Touch” tab.
- Now, uncheck the “Use your finger as an input device” option.
After removing this option from the list, the touch screen service will be disabled. Thereafter you can use your mouse to operate your computer.
In case you change your mind and wish to enable the touch screen again then you can follow the steps mentioned above but this time check the Use your finger as an input device box.
Must Read: Blue Screen of Death Error on Windows 8.1
How to Turn off Touch Screen on Windows 7?
On Windows 7, turn off touch screen service using the Control Panel or Device Manager. If you have no idea how to turn off touch screen on Windows 7, go through the following methods.
Method 1: Launch Control Panel
In this method, we will go through Control Panel options and disable the multi-touch gestures. Follow these steps to know more.
- Click on the “Start” menu.
- Open the “Control Panel”.
- Click on the “Hardware and Sound” option.
- Select the “Pen and Touch” option.
- When a new window opens, switch to the “Touch” tab.
- Now, uncheck the “Enable multi-touch gestures and inking” option.
- Hit the “Apply” and “OK” button.
Thereafter, the multi-touch service will be stopped. In case you change your mind and wish to enable it again then check the Enable multi-touch gestures and inking box again.
Method 2: Access Device Manager
By accessing the Device Manager, you can turn off the touch screen feature as you did for Windows 10. Let’s know how to do that.
- Click on the “Start” menu.
- Type “Device Manager” in the search bar.
- Go to the “Human Interface Devices”.
- Click right on the “HID-compliant touch screen” option.
- Choose the “Disable” option.
- Click the “Apply” and “OK” button.
Once done, the touch screen will be disabled until you enable it again. This is how you can turn off the touchscreen on Windows 7. All you have to access the Device Manager or Control Panel and disable the touch screen in just a few clicks. To enable the touch screen on Windows 7, you can follow the same steps mentioned above.
This is the Windows turn off touch screen whole procedure. Based on your Windows version, you can follow different methods and disable the touch screen service on your computer.
Till now you have learned how to turn off Windows touch screen features. In case, you enable it in the future and the touch screen is not working efficiently then you can continue reading the blog to know the fixes.
Must Read: How to Check PC Specs on Windows 10 and Windows 7?
What If Touch Screen is Not Working?
There are instances when the touch screen service is enabled but it’s not working. Outdated drivers may be the reason behind this. If your touch screen is not responding as expected then in this scenario, you can perform troubleshooting steps.
Here we are providing some of the methods such as re-enable the touch screen service, running hardware troubleshooter, calibrating the touchscreen, and more. Let’s understand these methods with a step by step guide.
Method 1: Turn off and on the Touchscreen
The first and simple fix is to disable and enable the touch screen service again. This can be done via Device Manager. To understand better, follow these steps:
- Use “Ctrl” + “X” keys on your keyboard.
- Pick “Device Manager” from the result.
- Click twice on the “Human Interface”. This will open the dropdown menu.
- Click right on the “HID-compliant touch screen” list.
- Hit the “Disable” button.
- Click “Yes” to confirm.
Since you have disabled the touch screen, you need to re-enable it. To do so, you are required to click right on the same list and choose the Enable option again.
Method 2: Run Windows Troubleshooter
By running the Windows troubleshooter, you can fix a number of minor issues on your computer. To find this troubleshooter, you can go after the following steps:
- Open the “Settings” app by using the “Windows” + “I” key on your keyboard.
- Click on the “Update & Security” option.
- Select the “Troubleshoot” located on the left pane.
- In the right pane, select the “Hardware and Devices”.
- Click on the “Run the troubleshooter” button.
When the troubleshooter starts running, you can wait for the process to finish. Thereafter, you can check using the touch screen.
Method 3: Calibrate the Touchscreen
In case, your touch is not responding correctly or working slow then recalibrating the touchscreen might help. When you recalibrate the screen, your touch can respond quickly. Below are the following steps one can go through:
- In the Windows search bar, type “Calibrate”.
- Then, click on the “Calibrate the screen for pen or touch” option. This will open a new window open with more settings.
- Go to the “Display” tab.
- Click on the “Setup”.
- Hit the “Calibrate” button.
This will successfully calibrate the touch screen. Later, you can check if your touch screen is working properly. In case, this method does not help then you should update the drivers.
Method 4: Upgrade Drivers
Computer drivers are necessary to be installed on your PC. If your system has outdated, corrupted, or the wrong driver installed then there are chances that your touchscreen does not respond accordingly.
Hence, you should check your drivers. If drivers are not compatible, you can replace them. In case, your drivers need to be updated then follow these steps discussed below.
- Use “Ctrl” + “X” keys on your keyboard.
- Pick “Device Manager” from the result.
- Click twice on the “Human Interface”. This will open the dropdown menu.
- Click right on the “HID-compliant touch screen” list.
- Choose “Update Driver Software”.
- Go with “Search automatically for updated driver software”.
Once you do so, your system starts searching for the driver and installs it automatically. You can follow the on-screen instructions if necessary.
Related Topic: How to Update Drivers in Windows 10 Automatically?
Method 5: Disable Power Management Settings
Although Windows PC works smartly to save power, it might disable certain activities such as a touchscreen. In this scenario, you can simply try disabling the save power mode. To do so, you can follow these steps:
- Open “Device Manager” using “Ctrl” + “X” keys on your keyboard.
- Click twice on the “Human Interface”. This will open the dropdown menu.
- Click right on the “HID-compliant touch screen” list.
- Go to the “Power Management” tab.
- Click on the “Allow the computer to turn off this device to save power” box to remove the tick.
- Hit the “OK” button.
This will disable the save power mode. After you are done following these steps make sure you restart your device and check your touchscreen.
Apart from this, you can try other ways to fix the touch screen. For instance, you can rollback the drivers, uninstall recent programs, or move to another room.
Closure
The procedure of disabling the touch screen on the Windows computer is pretty easy. You can do it from Windows Registry Editor, Device Manager, or Control Panel. In this guide, we have provided you different methods for different versions of Windows computer. By following these methods, you can learn the Windows turn off touch screen procedure.
If it is required, you can enable the touchscreen later. In addition, this guide serves a number of methods to fix the touch screen in case it does not work on your computer even after enabling it.
Do you want more such guides on Windows? If yes, we have curated guides on the following topics: